
Sell Subscription By Selldone Zero to Hero Guide – Your First 10 Paying Subscribers Will Change Your Life!

In this article, I will walk you through the process of setting up an online shop on your domain, connecting payment methods, and creating subscription products so you can start selling.
Why Subscription?
Subscription services have become increasingly popular in recent years, with many businesses now offering them as a way for customers to access their products or services on a regular basis. For small business owners and entrepreneurs, the acquisition of just 10 subscribers can have a significant impact on their lives. Of course, acquiring 10 subscribers is just the beginning. As a business grows, the number of subscribers will likely increase, providing even more benefits and opportunities. However, it is important to remember that building a successful subscription service takes time and effort. It requires consistent engagement with customers, a commitment to providing high-quality products or services, and a willingness to adapt and evolve as the business grows! Literally, you will need a community for your brand.
Why Selldone?
Setting up a subscription-based business, managing orders, and handling customers can be a complex process that requires various tools and applications. However, Selldone simplifies this process by providing an easy-to-use no-code and no-plugin platform that streamlines the process of selling subscription products and services. With Selldone, anyone can set up and start selling subscription products and services within a day. The platform's intuitive interface and built-in tools make it easy to manage orders, track customer information, and handle payments, allowing you to focus on growing your business.
Benefits of starting a subscription-based business
One of the biggest benefits of having a subscription service is the predictable revenue stream it provides. With a steady stream of subscribers paying on a regular basis, business owners can more easily plan for future growth and expansion. This can lead to a sense of financial security and stability, which can be incredibly valuable for small business owners who may have previously struggled to make ends meet.
MRR /ARR
In addition to providing a stable revenue stream, subscriptions can also help to increase customer loyalty. When customers sign up for a subscription, they are making a commitment to continue using the product or service on a regular basis. This can lead to a deeper sense of engagement and connection with the business, which can result in more repeat customers and positive word-of-mouth advertising.
Valuable insight
Another important benefit of subscriptions is the ability to gather valuable customer data. By tracking subscriber behavior and preferences, businesses can gain insight into what their customers want and need. This information can be used to improve products and services, as well as to develop targeted marketing campaigns that resonate with the specific needs of the subscriber base.
A step-by-step guide to creating a subscription shop on your domain
Here are the step-by-step instructions to guide you in building your online shop. By following these steps, you will have your shop up and running and start selling your subscription products in no time. Remember that it is an ongoing process, so keep an eye on your shop's performance and make adjustments as necessary.
Step 1: Register your domain name – If you haven't already, register a domain name that represents your business and brand. This will be the website address where customers will find your online shop.
Step 2: Choose an e-commerce platform – There are many e-commerce platforms available, such as Shopify, WooCommerce, and BigCommerce. Each platform has its own set of features and pricing plans, so choose the one that best suits your needs. But Selldone offers built-in native tools to sell subscription products and services. Selldone simplifies the process of selling subscription products and services by offering built-in native tools that eliminate the need for any additional plugins. With Selldone, you can easily implement any subscription-based business model, such as subscription boxes, paywalls, subscription membership and clubs, and subscription products.
Step 3: Design and customize your shop – Once you've chosen your platform, use the tools provided to design and customize your shop. This includes adding your logo, creating new landing pages, and adding pages such as an "About Us" or "Contact" page.
Step 4: Connect your payment methods – Selldone has built-in integration with various payment providers such as PayPal, Stripe, and Razorpay. To sell subscriptions you need to have Stripe.
Step 5: Create your subscription products – Once your shop is set up, create your subscription products. These can be recurring payments for products or services, such as monthly subscriptions to a magazine or a monthly delivery of a product.
Step 6: Promote and market your shop – Now that your shop is set up and ready to go, it's time to promote and market it. Use social media, email marketing, and other methods to reach your target audience and drive traffic to your shop.
How subscription works
Setting up the Shop
To start offering subscription-based products or services, you will first need to set up an online shop.
1. Create a shop by registering here. Today you can sell subscription products even on Free Plan + only 2% fee (🎉 New announcement).
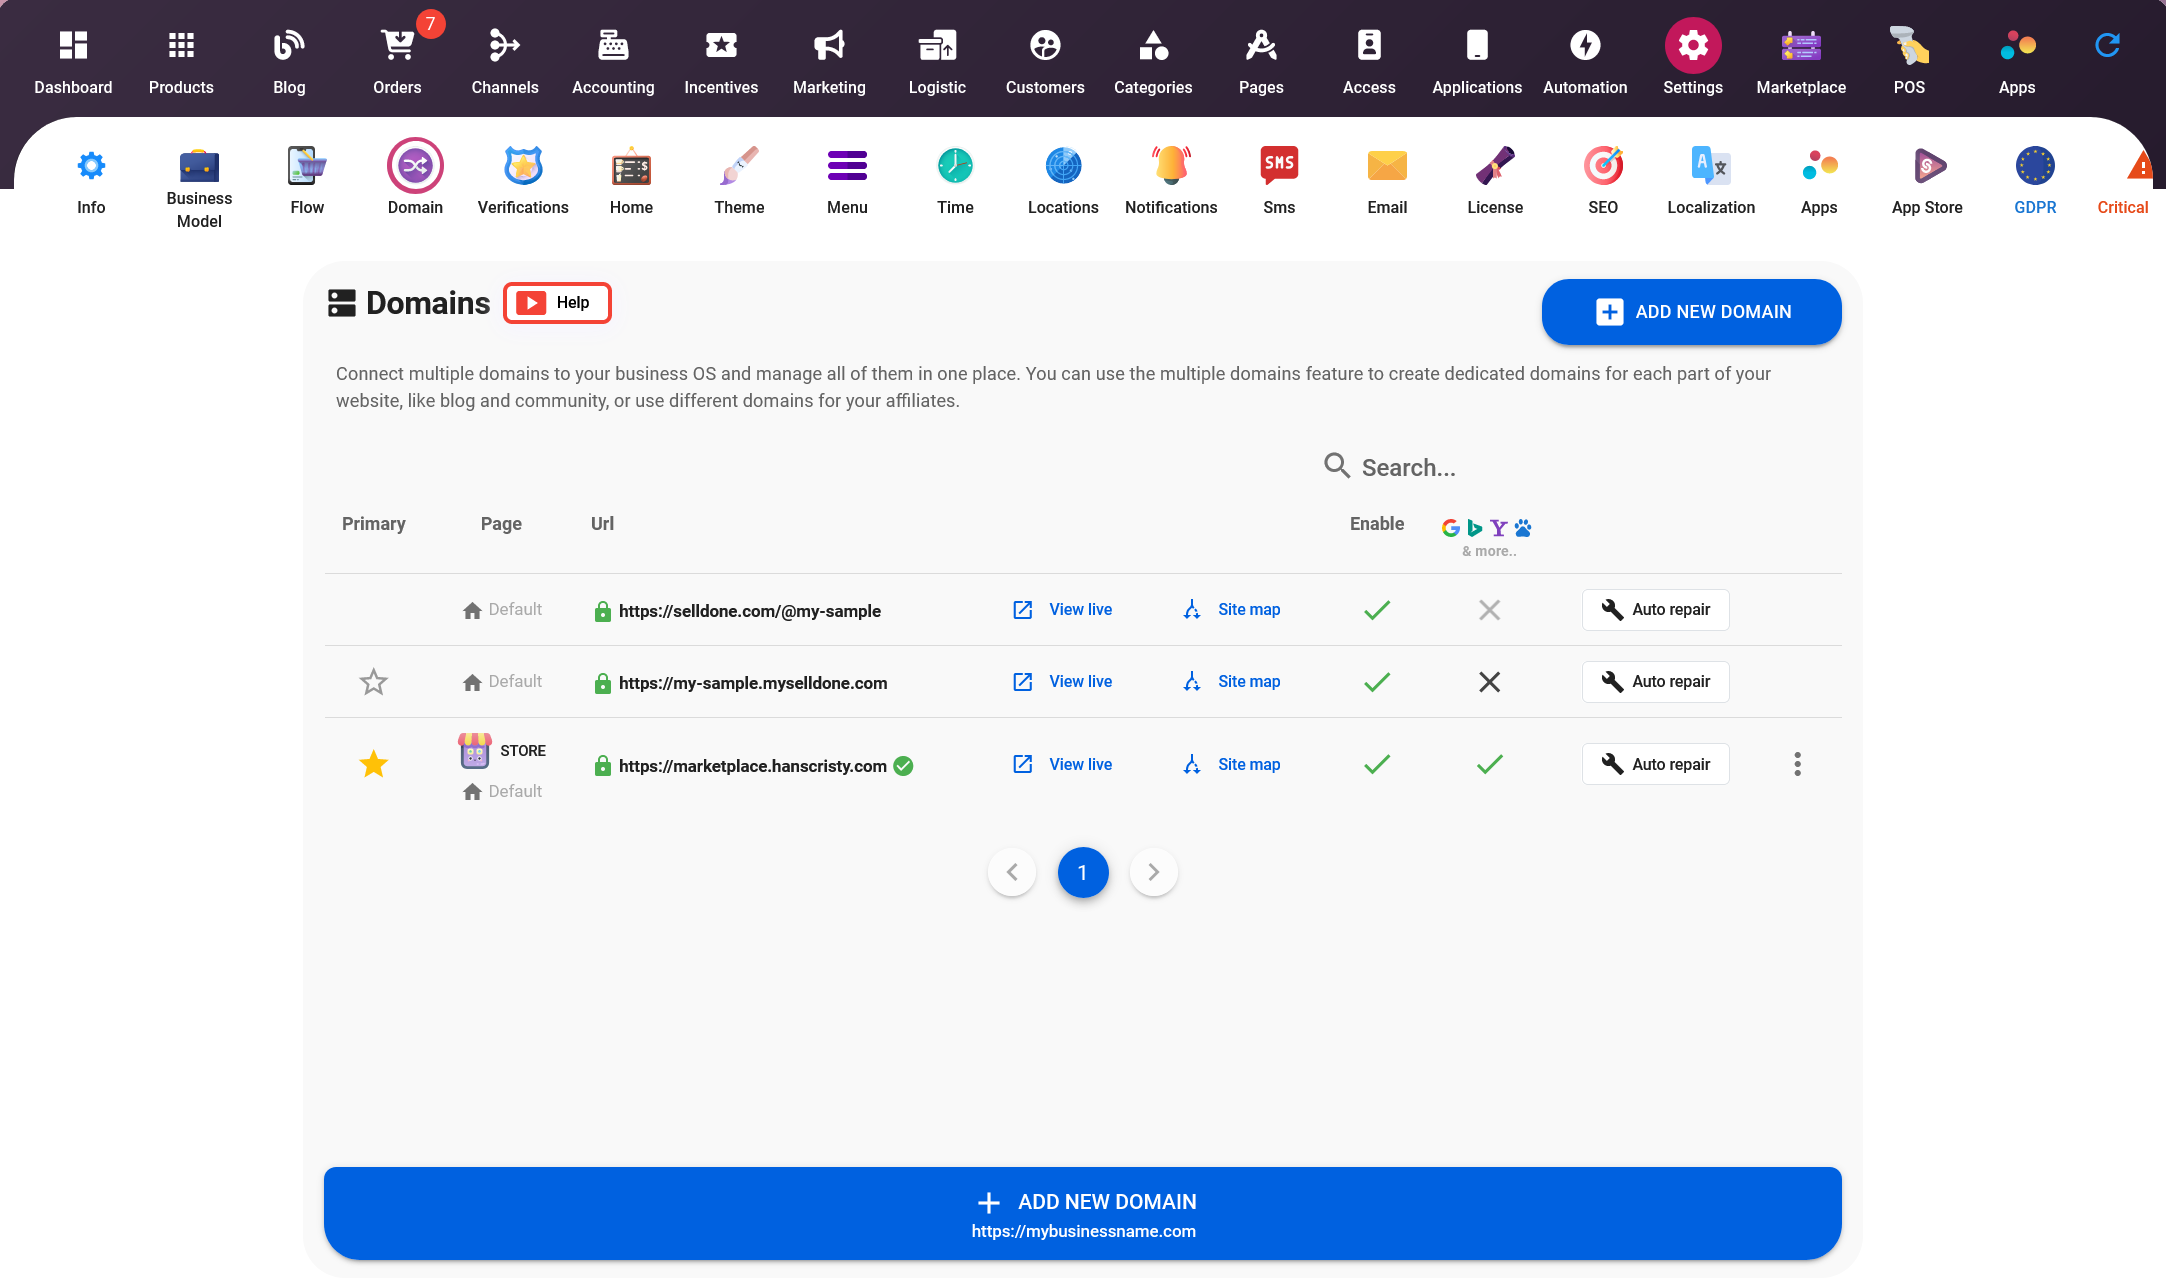
2. Get a domain and connect it to your shop by going to the Shop > Settings > Domains tab.
Setup Ribbon 🎗 – Subscription driver for your business
Ribbon is a convenient and user-friendly tool that makes starting a subscription box business model effortless. With Ribbon, creating custom subscription products is a breeze and can be done in seconds. The platform handles everything automatically in the background, allowing your products to go live instantly. Please go to the Shop > Channels > Ribbon tab.
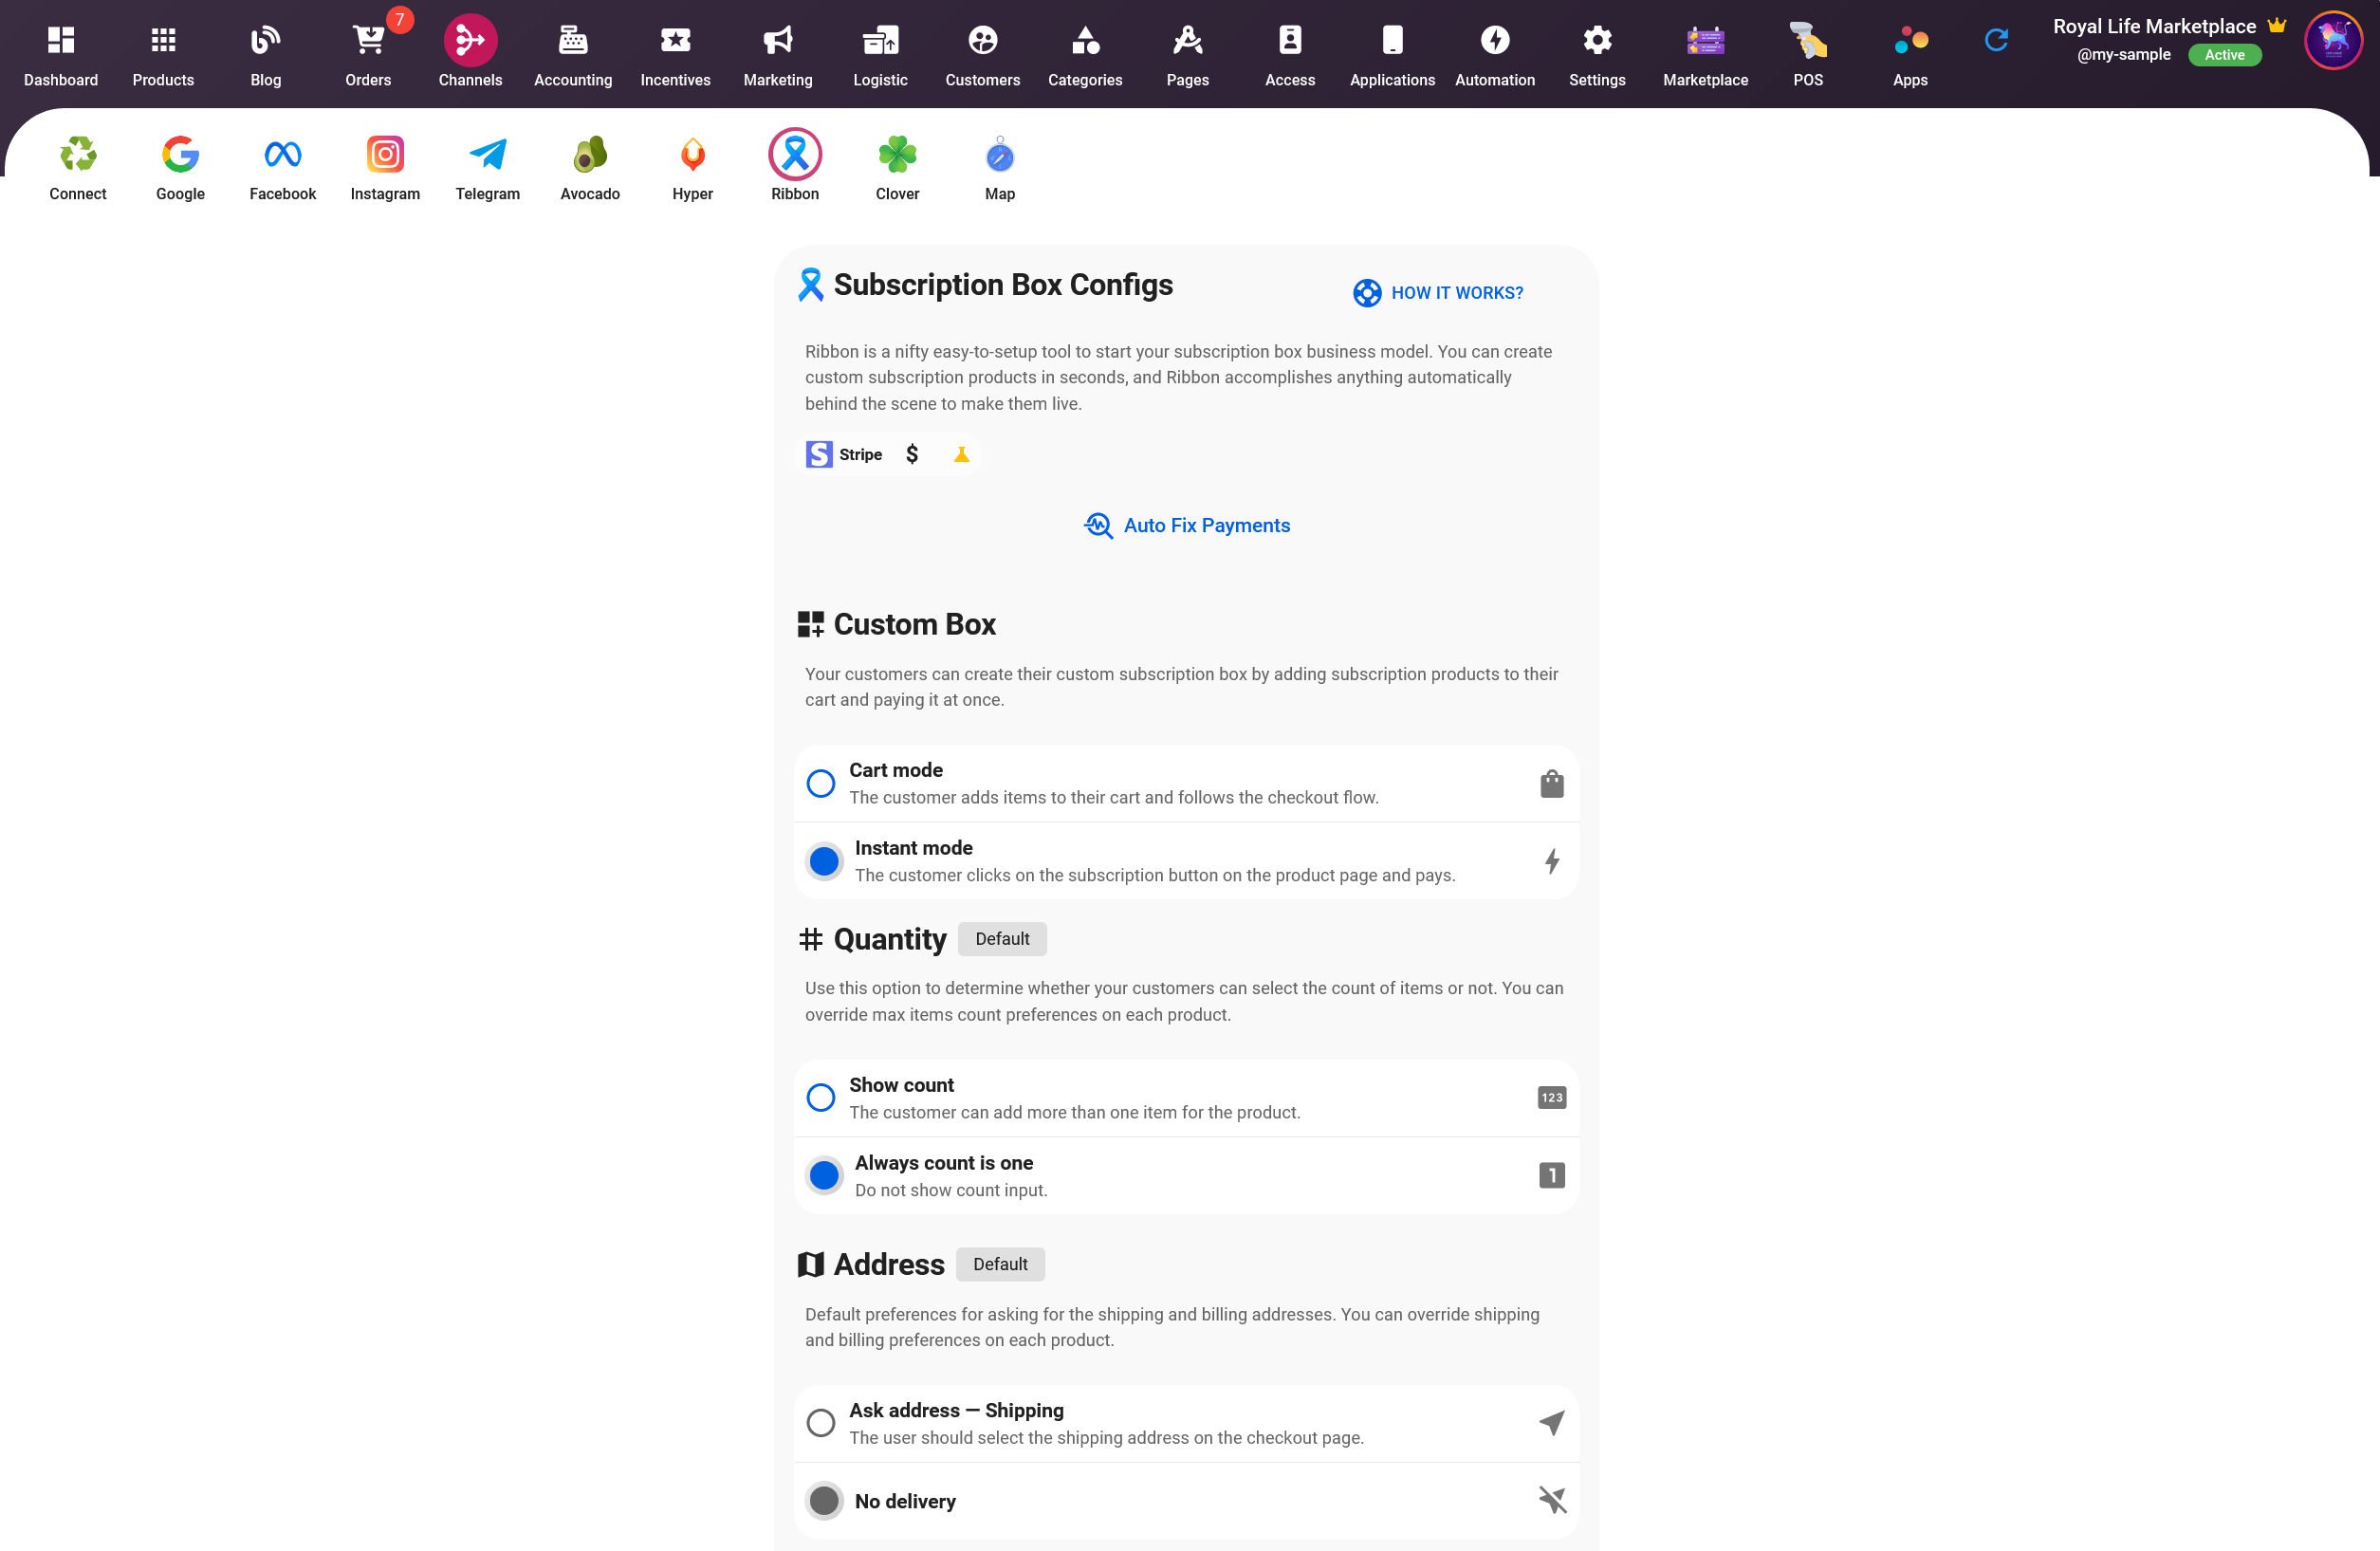
Custom box
When setting up your subscription flow in your shop, you have two options for your customers to choose from:
- Cart Mode: The first option is for customers to create their own custom subscription box by selecting the desired subscription products and adding them to their cart. They can then proceed to pay for their entire subscription box at once.
- Instant Mode: The second option is for customers to select individual subscription products to be delivered to them on a recurring basis. They will pay for each delivery separately.
Both options allow your customers to choose the subscription plan that best suits their needs and preferences.
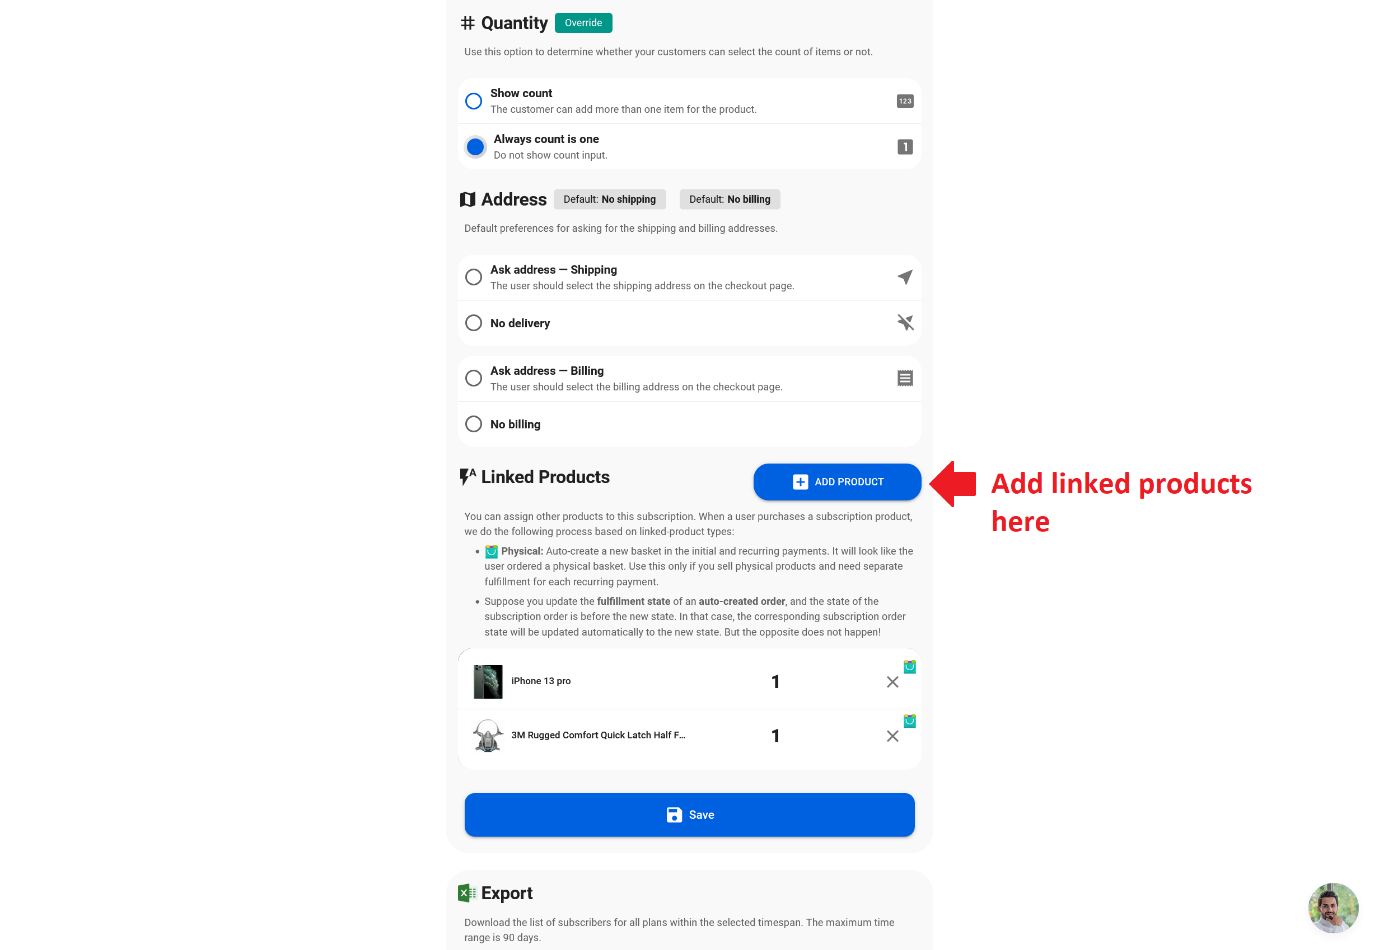
Quantity – Default purchase items limit
When setting up your subscription flow in your shop, you have the option to control the item count selection for your customers. You can choose to allow customers to select the number of items they wish to receive or enforce a maximum item count for each product. Here are the two options available:
- Show Count: By enabling this option, customers will be able to select the number of items they wish to receive for each product. This allows for more flexibility in their subscription choices.
- Always Count is One: If you choose this option, the item count input will not be shown to the customers. This will enforce a maximum item count of one for each product, regardless of what the customer chooses.
You can also override the max item count preferences on each product individually. This allows you to have more control over the subscription flow and provide a better customer experience.
Address – Default mode for asking for shipping/billing
When setting up your subscription flow in your shop, you have the option to control the default preferences for asking for shipping and billing addresses. You can choose whether to ask for the address or not for each product individually. Here are the two options available:
- Ask Address - Shipping or Billing: By enabling this option, customers will be asked to provide their shipping or billing address on the checkout page. This is useful for physical products that need to be delivered to the customer.
- No Delivery: If you choose this option, the customer will not be asked to provide their shipping or billing address. This is useful for digital products that do not require physical delivery.
You can also override the shipping and billing preferences on each product individually. This allows you to have more control over the subscription flow and provide a better customer experience.
Auto-fix payment methods
The "Auto Fix Payments" feature on the Ribbon tab in Selldone is a useful tool for ensuring the smooth functioning of your subscription-based business. When you click on this button, Selldone will automatically check and fix any issues with your payment methods, with the most critical step being the verification of the webhook.
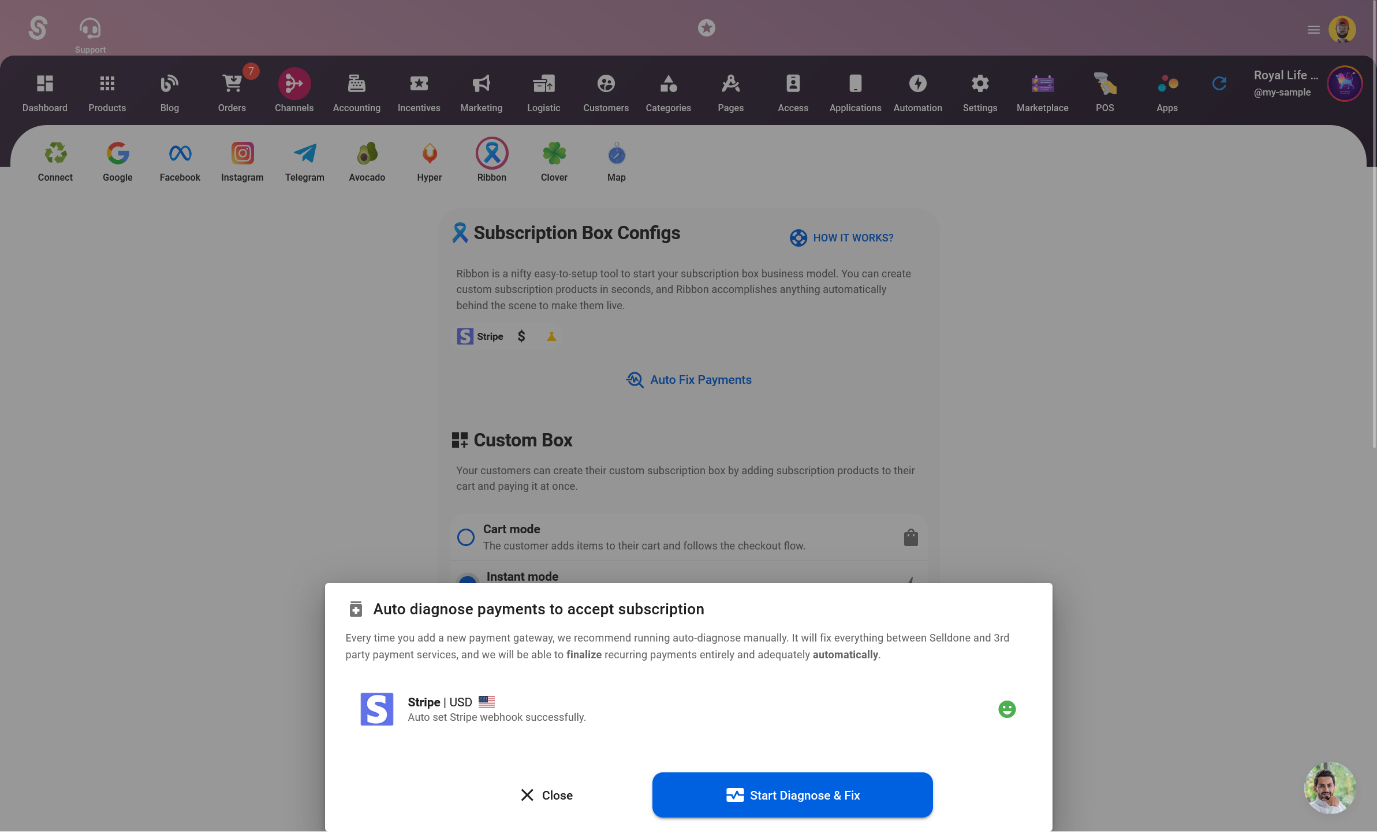
Webhooks are used by Stripe to communicate updates about subscriptions and payments to Selldone. This feature ensures that the platform is always aware of the latest changes and can take the appropriate actions. By clicking on "Auto Fix Payments," Selldone will ensure that the webhook is properly configured and working, guaranteeing a seamless experience for both you and your customers.
Setting up Payment
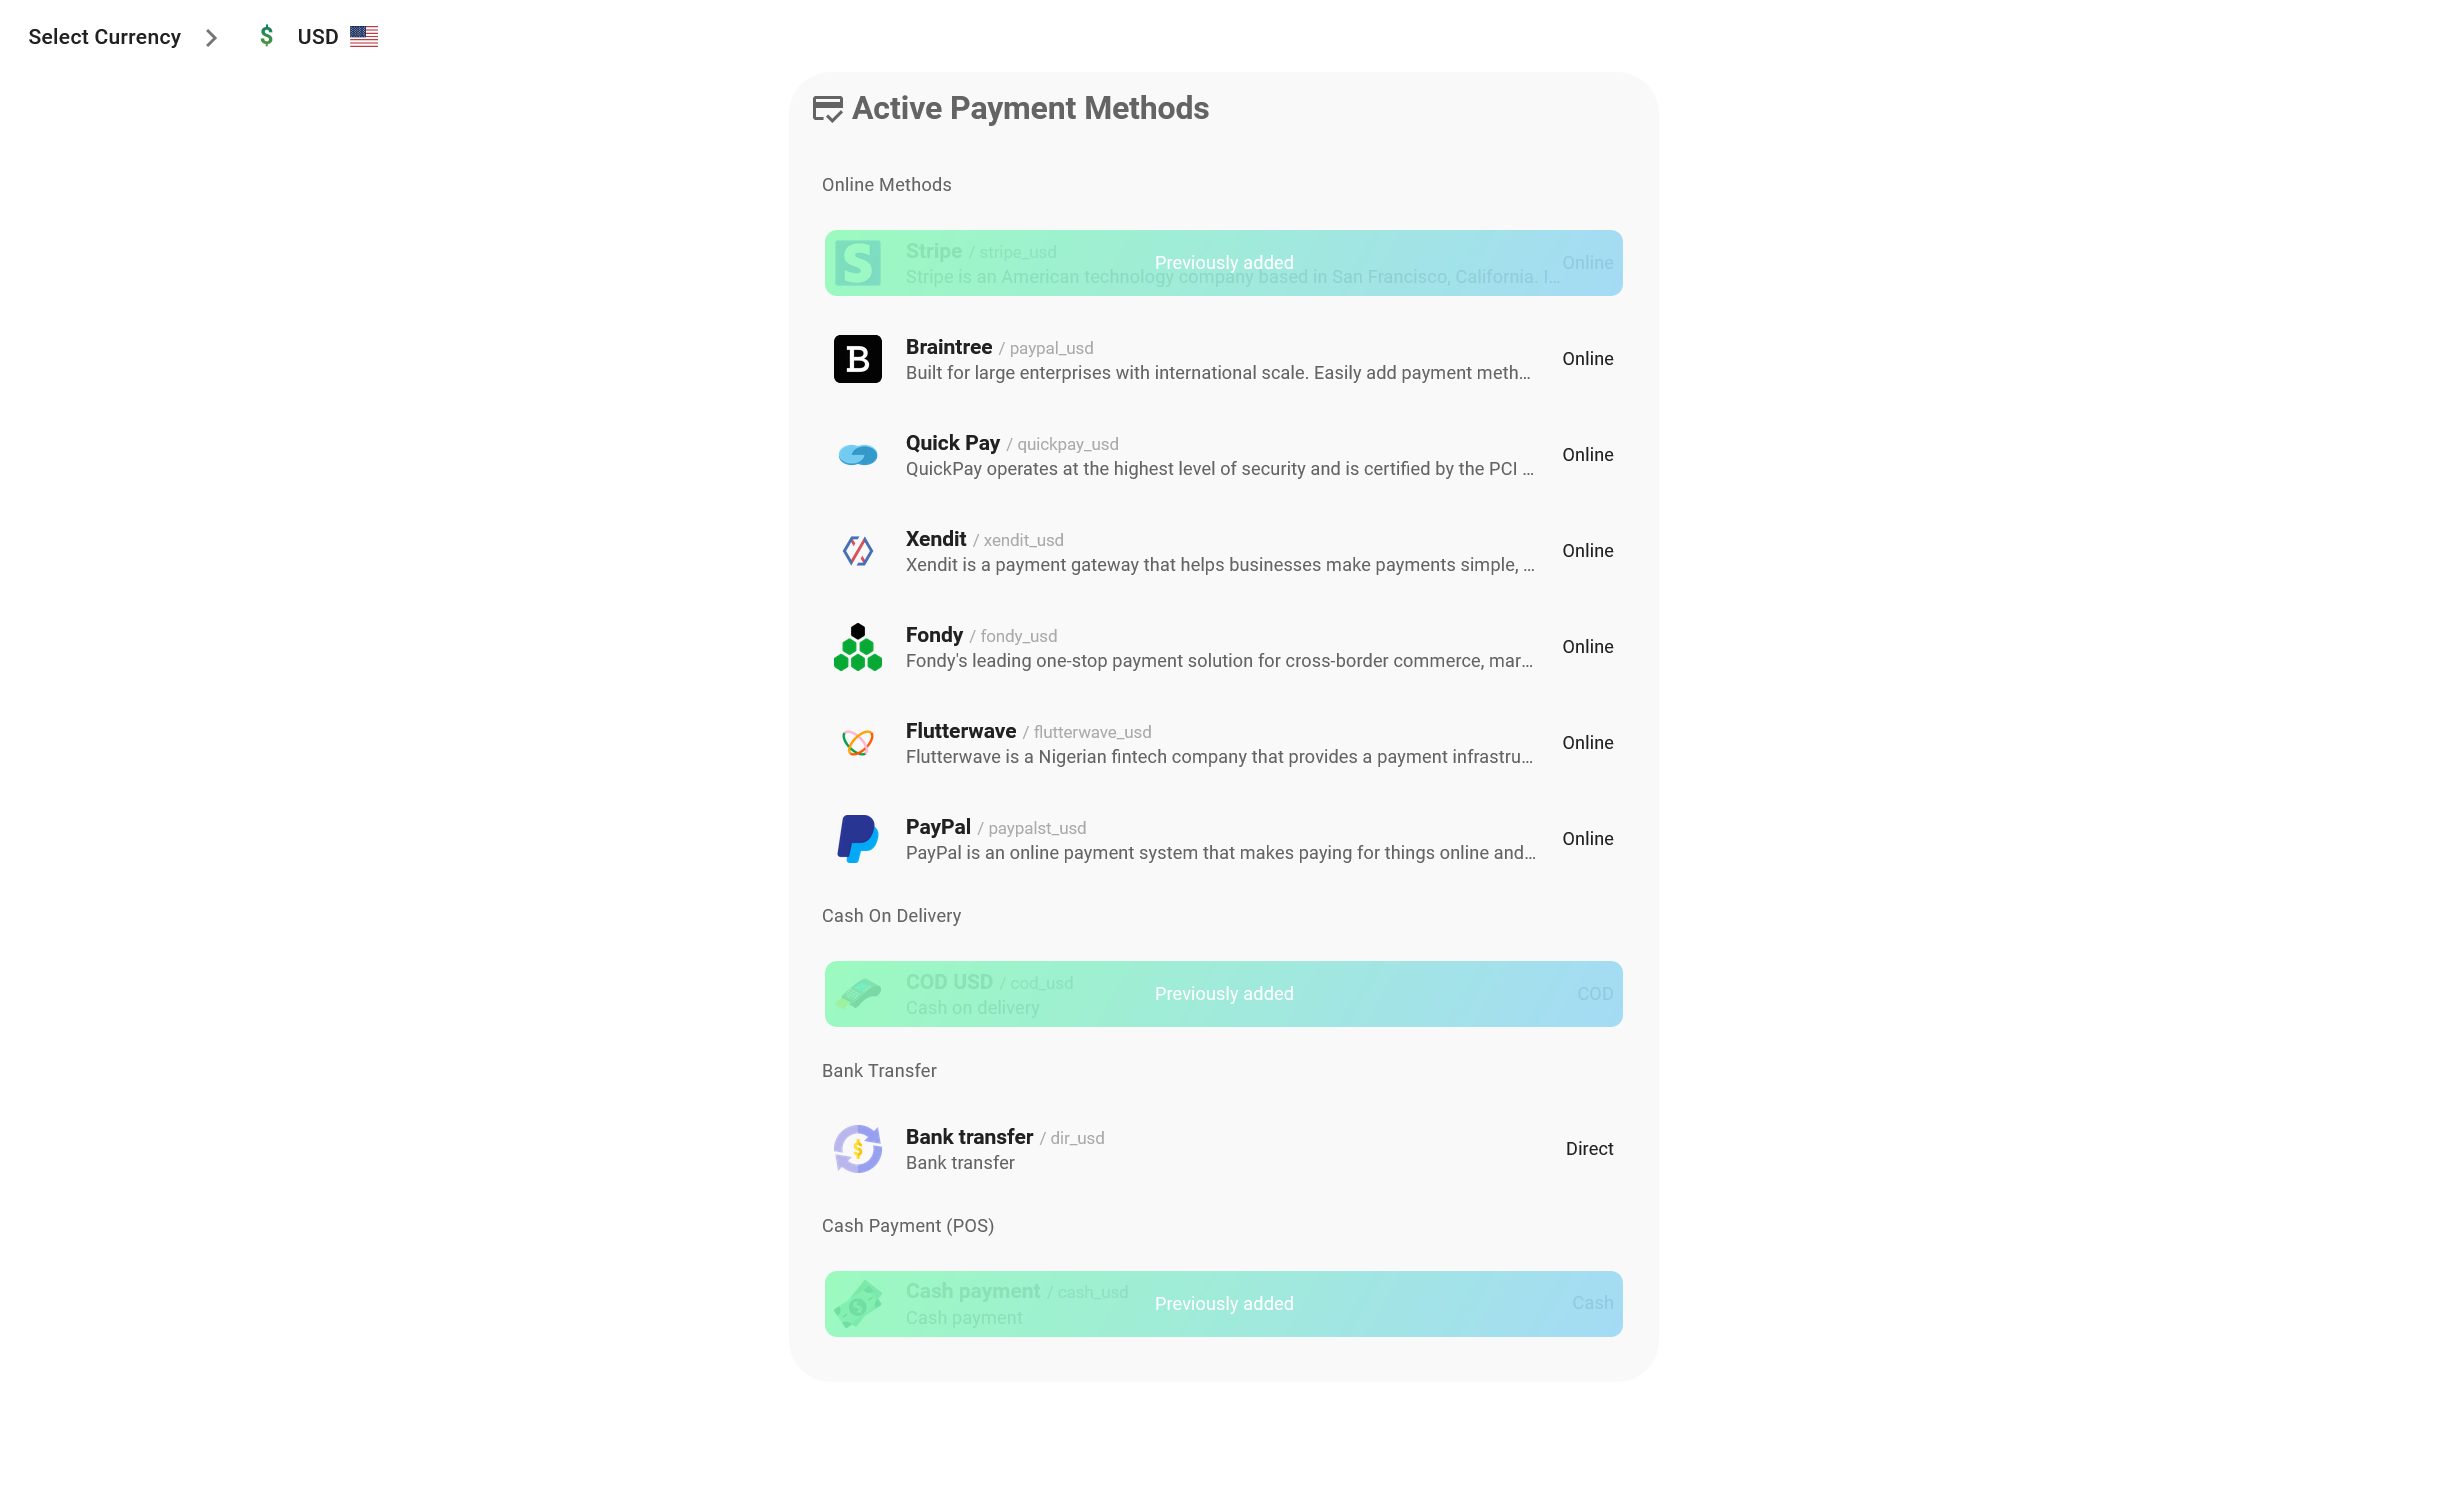
Once your shop is set up, you'll need to connect a payment gateway to your shop. For now, just Stripe is supported for Subscription products. You can add Stripe in the Shop > Accounting > Gateways tab.
1- Click on the New Payment Method button.
2- Select your currency. You can add more currencies in the Exchange tab. For example, if you add just USD as your currency and add Stripe for USD, then you can accept payments in all supported currencies like EUR, and GBP.
3- Select Stripe under online payment methods.
4- Fill in the API keys or click on the Auto Connect button. You can find API keys in your Stripe dashboard. Make sure you select Live mode.
IMPORTANT: If you have previously added Stripe to your Selldone account, you can access the gateway page by clicking on it. From there, you have the option to connect to your Stripe account either automatically or manually. To connect automatically, simply click on the "Auto Connect" button in the Gateway > Dashboard tab. Alternatively, you can connect manually by going to the "Edit" tab and entering your API keys manually. This allows you to have more control over the connection process and ensure that everything is set up correctly.
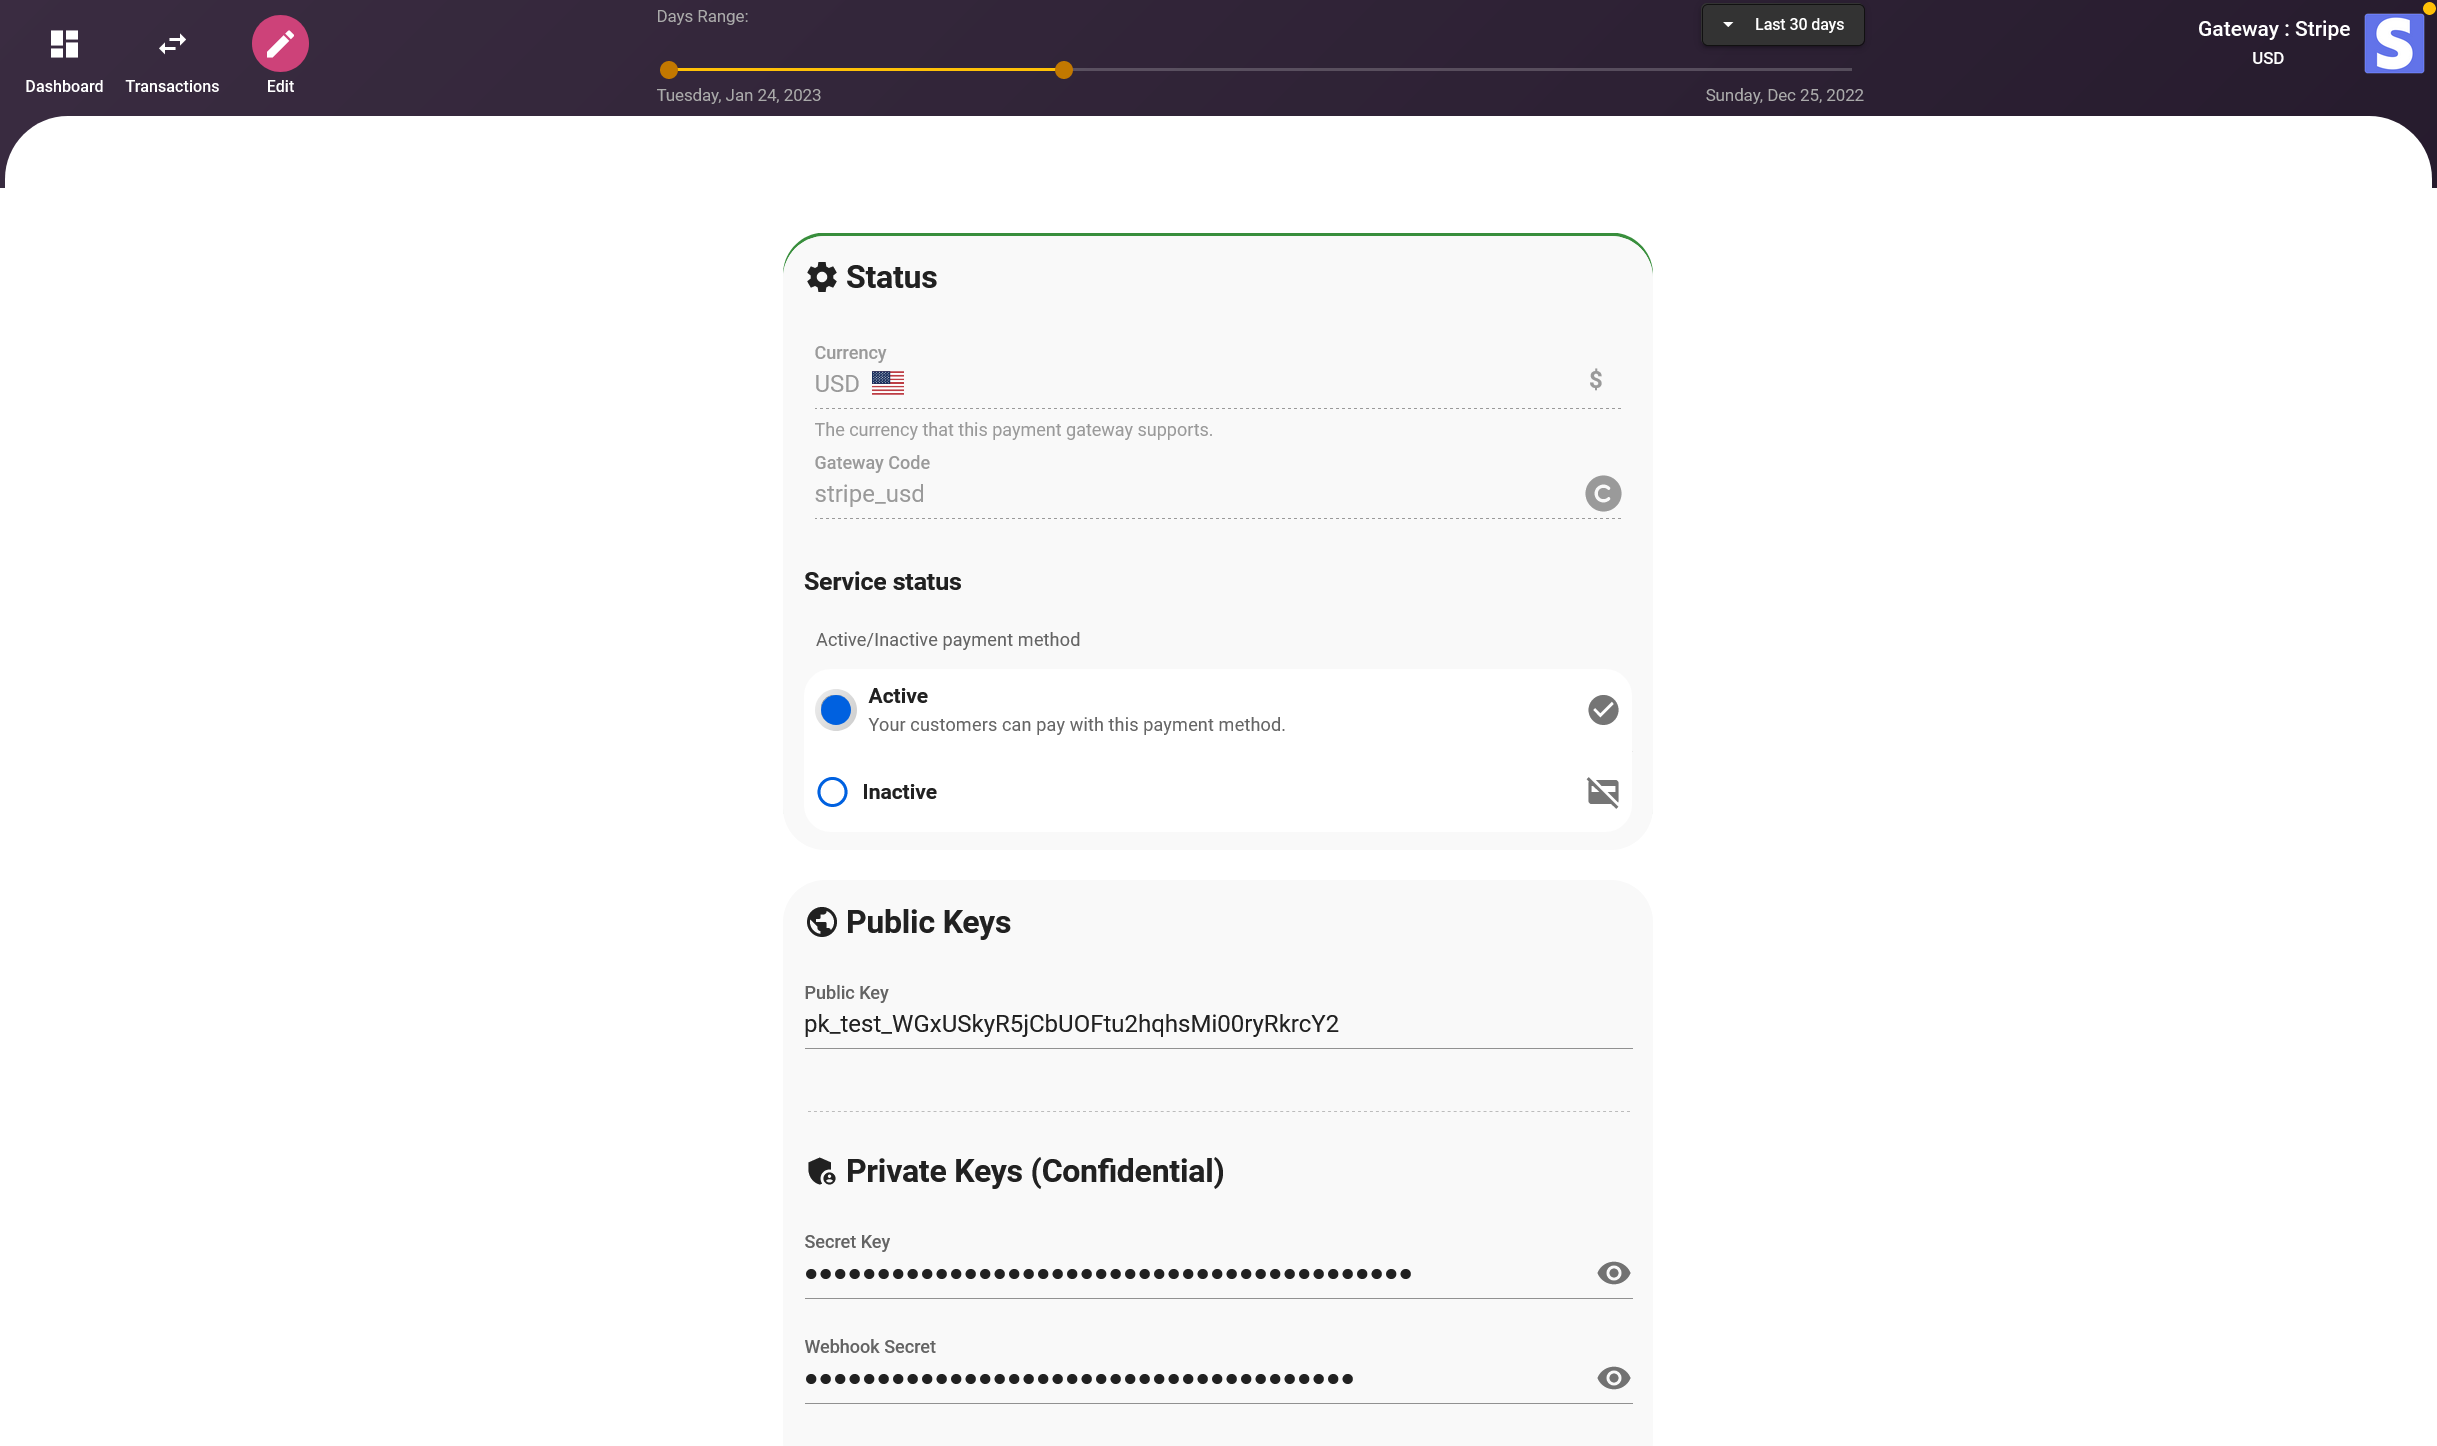
Debug/Live Mode
Make sure you are in the live mode to accept real payments.


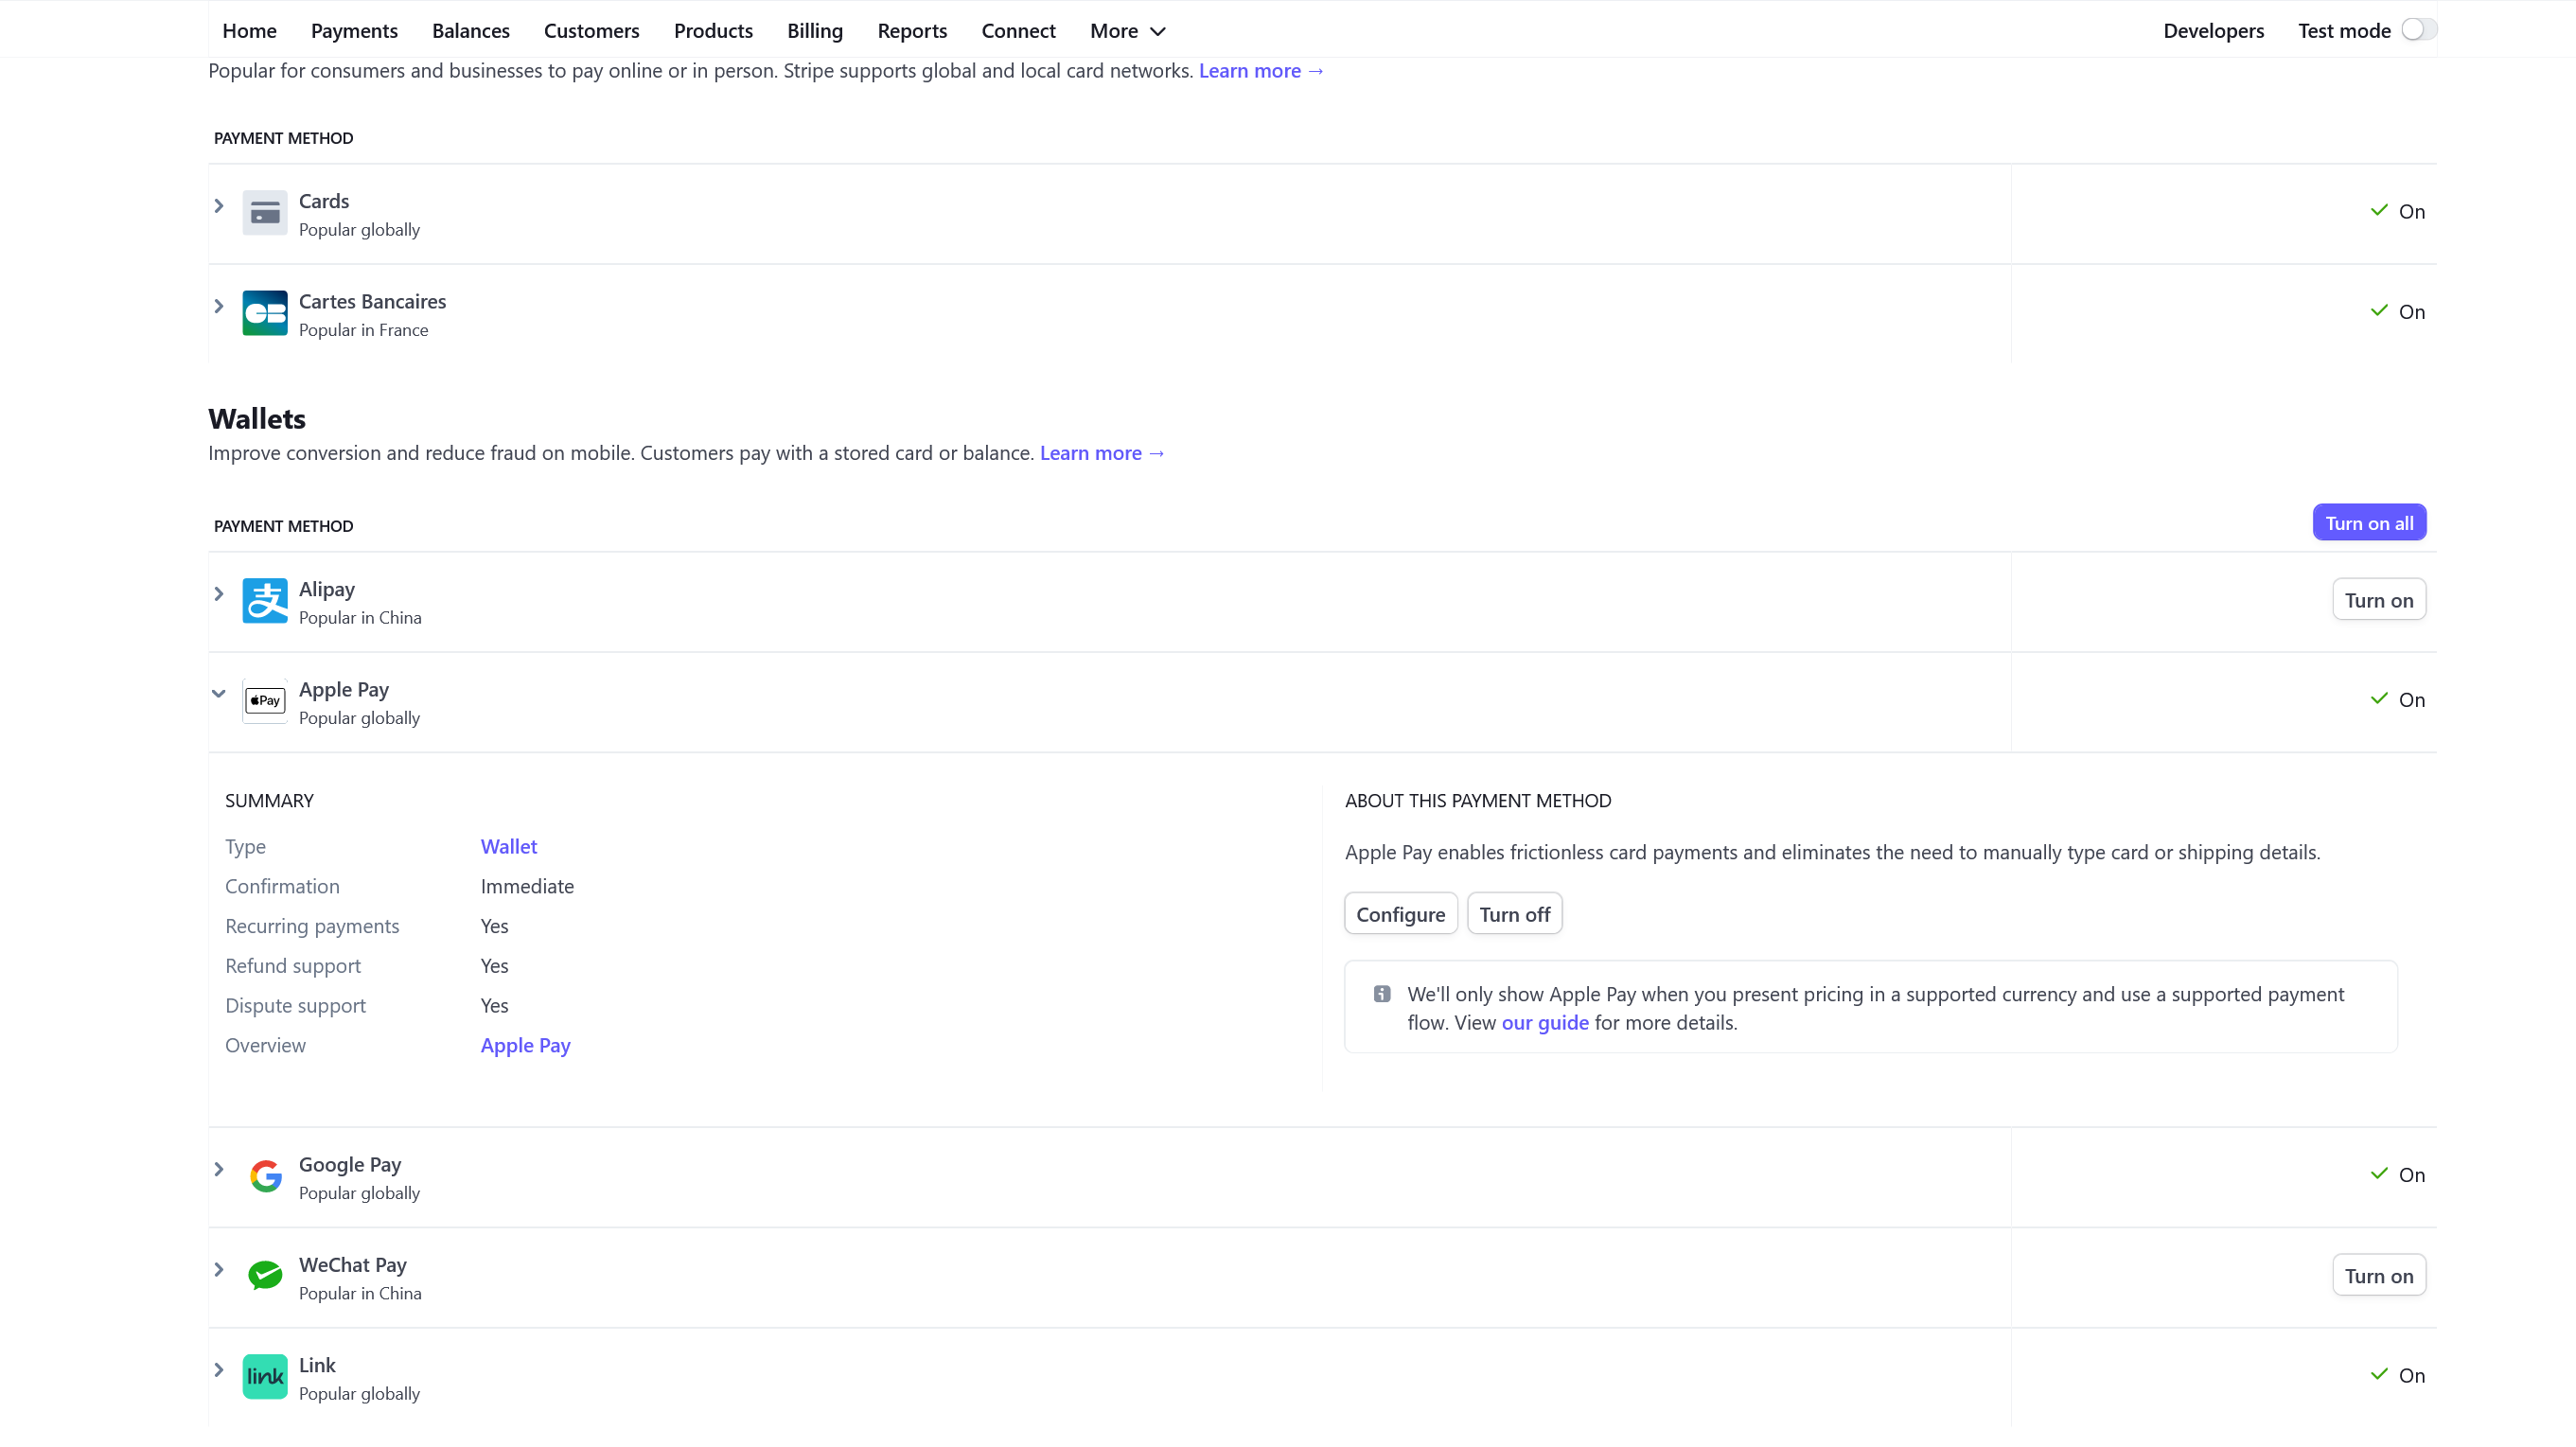
Setup Apple Pay – Domain verification
In order to accept ApplePay for your subscriptions via Stripe, you will need to verify your domain first. To do this, click on the "Active" button of the Apple Pay tab and enter your domain. Next, you will need to upload the verification file. You can obtain the verification file from the Payment Method Configuration tab in your Stripe account. Once the verification process is complete, your customers will be able to make subscriptions via ApplePay.
To enable Apple Pay in Stripe, you will need to follow these steps:
1. Log in to your Stripe account and navigate to the Settings > Payment Methods tab in the dashboard.
2. Scroll down to the "Apple Pay" section and click on the "Activate" button.
3. Verify your domain by entering your domain name and uploading the verification file. The verification file can be obtained by going to the Payment Method Configuration tab in your Stripe account.
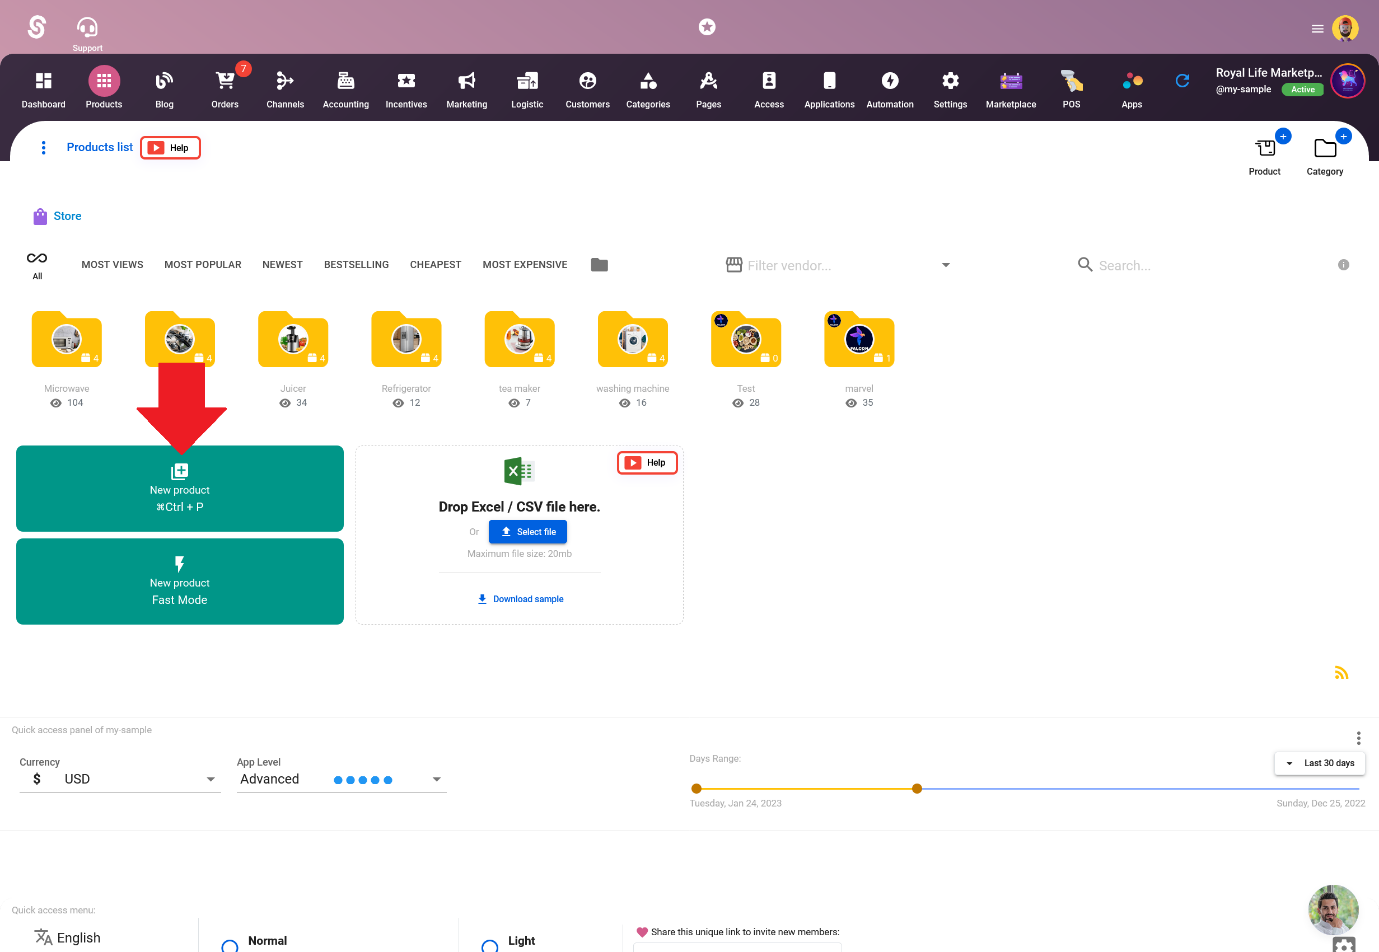
Adding Products
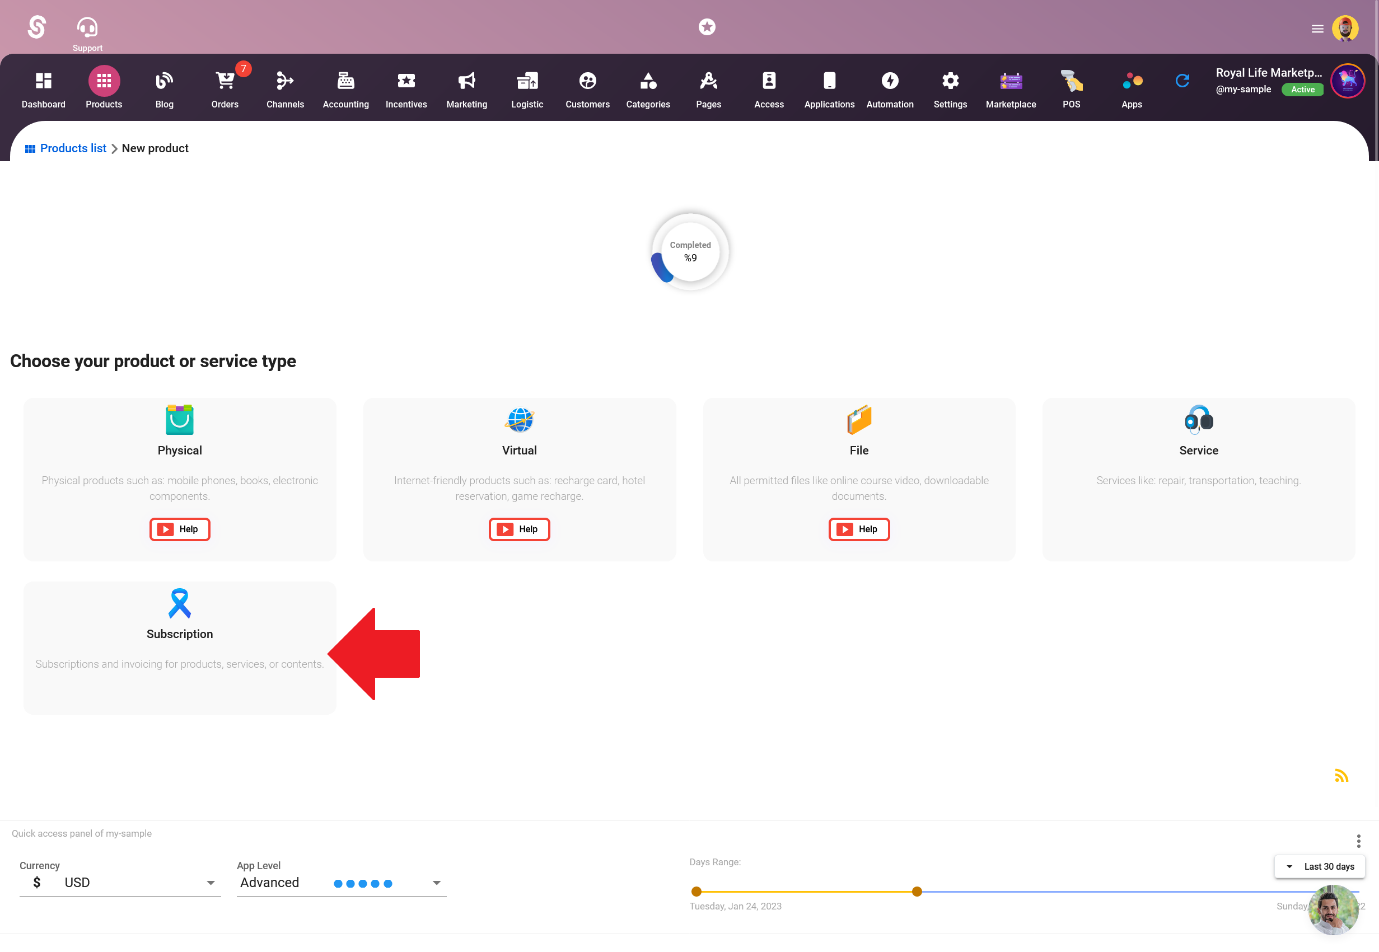
After setting up your shop and payment gateway, you can begin adding products or services that you want to offer as subscriptions. To sell physical products like subscription boxes or digital products like online courses or memberships you just need to select Subscription as the product type.
1- Go to the Shop > Products tab. The product will be created in the current category.
2- Select the Subscription type.
3- Set a title and add more information about the product (optional).
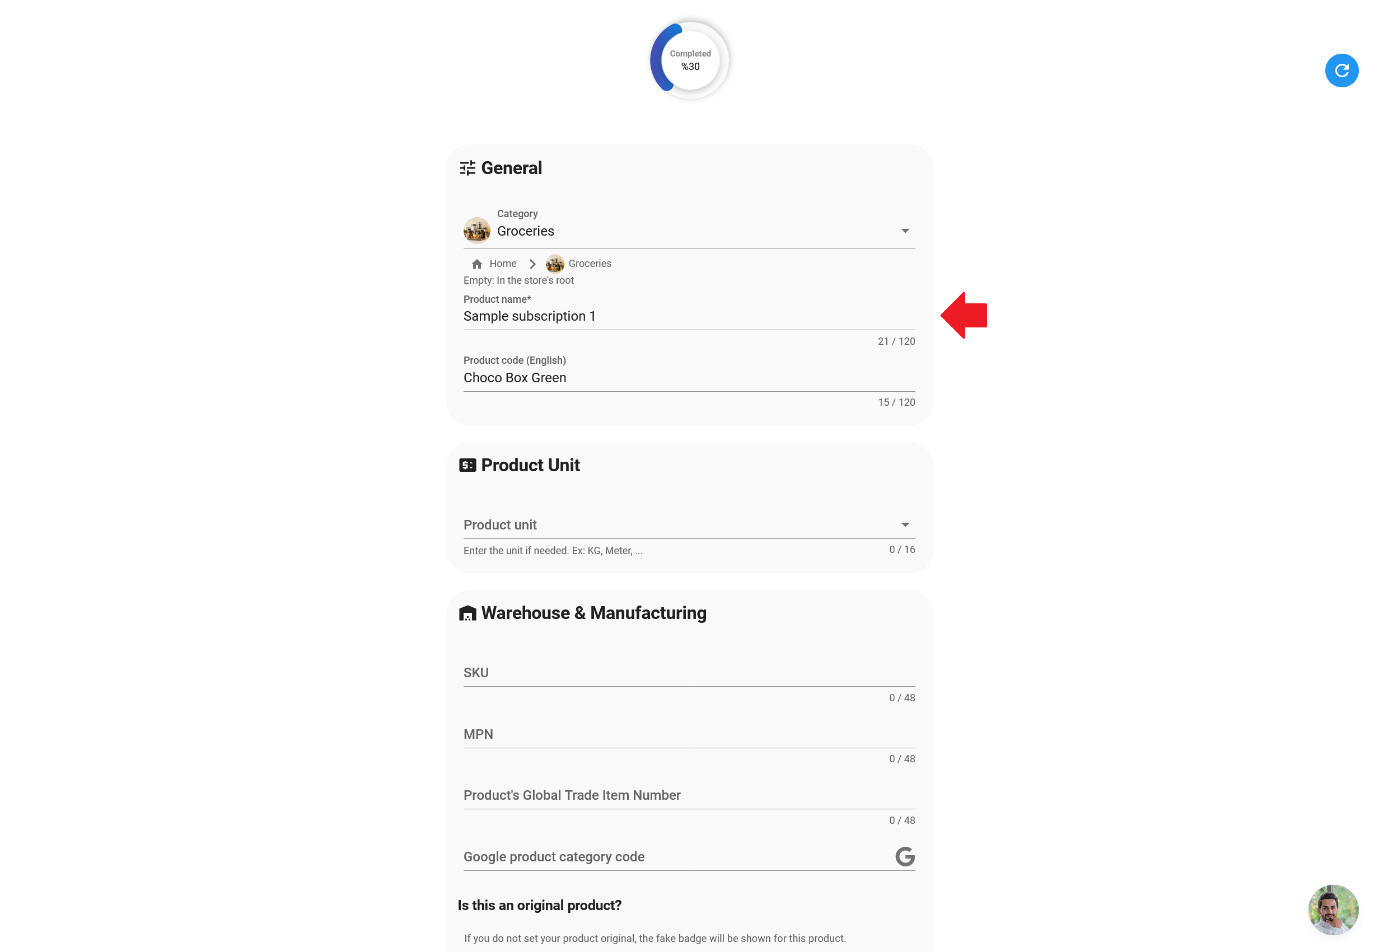
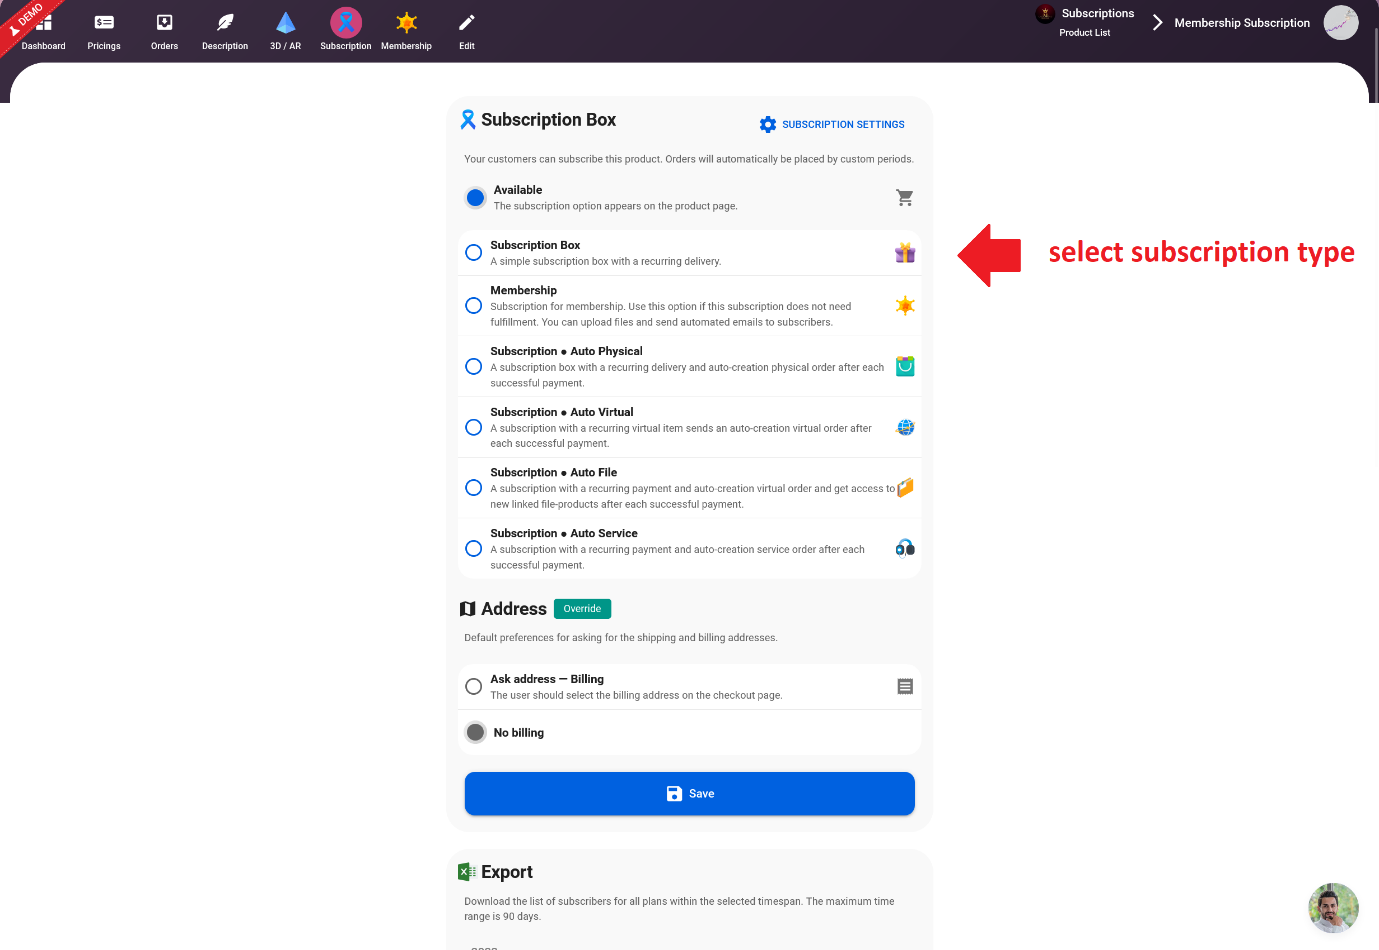
4- Set the subscription type in the Product > Subscription tab.
Add Pricings for the Product
Once your products are added, you will need to set the pricing for your subscription-based products or services. You can choose to offer different pricing options such as monthly, quarterly, or annual subscriptions. This will allow customers to choose the pricing plan that best suits their needs.
To add pricing, go to the Product > Pricing tab and click on the “Add New Pricing” button
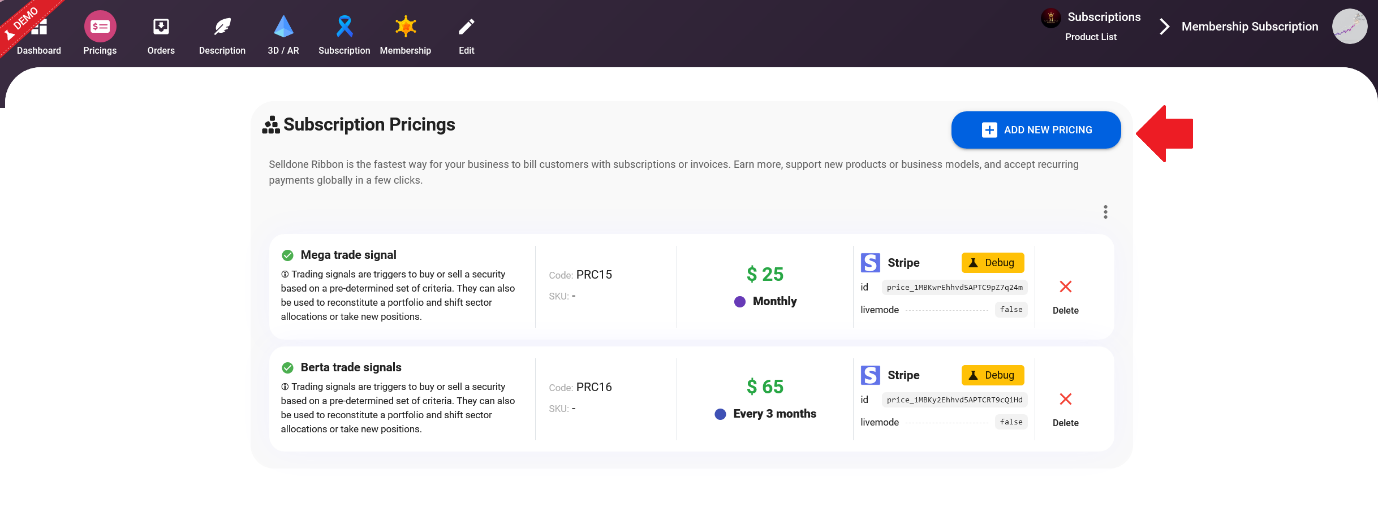
Now you can define a pricing model.
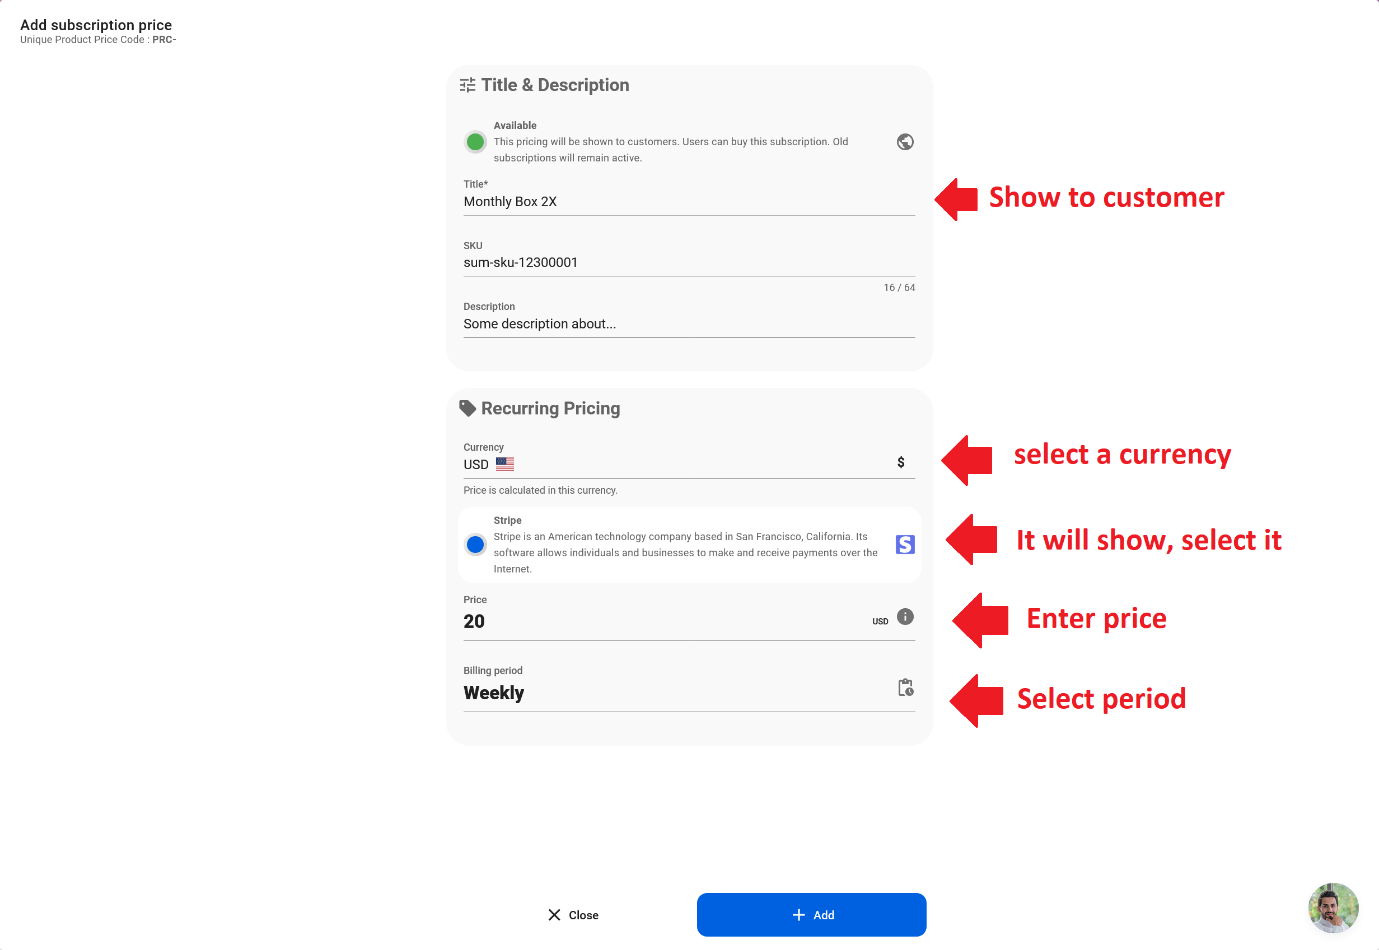
When you click on the "Add" button in Selldone, the platform will automatically create products and pricing models on your Stripe account, eliminating the need for any additional configurations. This means that you don't have to worry about manually setting up products and pricing in Stripe, as Selldone handles this process for you. This feature streamlines the process of setting up a subscription-based business and makes it easy to start selling products and services.
IMPORTANT: You cannot change the price and period after creation.
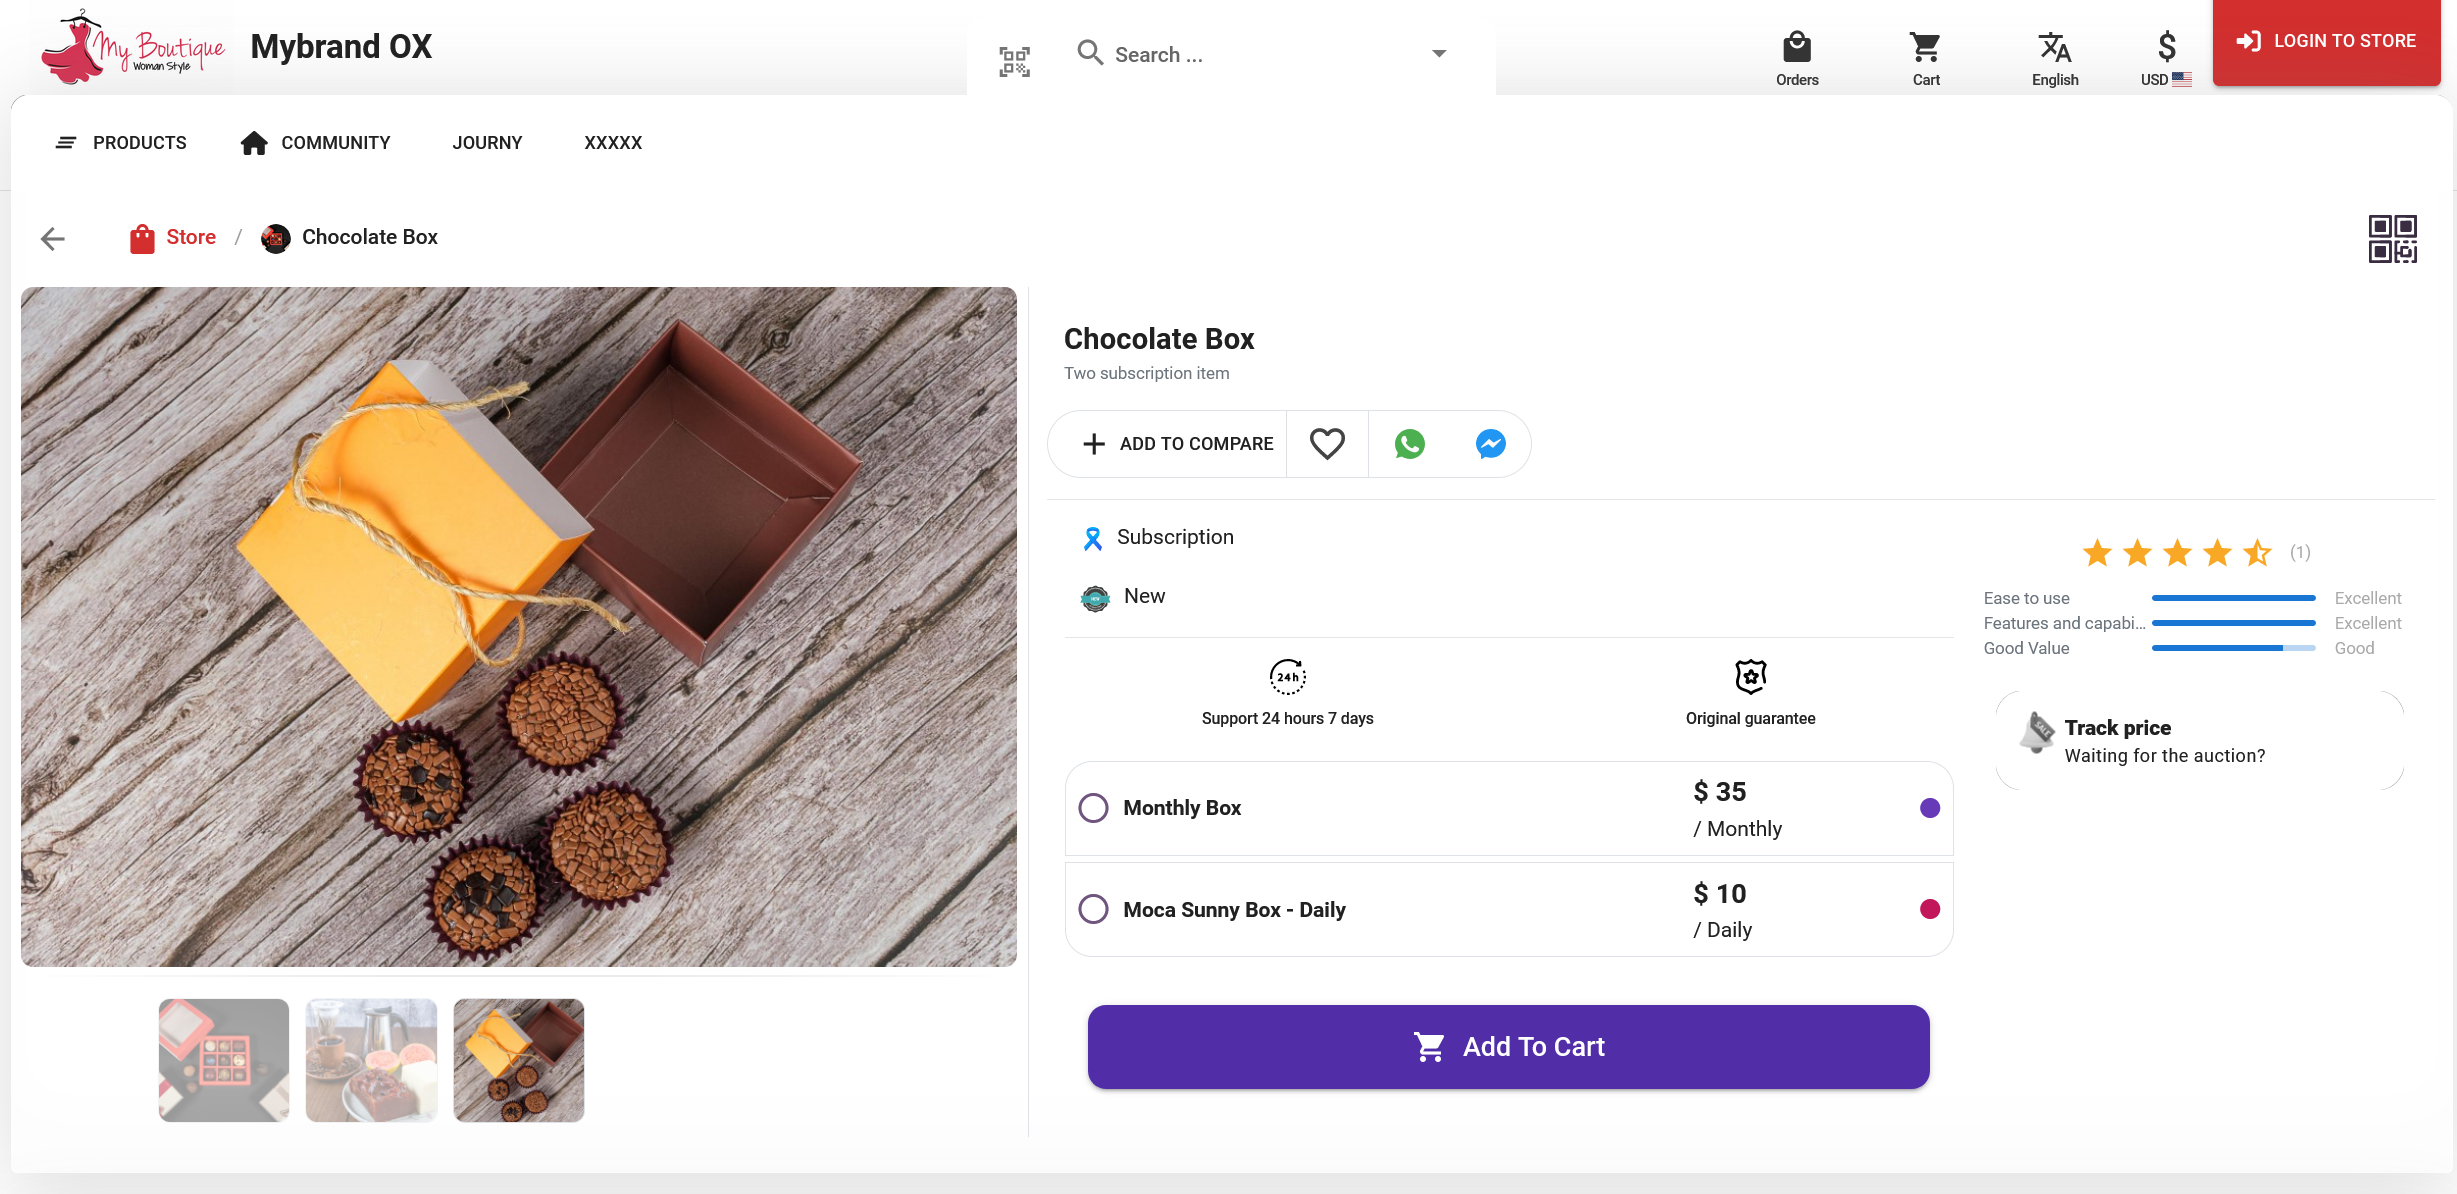
![Subscription Mode: Subscription Box [🎈 Simple, fast and common]](https://cdn.selldone.com/app/contents/articles/16037ead11f634fac40cd1fe41a3d8fa.jpeg)
Subscription Mode: Subscription Box [🎈 Simple, fast and common]
A subscription box with a recurring delivery is a great way to offer customers a convenient and personalized shopping experience. It is a simple and easy-to-set-up business model that can be used for a variety of products, from beauty and skincare products to snacks and treats.
A subscription box typically includes a selection of products that are delivered to the customer on a regular basis, such as monthly or quarterly. Customers can choose from different subscription options, such as monthly, quarterly, or annual plans.
When it comes to setting up a subscription box, there is no need for any additional configurations. This means that you can start selling your subscription boxes immediately and begin receiving orders in the "Orders Processing" tab within your shop. This streamlined process allows you to quickly and easily launch your subscription box business and start generating revenue.
![Subscription Mode: Membership / Paywall [⭐ Advance membership]](https://cdn.selldone.com/app/contents/articles/44803742190ae084f3a05d0ea763e88c.jpeg)
Subscription Mode: Membership / Paywall [⭐ Advance membership]
The "Membership / Paywall" subscription mode is a great option for businesses that offer membership-based subscriptions and share content with members in a regular manner, such as access to exclusive content or services. This mode allows you to upload files and send automated emails to subscribers without the need for any fulfillment or shipping.
IMPORTANT: Do not use this option if you want to sell just some files like online courses. This option is suitable for selling something like daily training, or selling daily market signals.
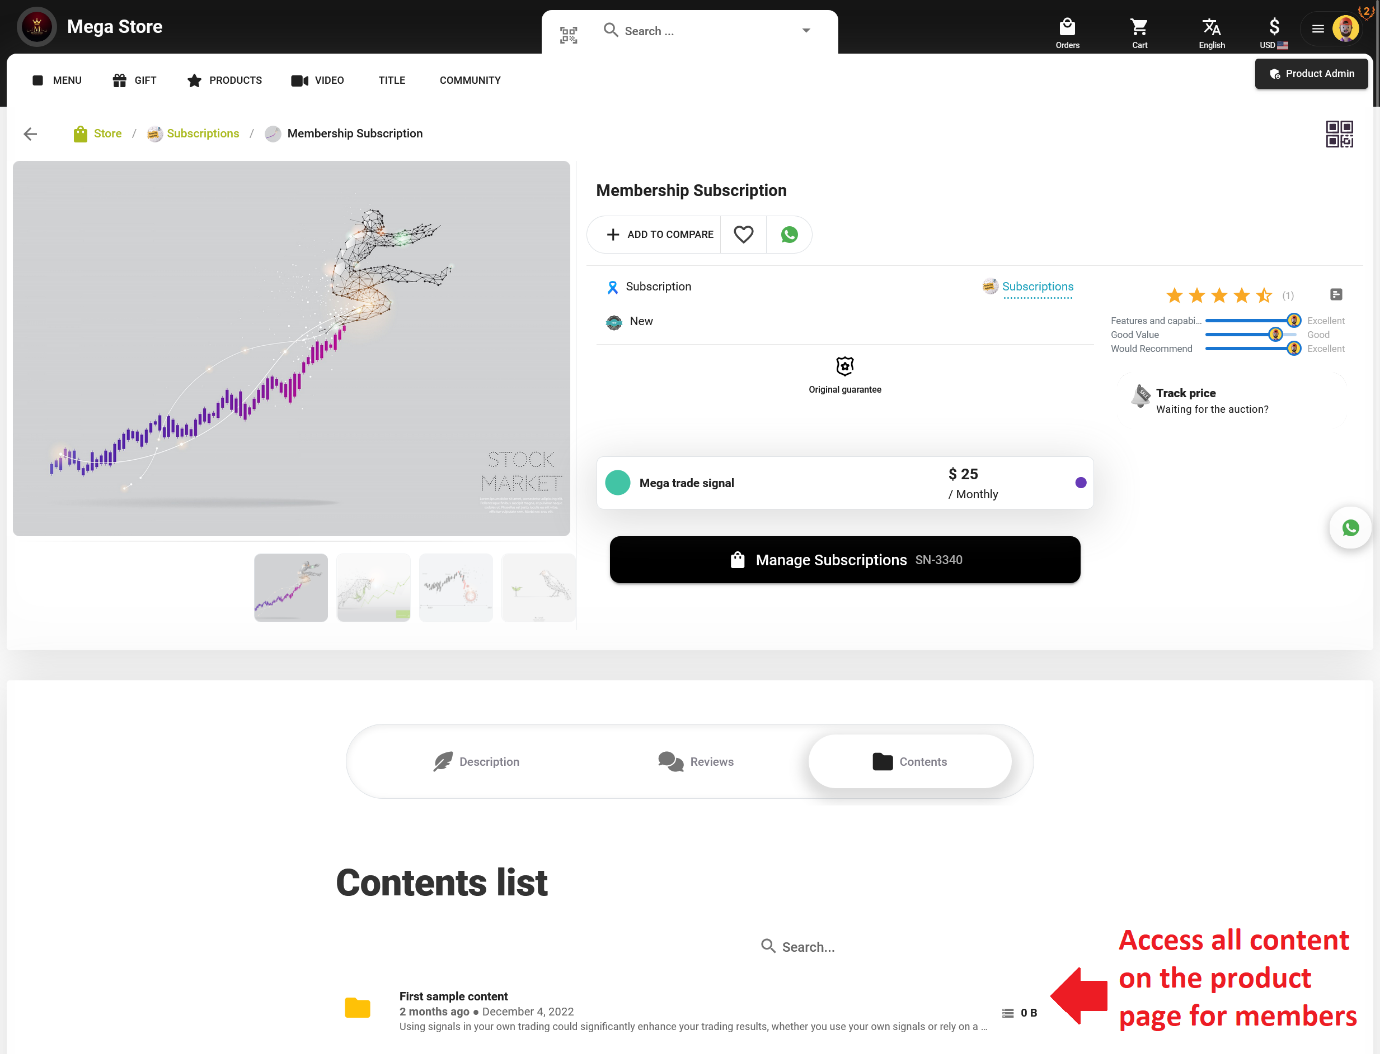
In this mode, a new "Membership" tab will be added to the product page, where you can add new content and send updates to subscribers. This feature eliminates the need for external storage, email tools, or content management services to share and sell your content to your audience. Selldone provides a high-quality and fast cloud storage for your content.
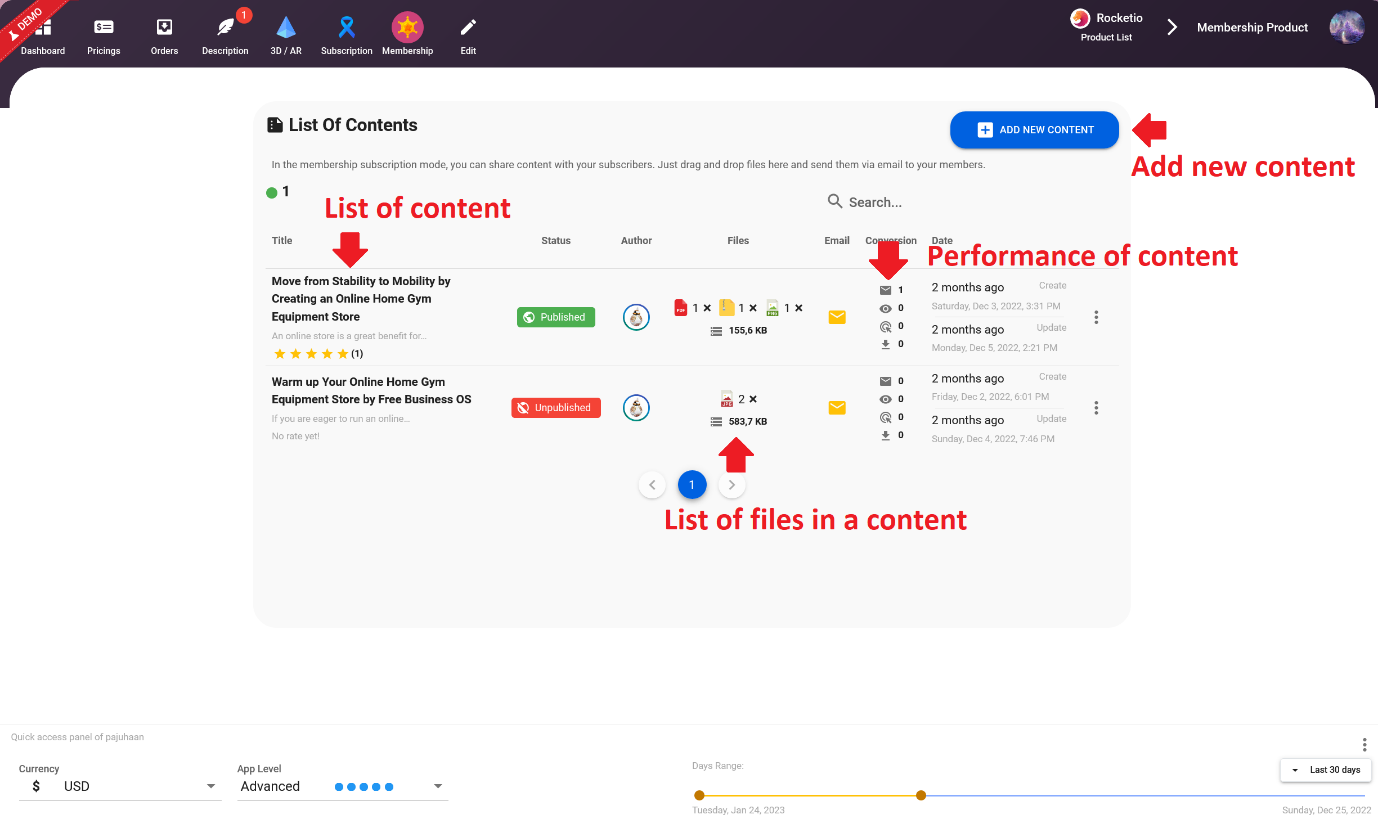
Members will be informed via email about new content and will have access to a list of files, they can also download files directly from the product page. All files are downloaded via secure and expirable links. This feature provides a secure and easy way to share and sell content to your audience.
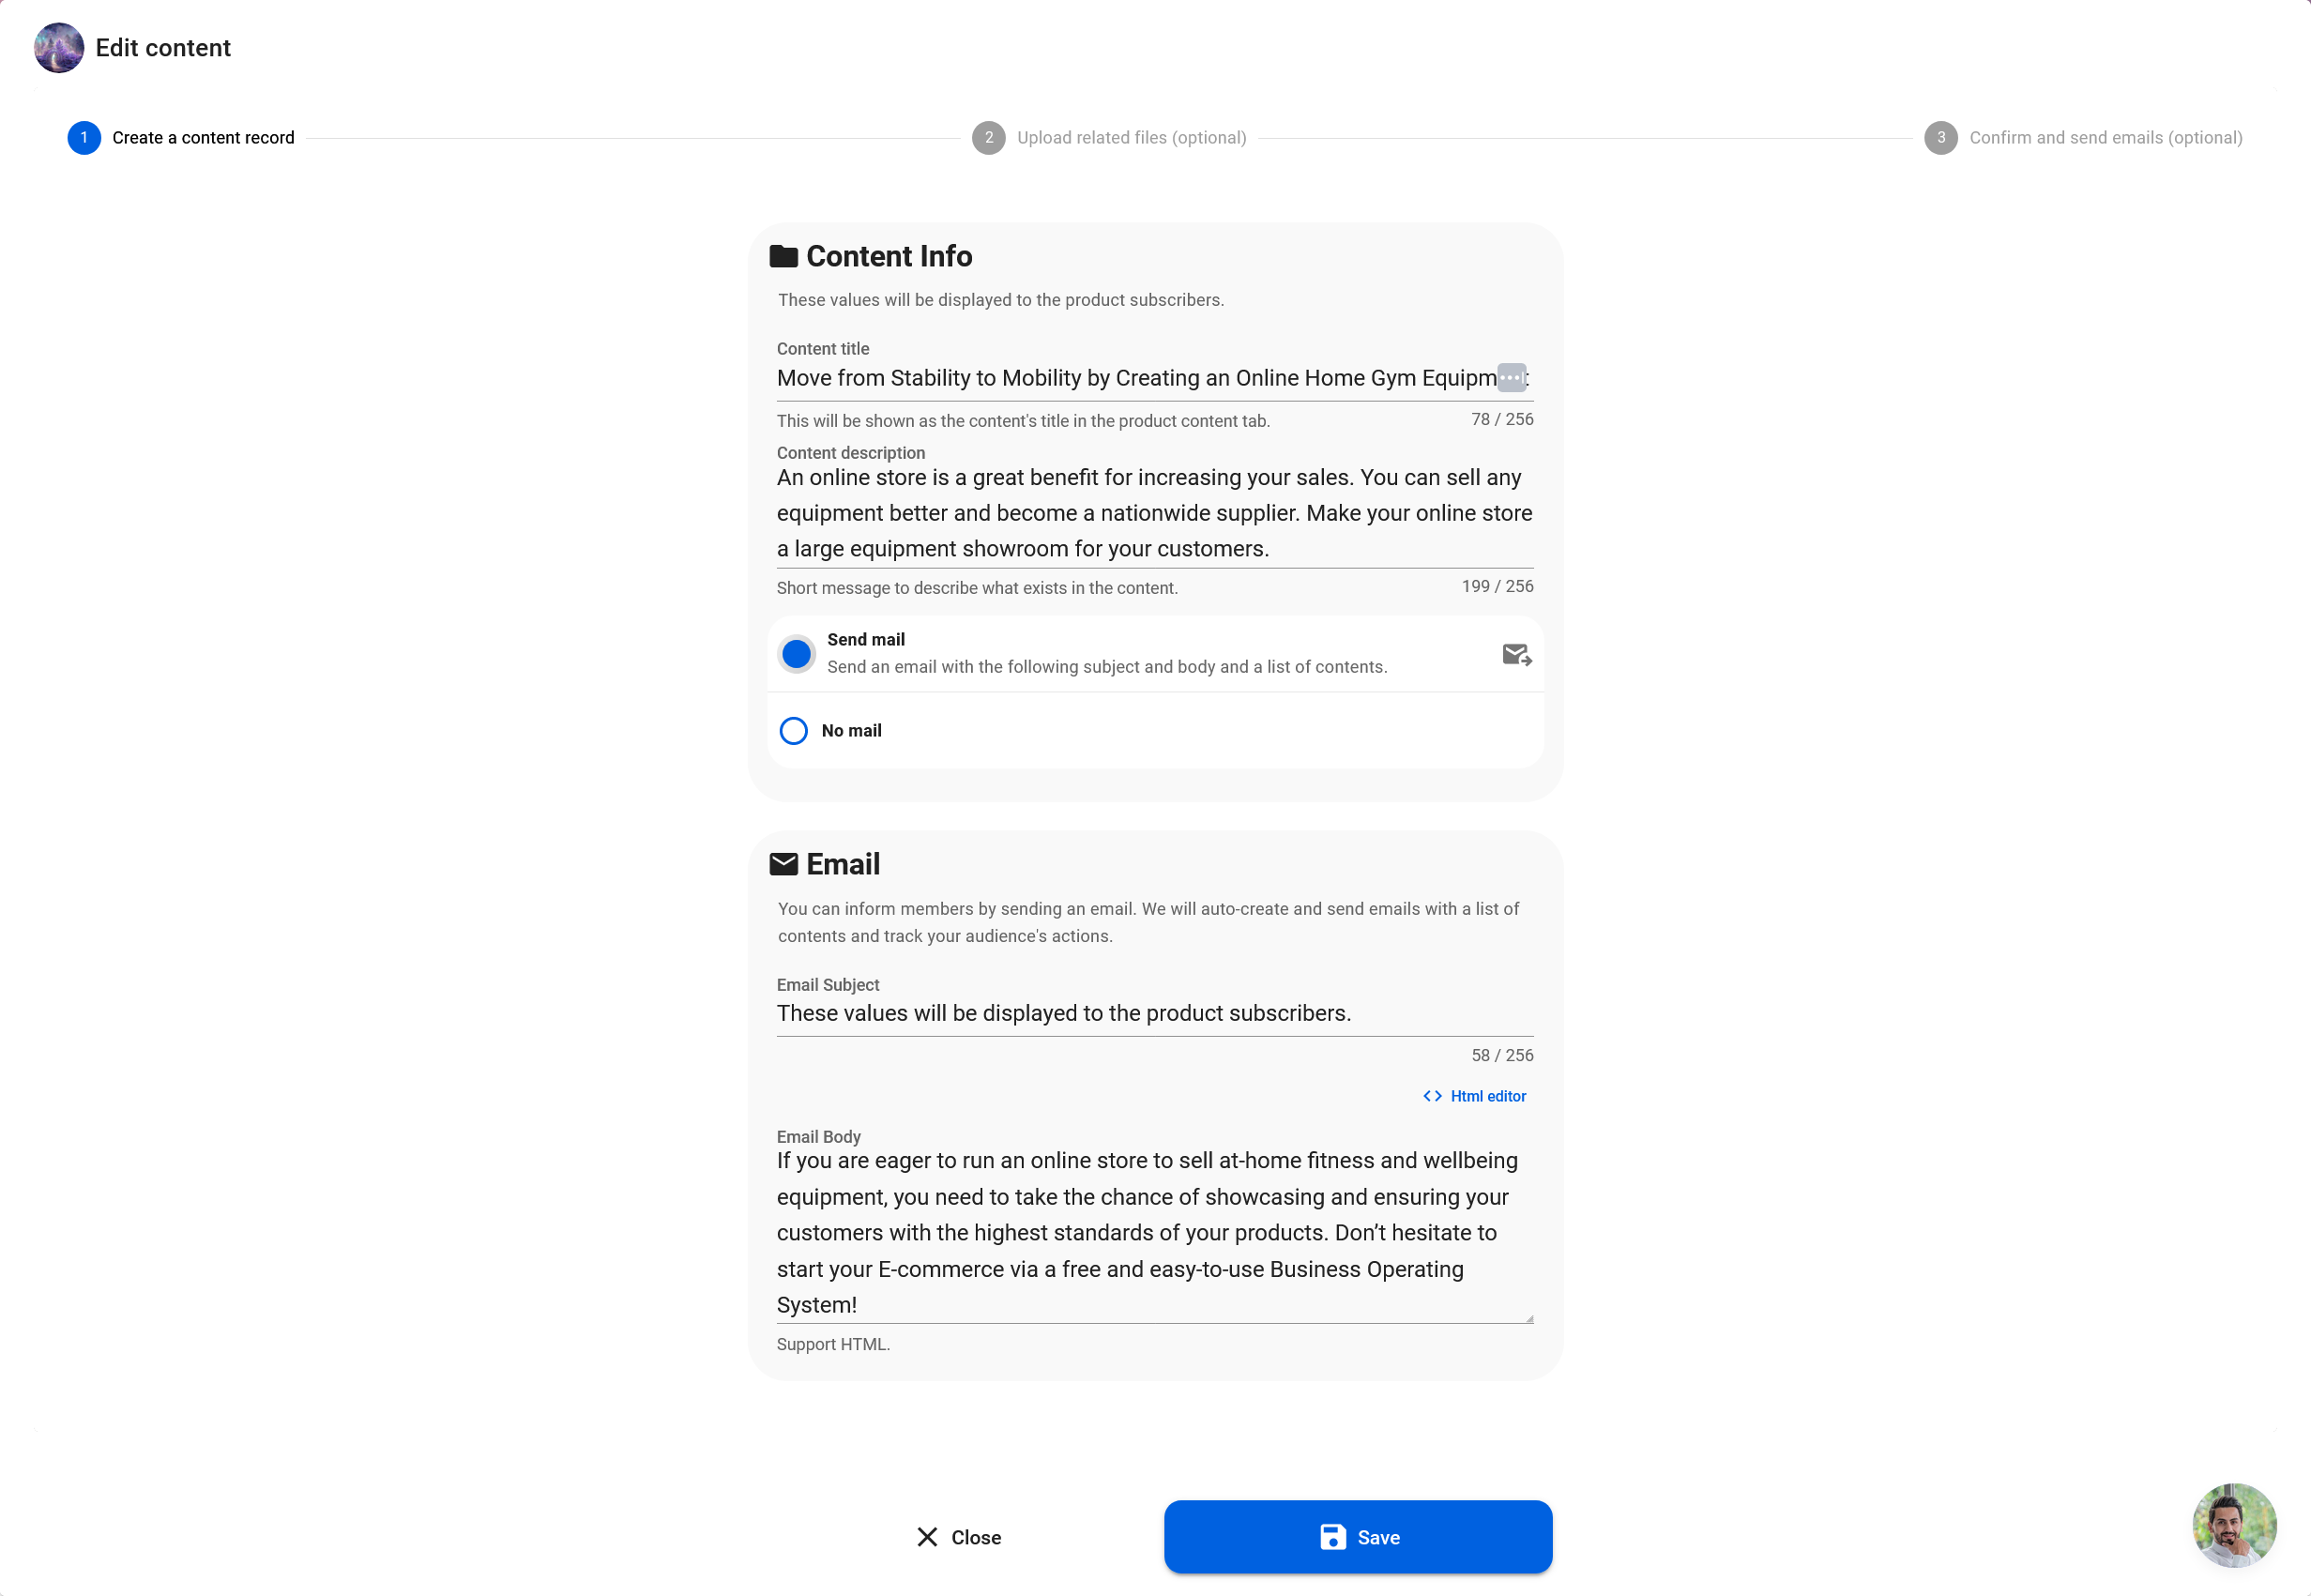
Create a content package for membership subscription
Click on the Add New Content button and enter a title and description. Also, you can enable sending emails and then enter the email subject and body here.
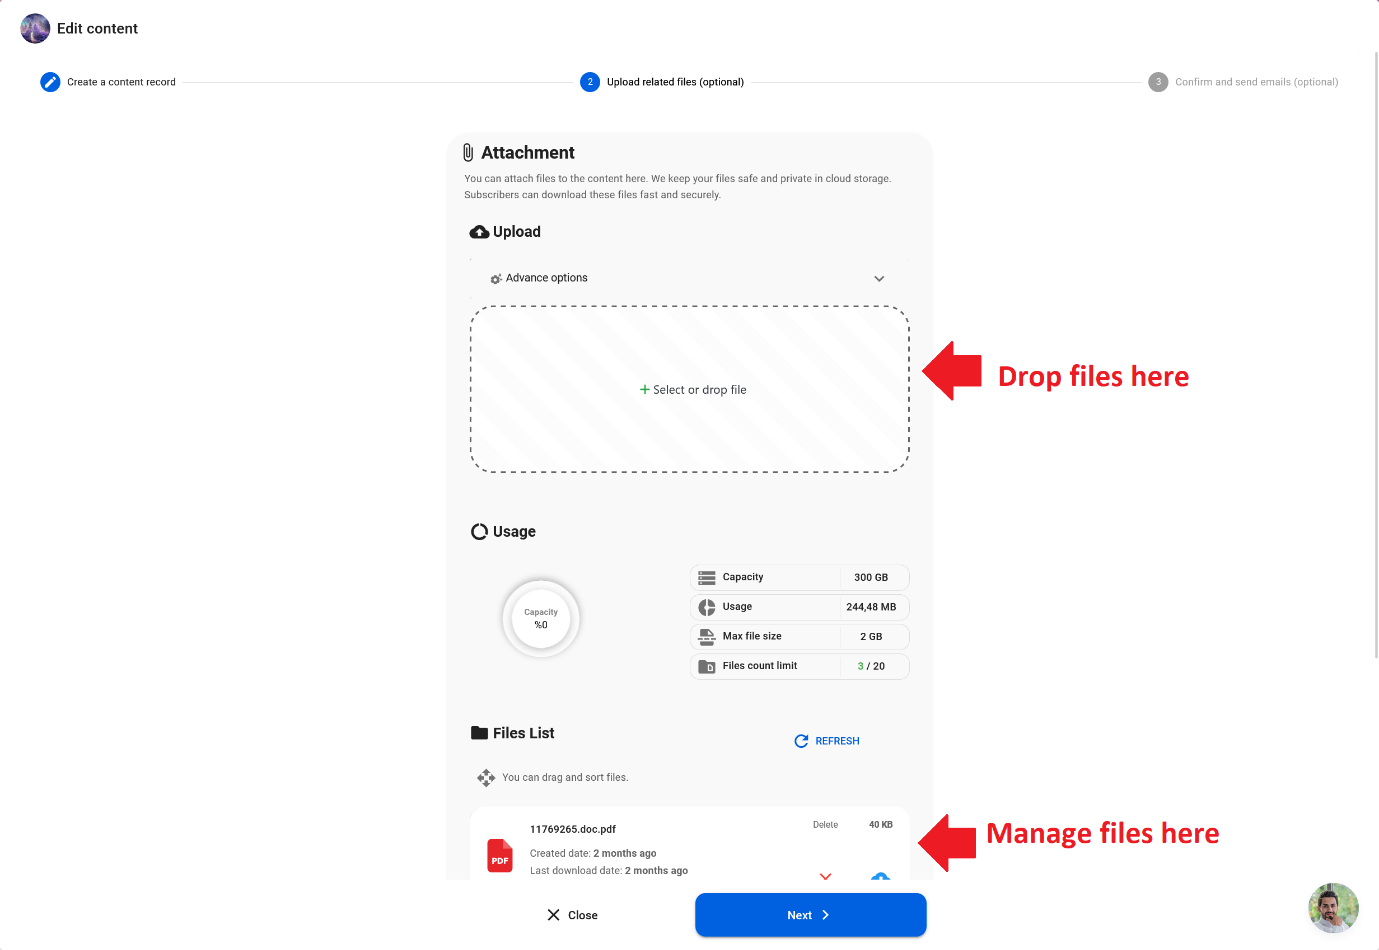
Upload files to the content
In the next step, you can attach files to the content.
Confirm and send content
In the final step, you have the option to review and confirm the content that will be sent to your members. Additionally, you can also preview the email that will be sent to your members, ensuring that the content is accurate and the email is formatted correctly. This allows you to make any necessary adjustments before the email is sent to your members, ensuring a seamless and professional experience for them.

Subscription Mode: Subscription ● Auto Physical
The "Subscription - Auto Physical" mode is a great option for businesses that offer subscription boxes with recurring deliveries and automatically create physical orders after each successful payment. This mode streamlines the process of fulfilling orders and ensures that your customers receive their subscription boxes on a regular basis.
When a customer subscribes to your subscription box, their payment is processed automatically, and a physical order is created. This order includes all the items included in the subscription box and is sent to the customer's shipping address. The customer can choose from different subscription options, such as monthly, quarterly, or annual plans.
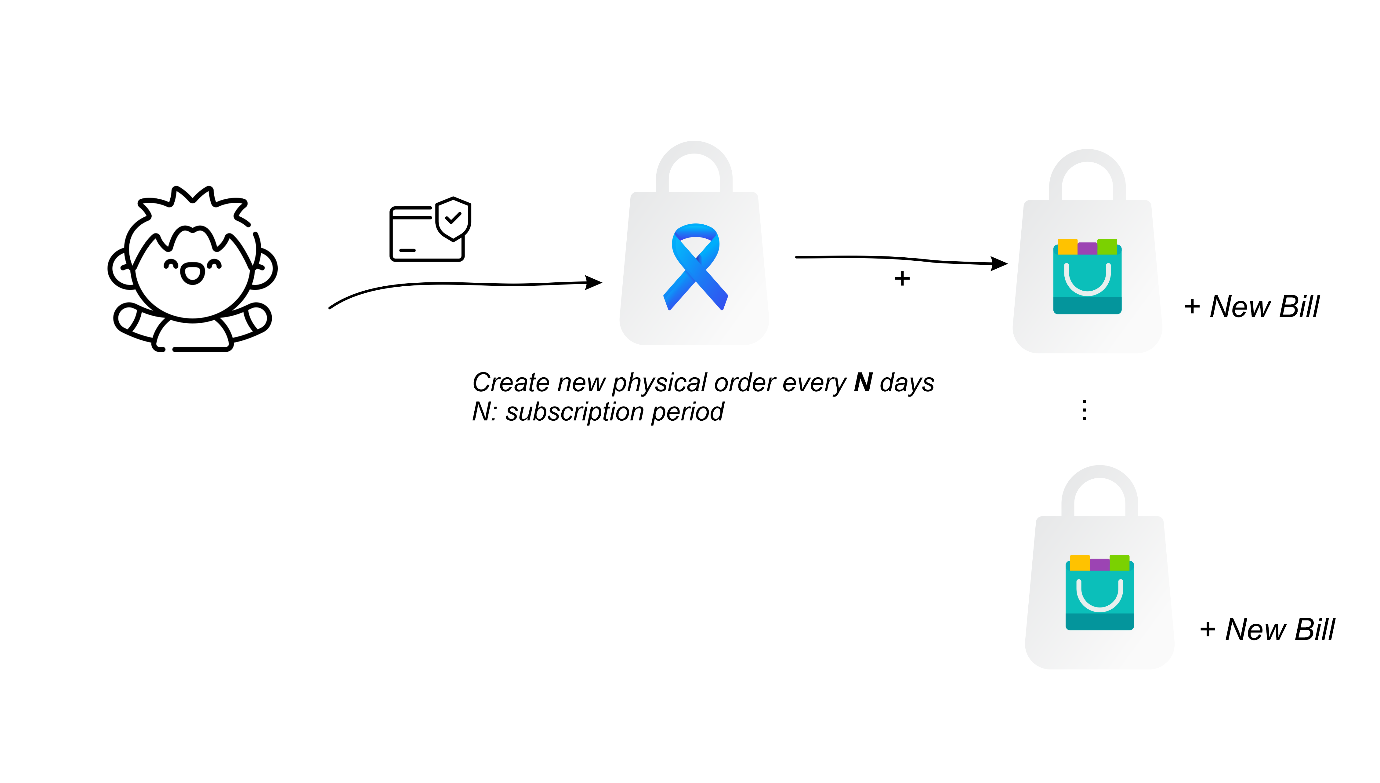
The process is automated, and you can be sure that the orders are created and shipped on time. This mode eliminates the need for manual order creation and shipping, which saves time and resources for the business. Additionally, the tracking number and expected delivery date, are provided to the customer.
Subscription Mode: Subscription ● Auto Virtual [Not recommended for all]
The "Subscription - Auto Virtual" mode is a great option for businesses that offer virtual products or services that are delivered on a recurring basis. This mode allows you to set up a subscription that automatically creates a virtual order after each successful payment.
For example, this mode can be used for businesses that offer online courses, digital products, or memberships with exclusive content via Keys or Links or any type of text that can be set as the output of virtual items. After a customer subscribes and makes a successful payment, the virtual item, such as a course module or digital product, will be automatically delivered to them.
This mode eliminates the need for manual fulfillment of virtual products and ensures that customers receive their subscription items in a timely manner. Additionally, it also allows you to track and manage the subscription orders effectively.
Subscription Mode: Subscription ● Auto File [Not recommended for all]
The "Subscription - Auto File" mode is a great option for businesses that offer recurring subscriptions with access to new linked file-products after each successful payment. This mode allows customers to make recurring payments and automatically grants them access to new linked file-products, such as digital downloads, ebooks, or music files, after each successful payment.
Subscription Mode: Subscription ● Auto Service
The "Subscription - Auto Service" mode is a great option for businesses that offer subscription-based services that require recurring payments. This mode allows you to set up a subscription with a recurring payment plan and automatically creates a service order after each successful payment.
This feature is particularly useful for businesses that offer services such as cleaning service, coaching, or consulting. It eliminates the need for manual order creation and ensures that service delivery is consistent and timely for the subscriber.
When a customer subscribes to a service using this mode, they will be charged a recurring fee at the frequency you specify (e.g. monthly, quarterly, annually). Once a payment is successful, the system will automatically create a new service order, and the customer will receive an email confirmation.
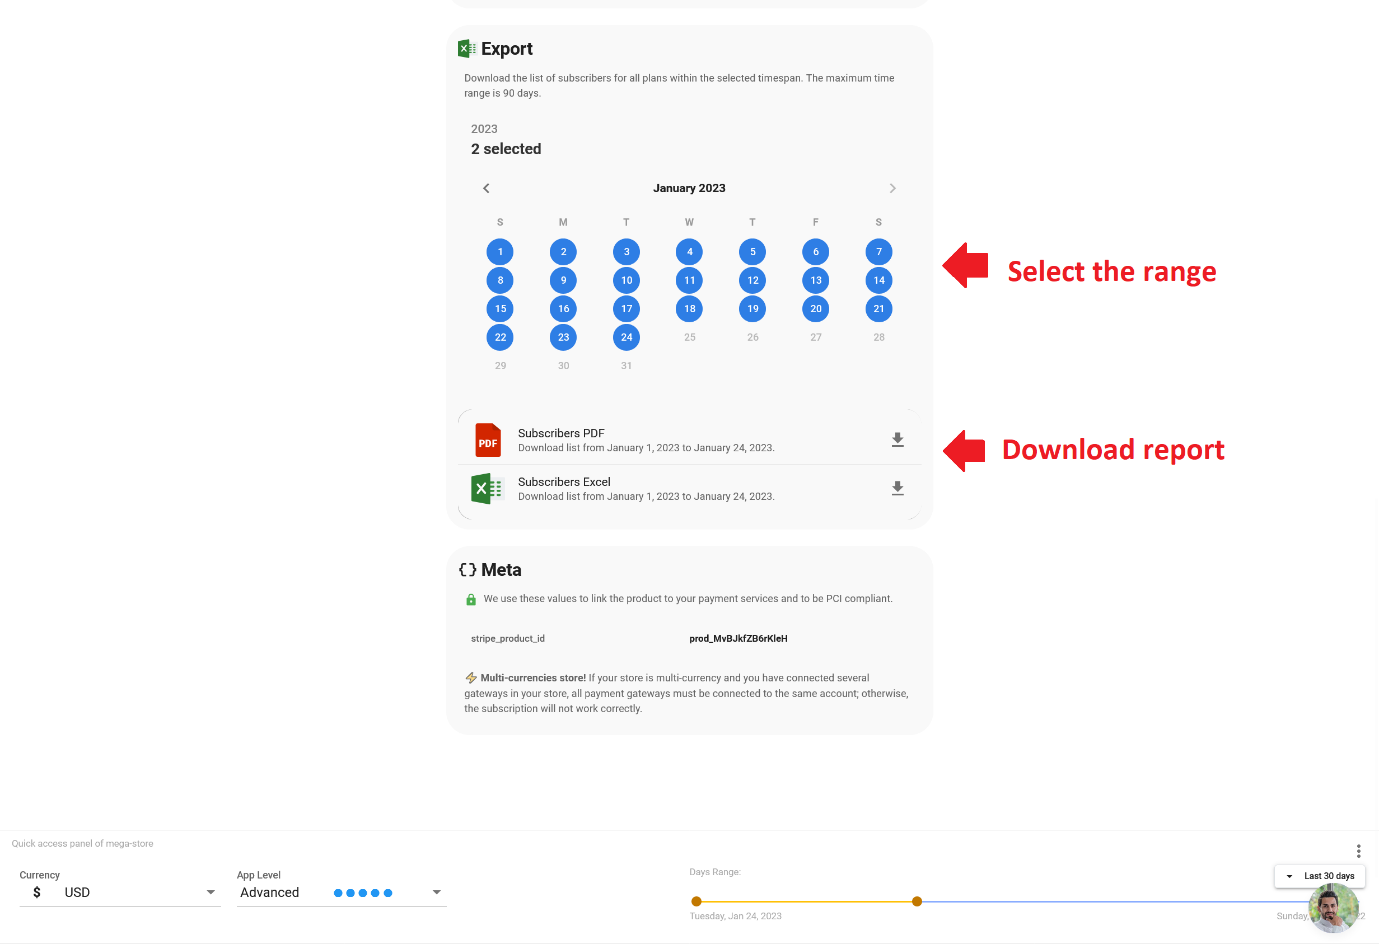
Download the list of members
You have the option to download a list of subscribers for all plans within a specified timespan. The maximum time range for this download is 90 days. This feature allows you to easily access and analyze subscriber data, such as the number of subscribers, plans, and revenue generated. You can use this information to make data-driven decisions and improve your business strategies. This feature is particularly useful for businesses that have multiple subscription plans and want to track the performance of each plan separately.
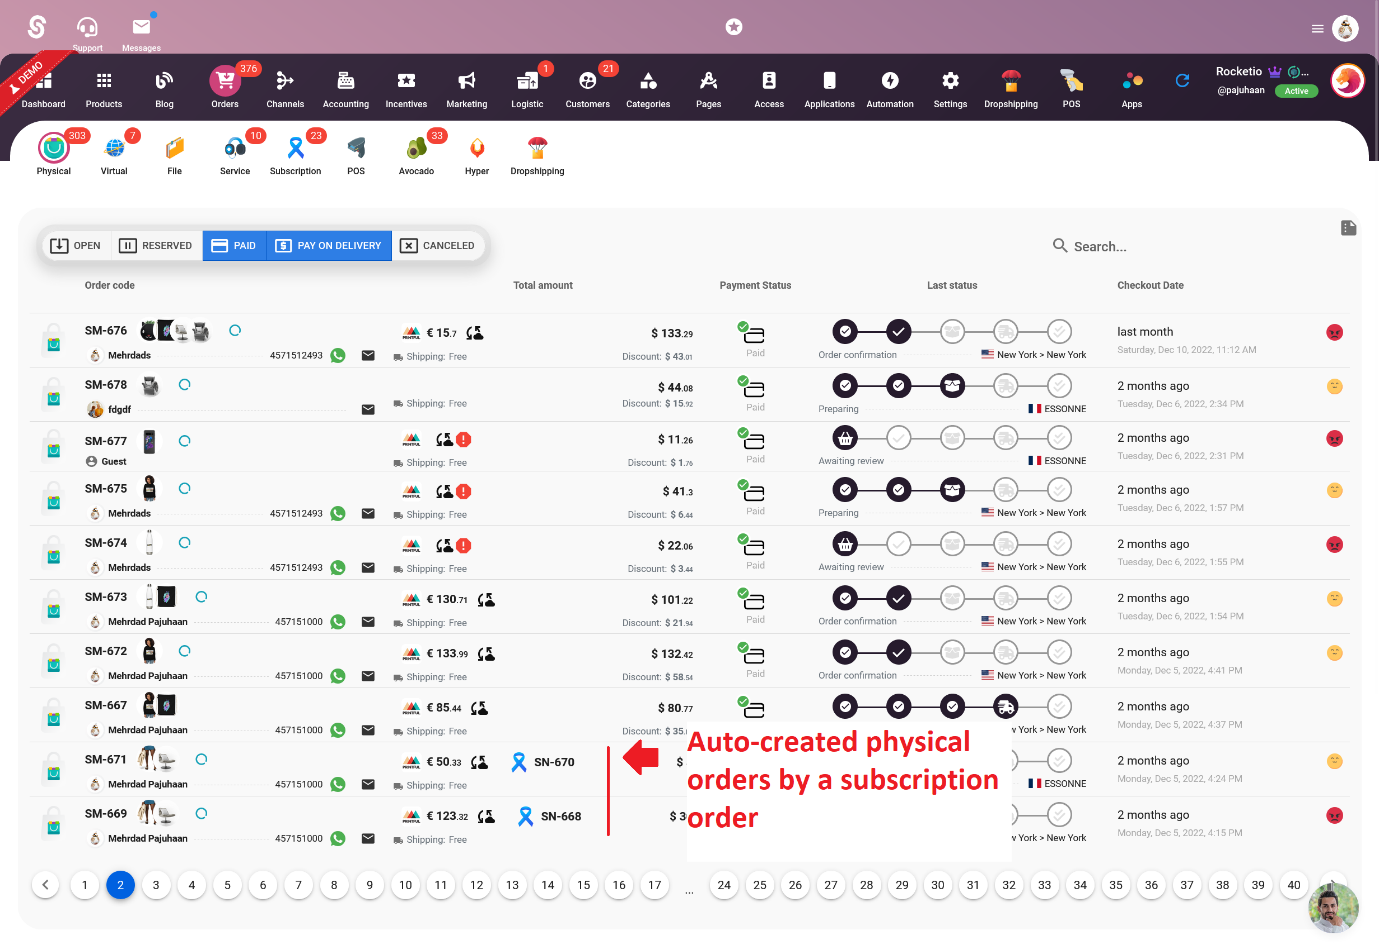
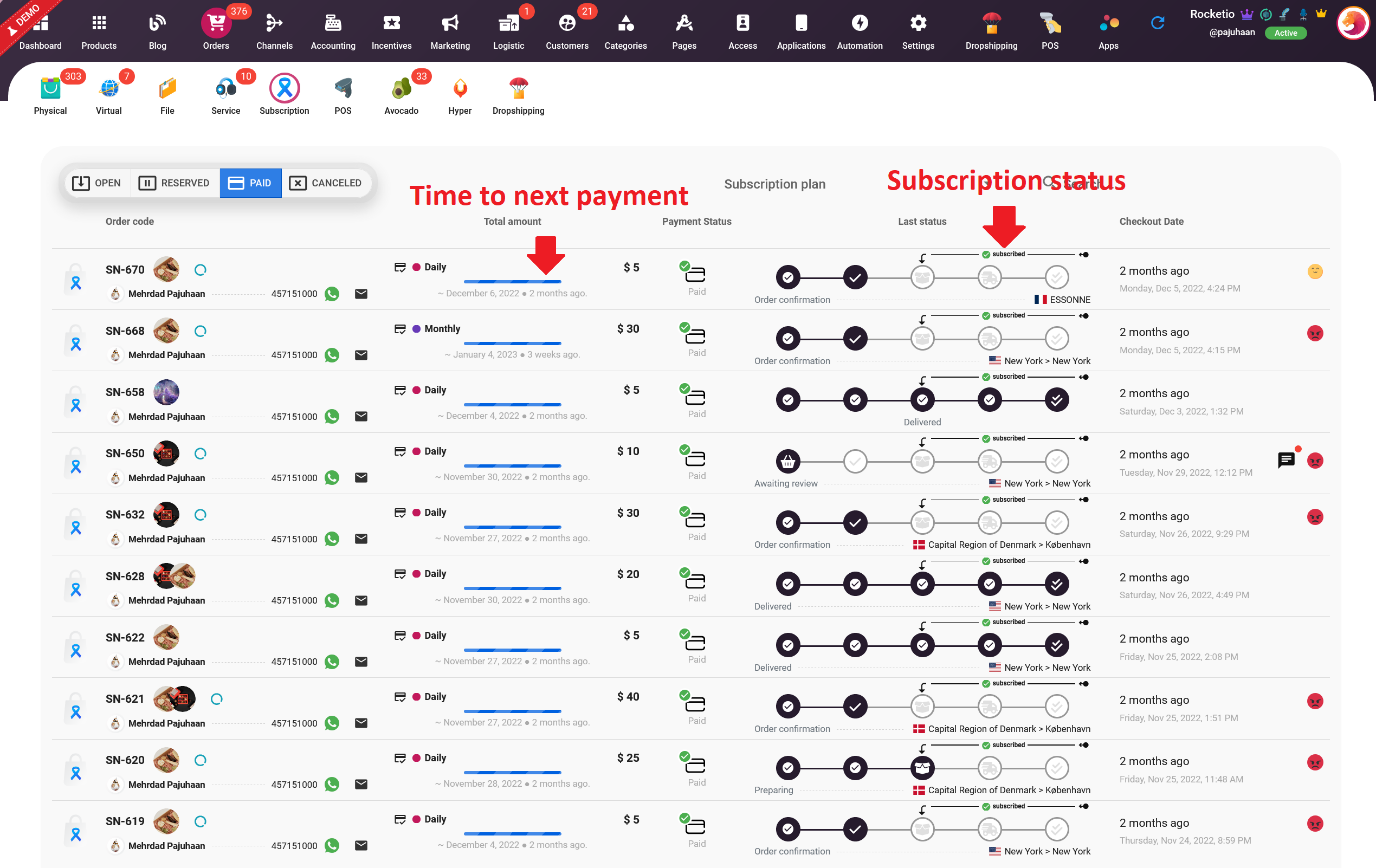
Subscription orders management and fulfillment
When a customer subscribes to a product or a cart, you will receive a new subscription order in the Shop > Orders > Subscription tab. This list will provide useful information about the orders, including the last status, items in the order, payment status, and the time until the next billing. This feature allows you to easily track and manage all of your subscription orders in one place.
The "Subscription" tab will show all the active, pending, and completed subscriptions, as well as the customer's information, the items in the order, the next billing date and the total amount. This feature allows you to have a complete overview of your subscription business and make data-driven decisions.
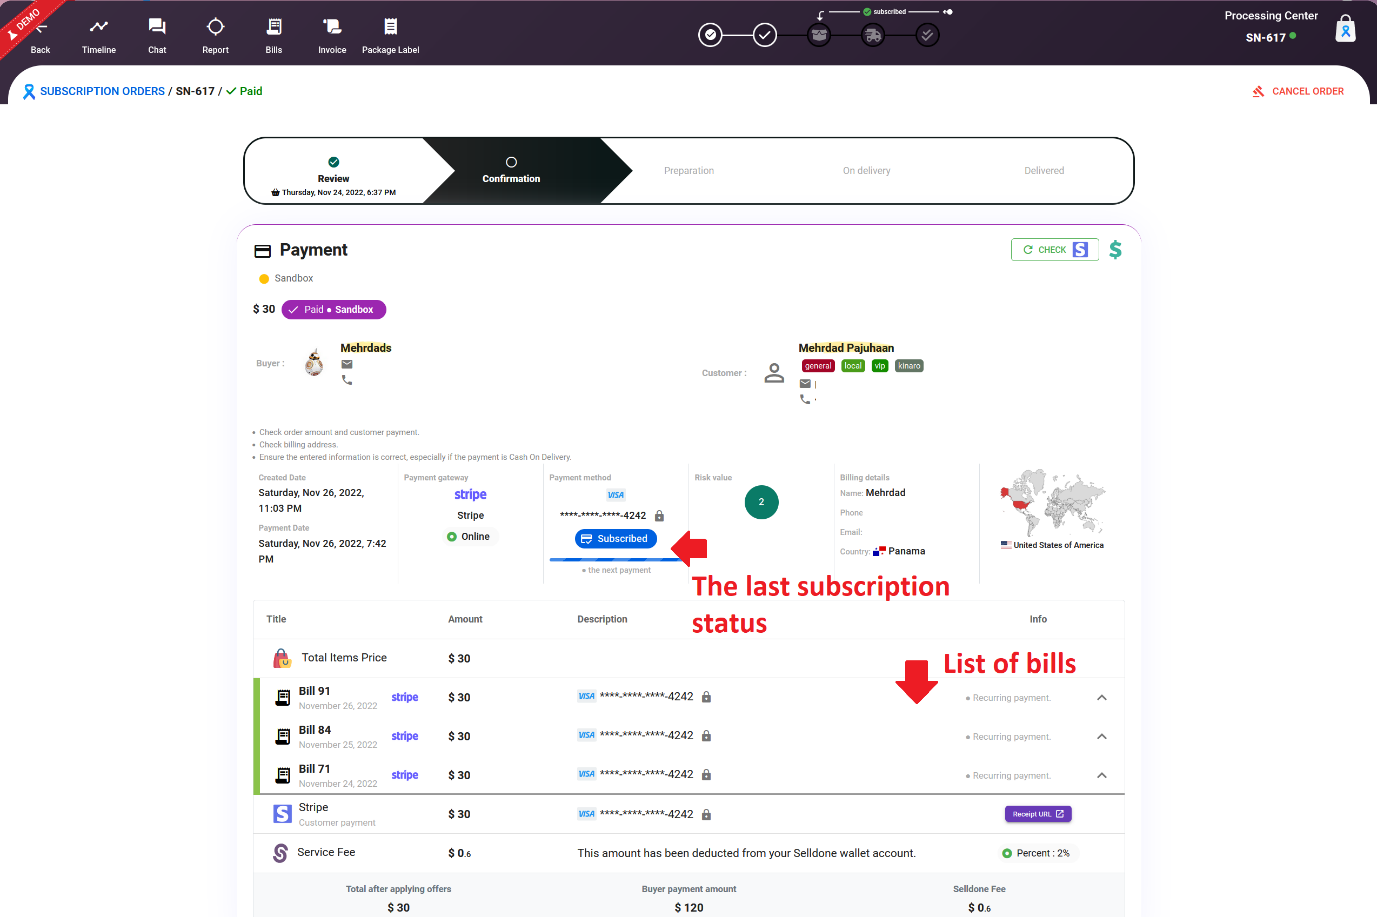
Subscription order detail
On this page, you can view detailed information about the payment, items included in the order, update the fulfillment status, and view other relevant information about the customer and the order. This feature allows you to easily manage and track your subscription orders, ensuring that they are fulfilled and delivered on time. Additionally, you can also use this information to communicate with your customers (via built-in chat) and provide them with a better experience.
Manage subscription and billing by customer
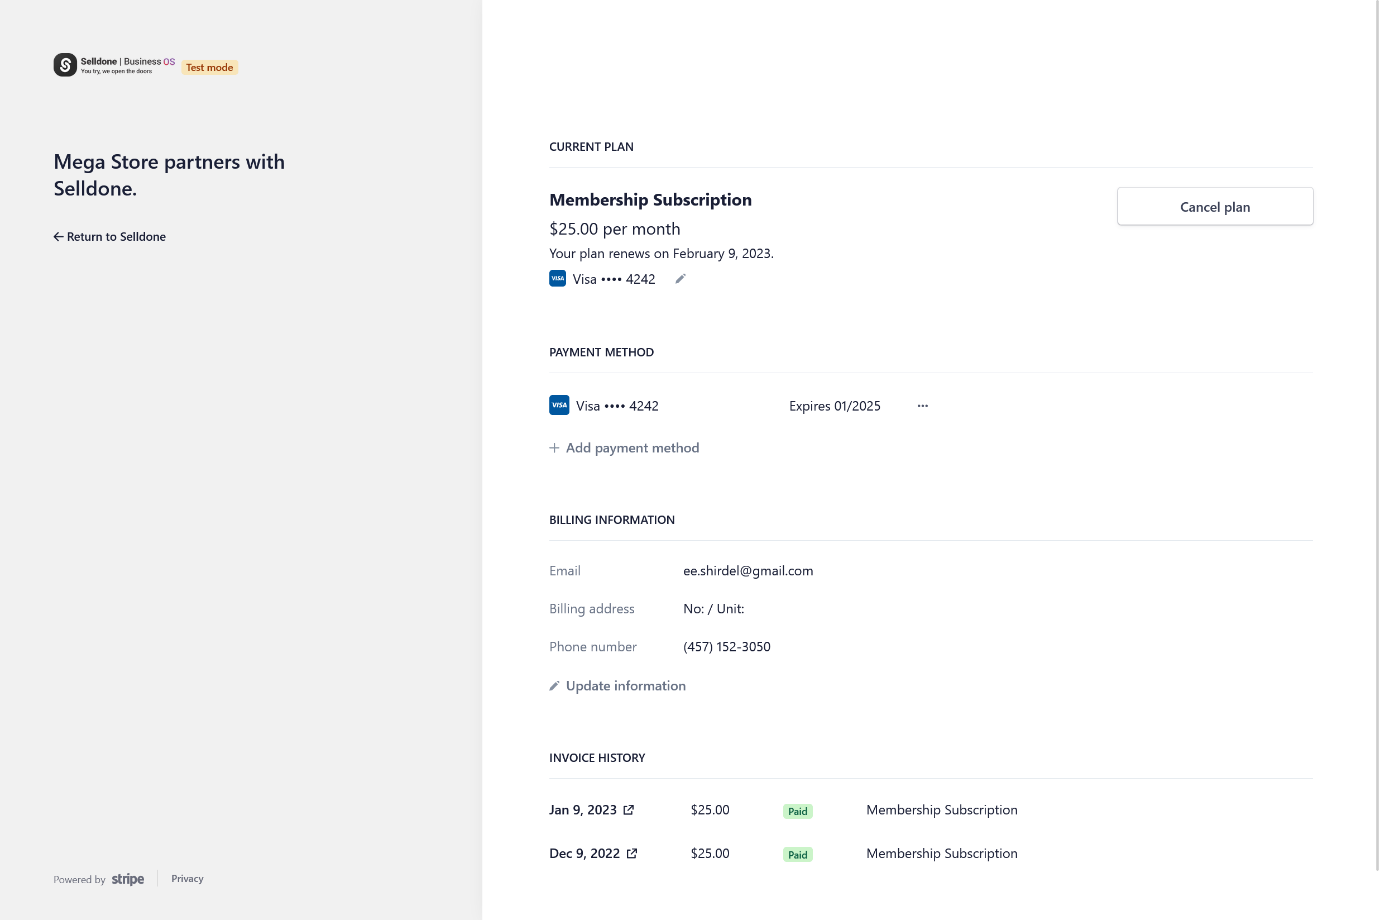
Your customers have the ability to manage their subscriptions through a secure portal, which they can access from the order detail page by clicking on the "Subscription Portal" link. This portal provides them with a list of all their subscriptions, including detailed information about payments and saved payment methods. They can also cancel their subscriptions if needed. This feature provides customers with a convenient and secure way to manage their subscriptions, giving them more control over their subscription experience.
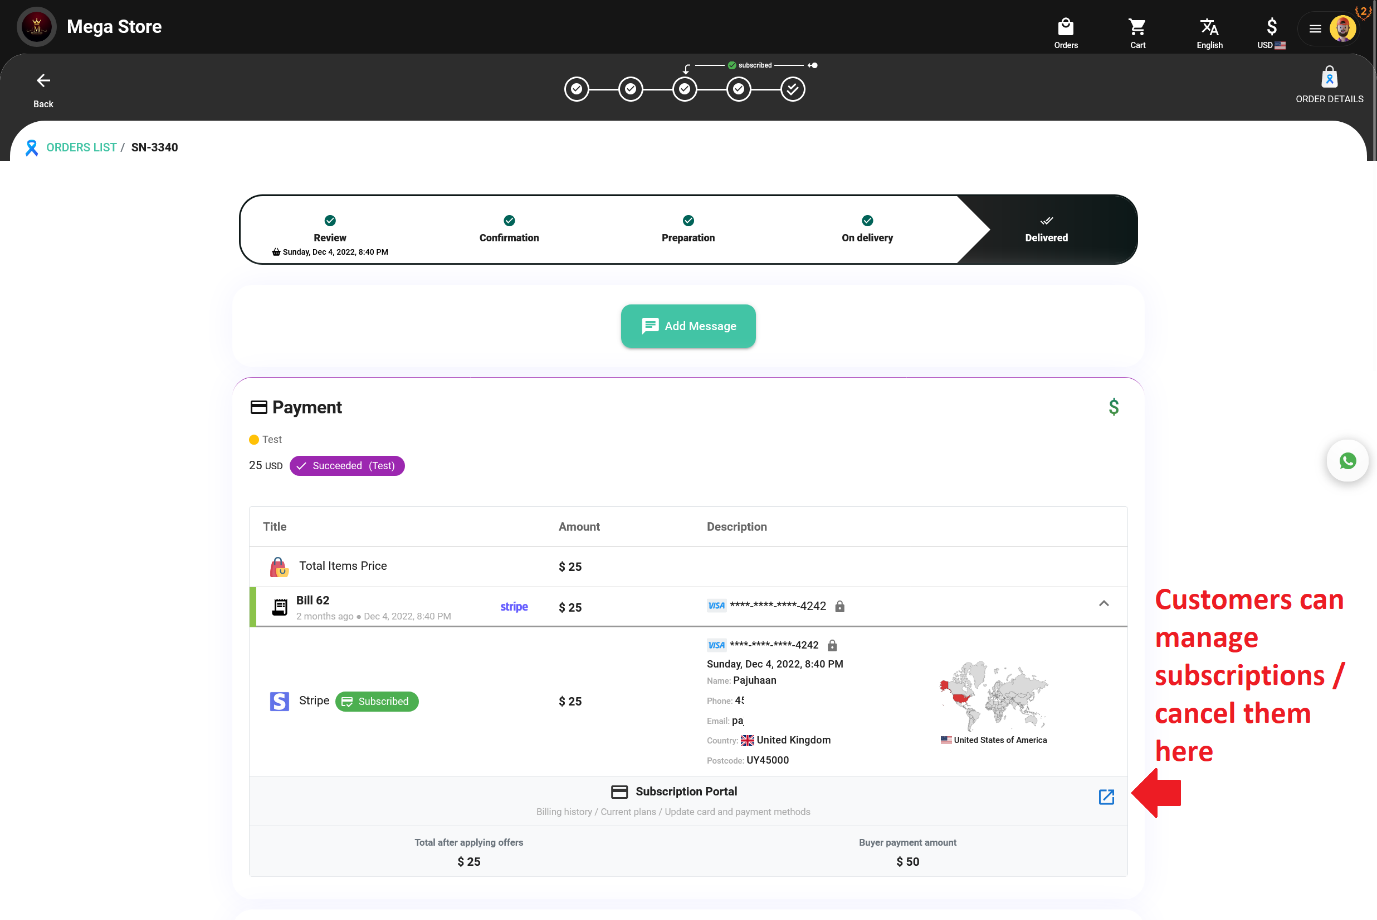
The customer portal allows your customers to self-manage their payment details, invoices, and subscriptions in one place.
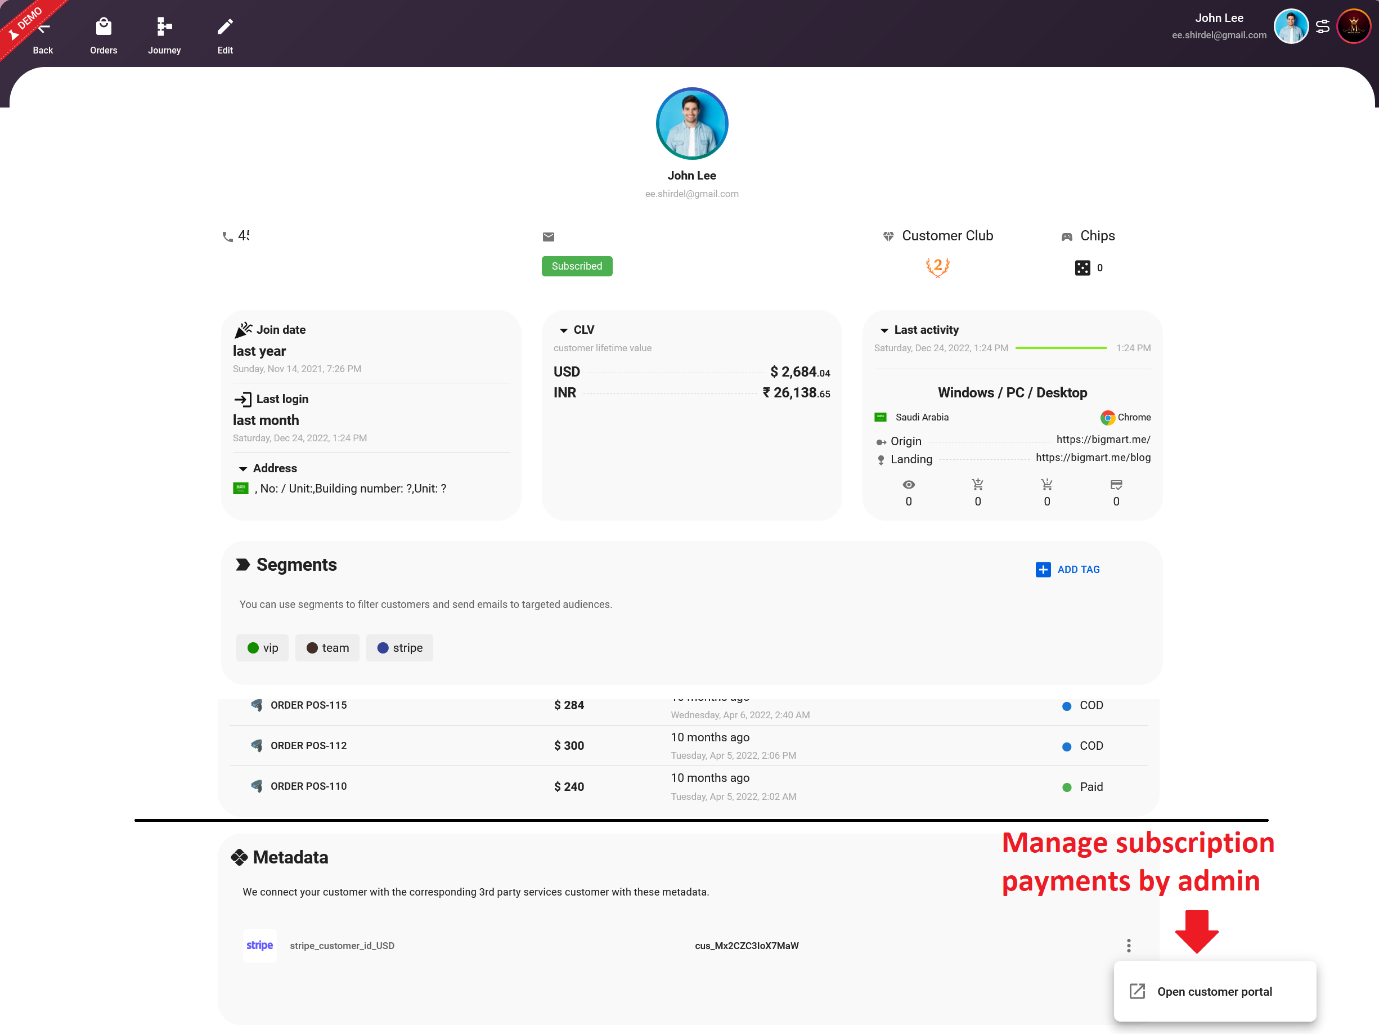
Manage subscription and billing by admin
As a business owner, you have the ability to manage payments and subscription status for your customers through a secure portal. To access this portal, you can go to the customer page in the Shop > Customers > Customers tab and click on the desired customer, or by directly accessing the customer page by clicking on the customer's avatar in the order page. Once you are on the customer's page, scroll down and find the Stripe section under the "Metadata" section. Click on the menu button, and then click on the "Open customer portal" option. This will give you access to the customer's payment and subscription information, allowing you to manage and update their subscriptions as needed. This feature provides a convenient and secure way to manage your customer's subscriptions, giving you more control over the subscription experience.
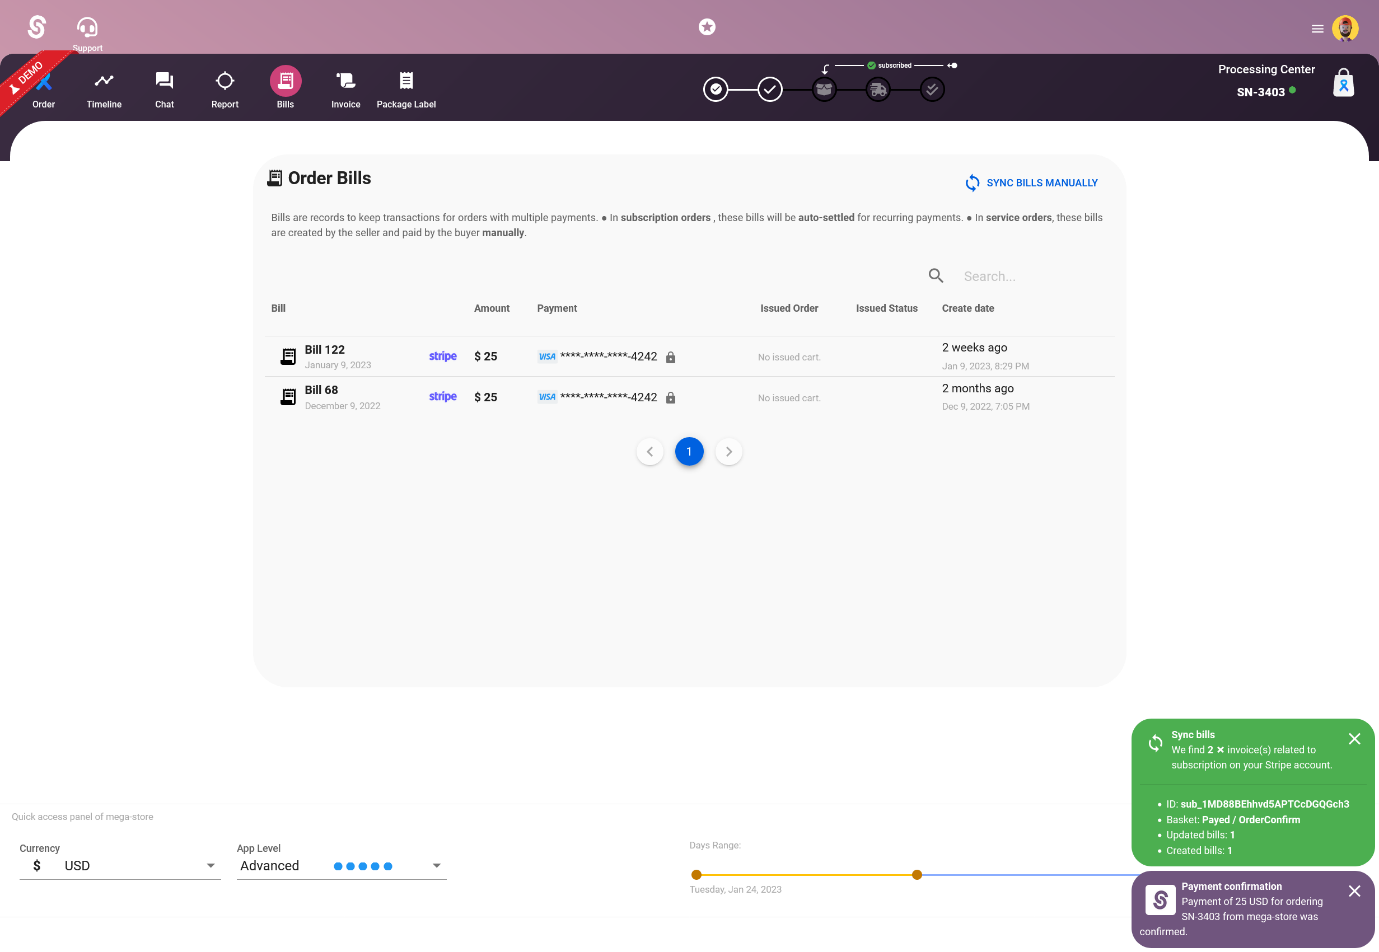
Fix missed billing and payment manually
If webhooks are missed due to manual misconfiguration, you can manually retrieve and update billing information by going to the Orders page > Bills tab and clicking on the "Sync Bills Manually" button. Selldone will retrieve the latest billing information and automatically update the current subscription order and create new orders (if necessary). This feature allows you to easily synchronize and update billing information, ensuring that all subscription orders are accurate and up-to-date. This feature ensures that even if some webhooks are missed, you can still have the most recent billing information and keep your subscription service running smoothly.
RECOMMENDATION: Selldone is a versatile platform that can accommodate the needs of businesses of all sizes, from hello-to-world startups to world-class enterprises with over 10,000 employees. To ensure seamless integration and prevent any conflicts, I recommend only connecting Selldone directly to your Stripe account, particularly for subscription billing updates. This will ensure that all billing information and updates are handled smoothly and efficiently.
I will complete this article for more advanced use cases.
Make Your Business Online By The Best No—Code & No—Plugin Solution In The Market.
30 Day Money-Back Guarantee
Create Your E-commerce Store Start now — it's freeSay goodbye to your low online sales rate!