

How To Create My Multi-Vendors Marketplace – Zero To Hero Guide
In this article, I will provide a detailed guide on using the Selldone marketplace builder to set up your own online Marketplace. Topics covered will include creating your Marketplace, adding payment methods, managing products and vendors, and other essential features. If you have any specific questions, please leave them in the comments section, and I will be happy to include additional information in the post.
1. Create your shop and configure it as a marketplace
There are several options available for creating a shop using SD marketplace builder, including:
Option I: Create raw shops
Users can opt to create a shop without any sample products by using the link https://selldone.com/shuttle. The first shop created is free of cost, however, additional ones are charged at $25 each.
Option II: Create shops + Samples products
Another option available to users is to use the Selldone onboarding link, https://selldone.com/onboarding. This link includes sample products and an auto-configuration feature, making it easy to set up your shop. The first onboarding is free, but additional onboarding options may cost $25.
Option III: Create shops with a deal
Users who have a deal can take advantage of the link https://selldone.com/shuttle/deals, which grants access to create new shops for free. In the event that a user mistakenly pays for a store and later discovers they have a deal, Selldone's customer support team can process a refund ($25 – store creation fee) to the user's SD wallet.
2. Setup your Shop
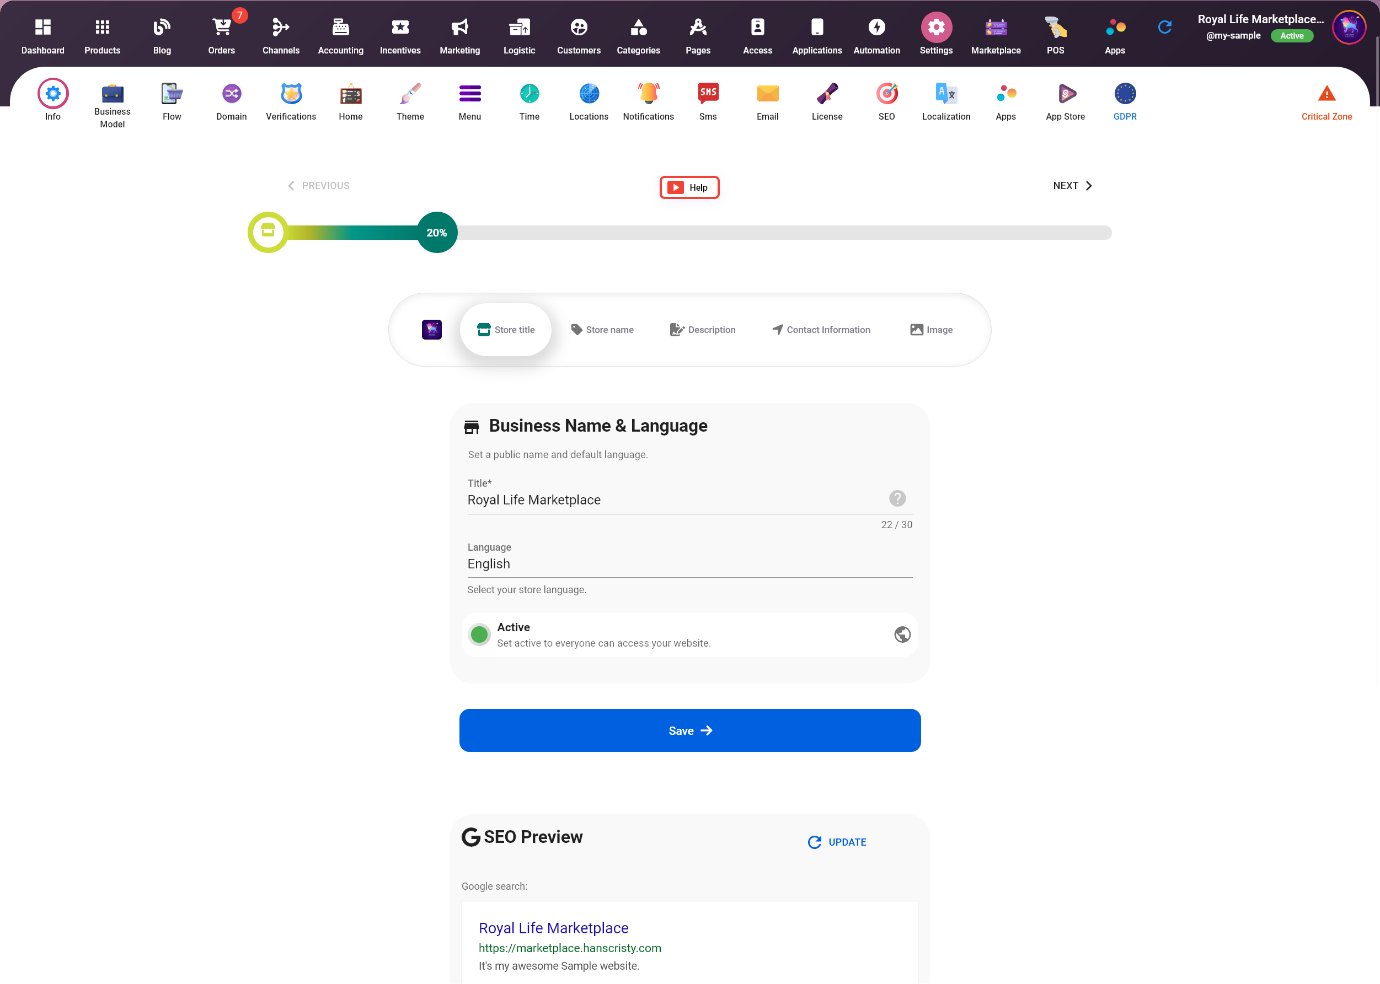
Go to the Shop> Settings > Info; here, you can customize the title of your shop, choose a unique name, add your contact information, upload a logo, and complete other details.
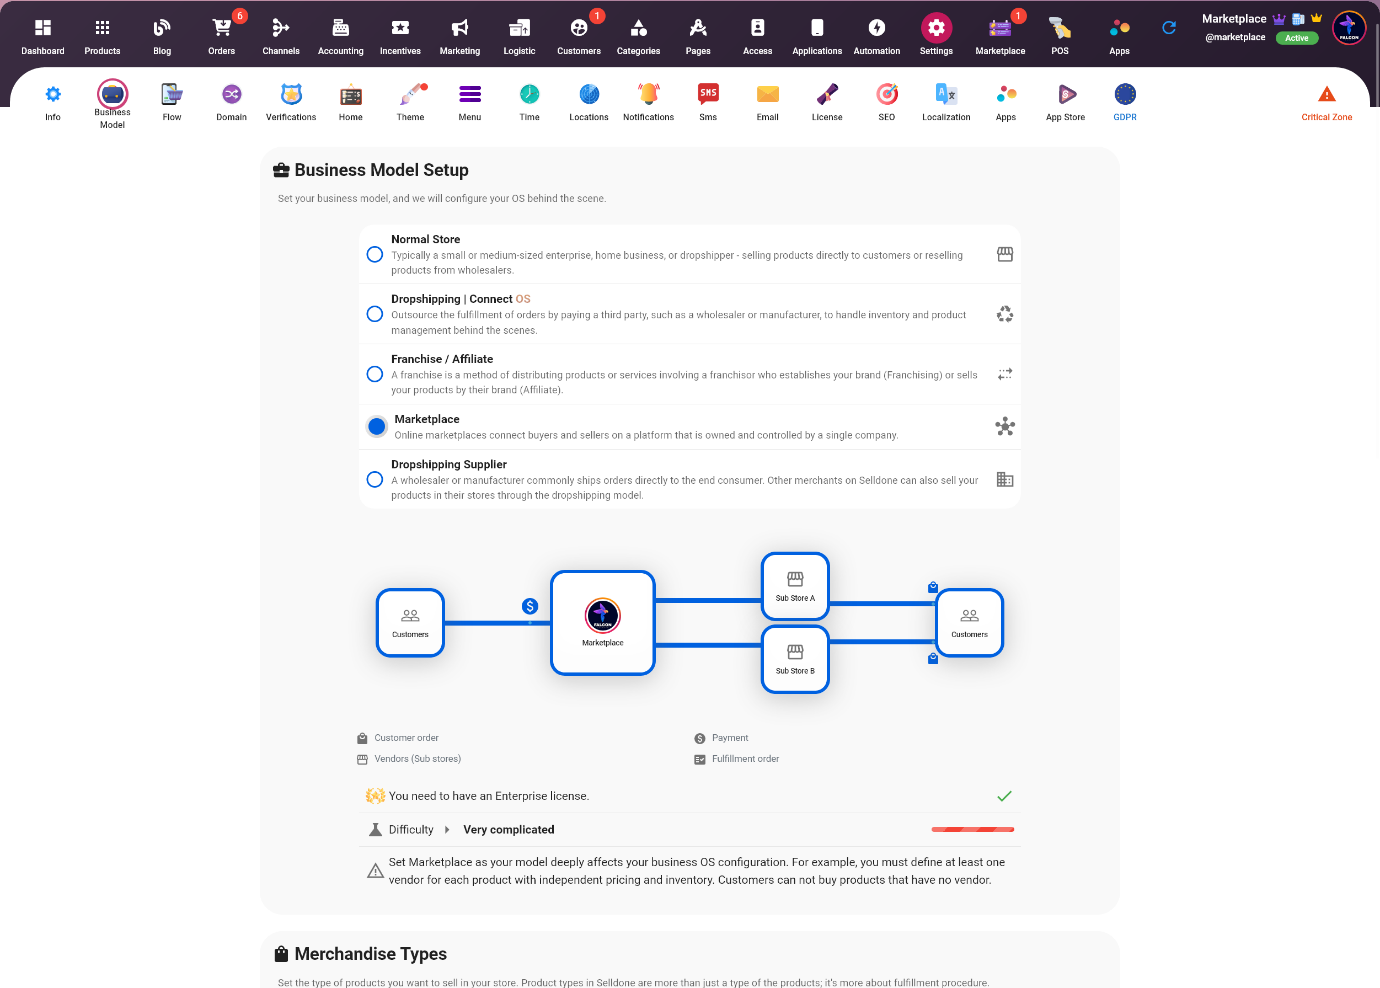
3. Configure your business model
Now we should configure our business model by going to the Shop> Settings > Business mode tab, selecting Marketplace, and clicking save.
4. Add my custom domain
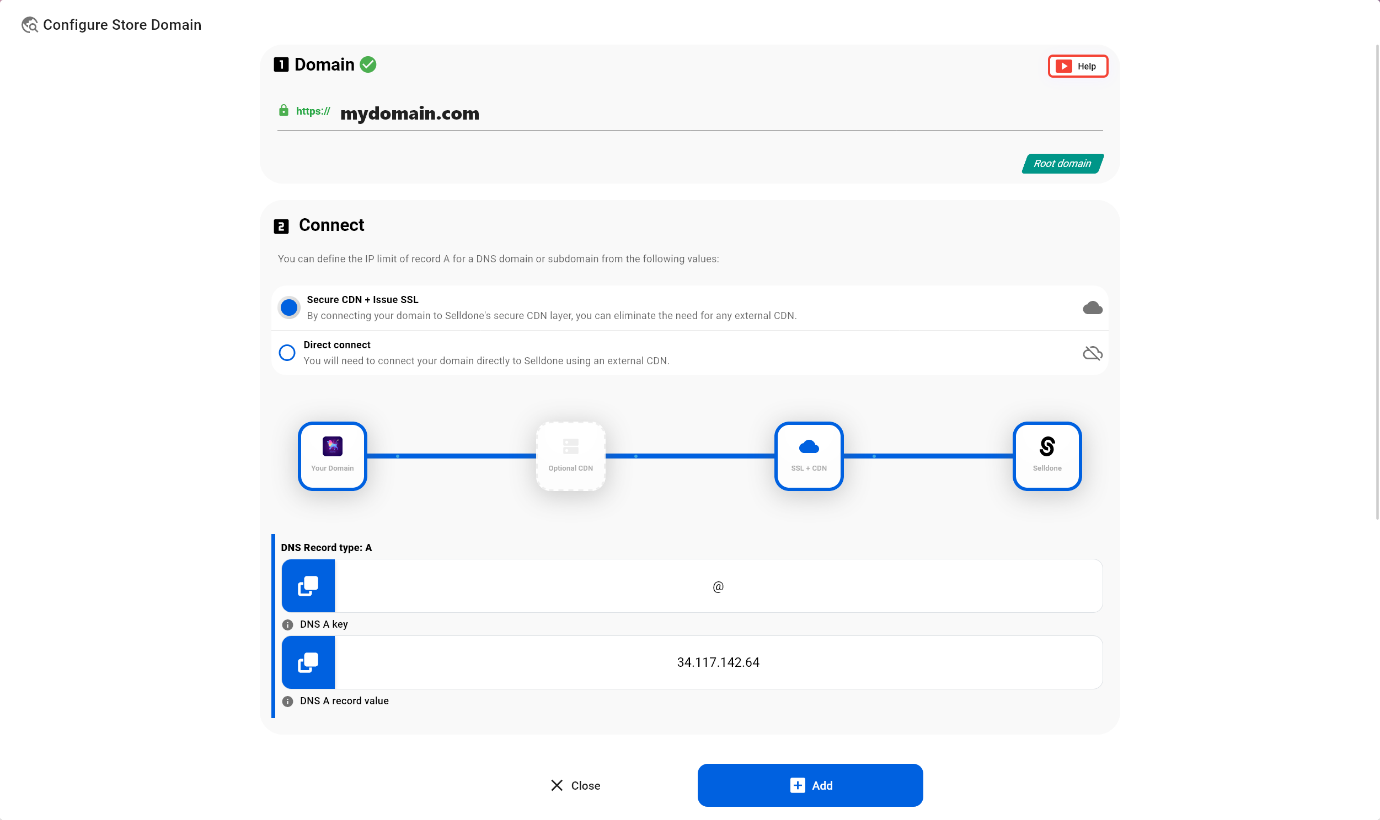
Selldone allows you to connect multiple domains to your business operating system and manage them all from a single location. This feature can be used to create dedicated domains for different sections of your website, such as a blog or community, or for different affiliates. To add a new domain, navigate to the Shop > Settings > Domains tab and click on the "ADD NEW DOMAIN" button. Next, enter your desired domain name and add the necessary A and TXT DNS records via your domain provider's website before clicking "Add".
5. Setup my payment methods (Stripe, Razorpay, Paypal,...)
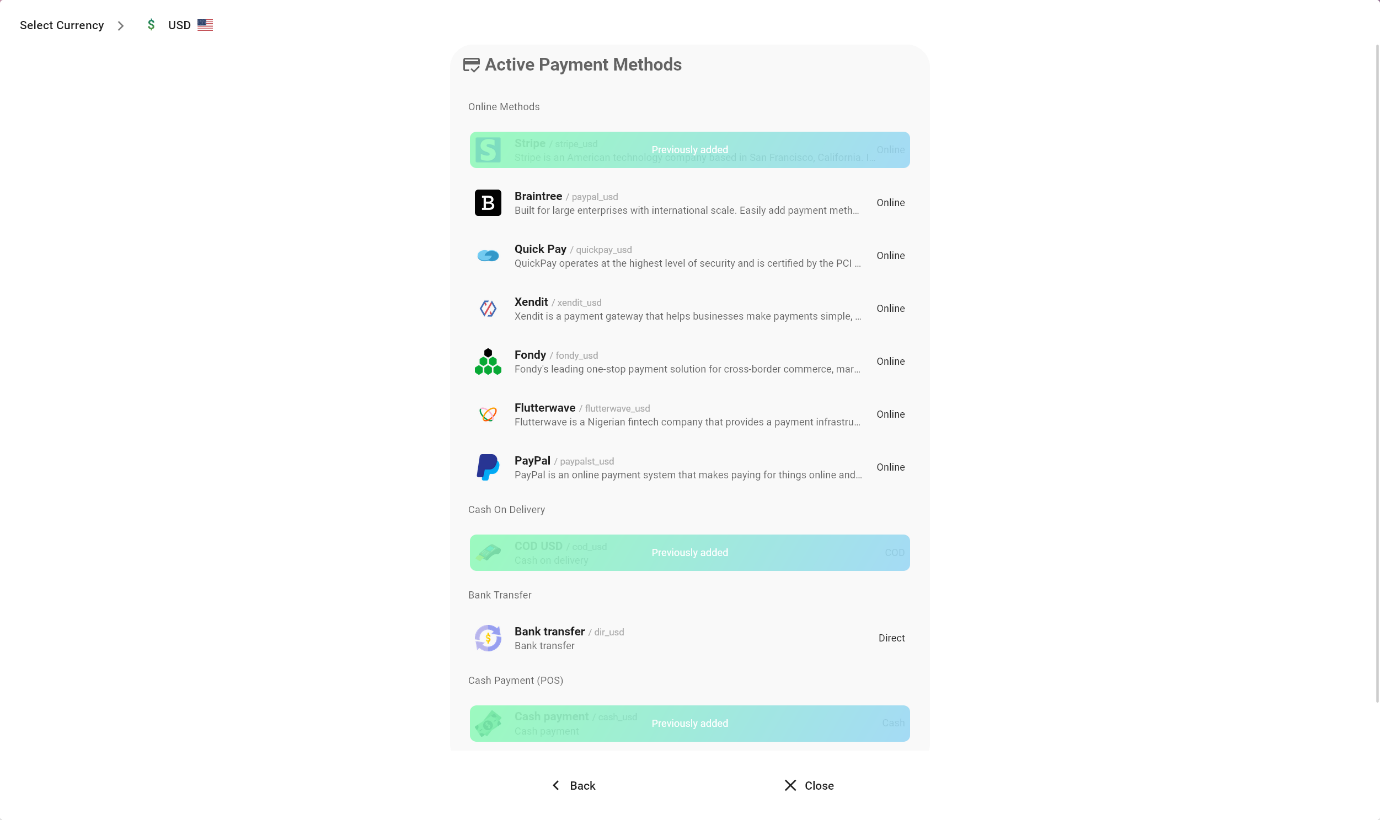
Selldone enables you to receive 100% of your customers' payments through Stripe, PayPal, or other supported payment services. To set up your payment method, navigate to the Shop > Accounting > Gateway tab, then click on the "NEW PAYMENT METHOD" button.
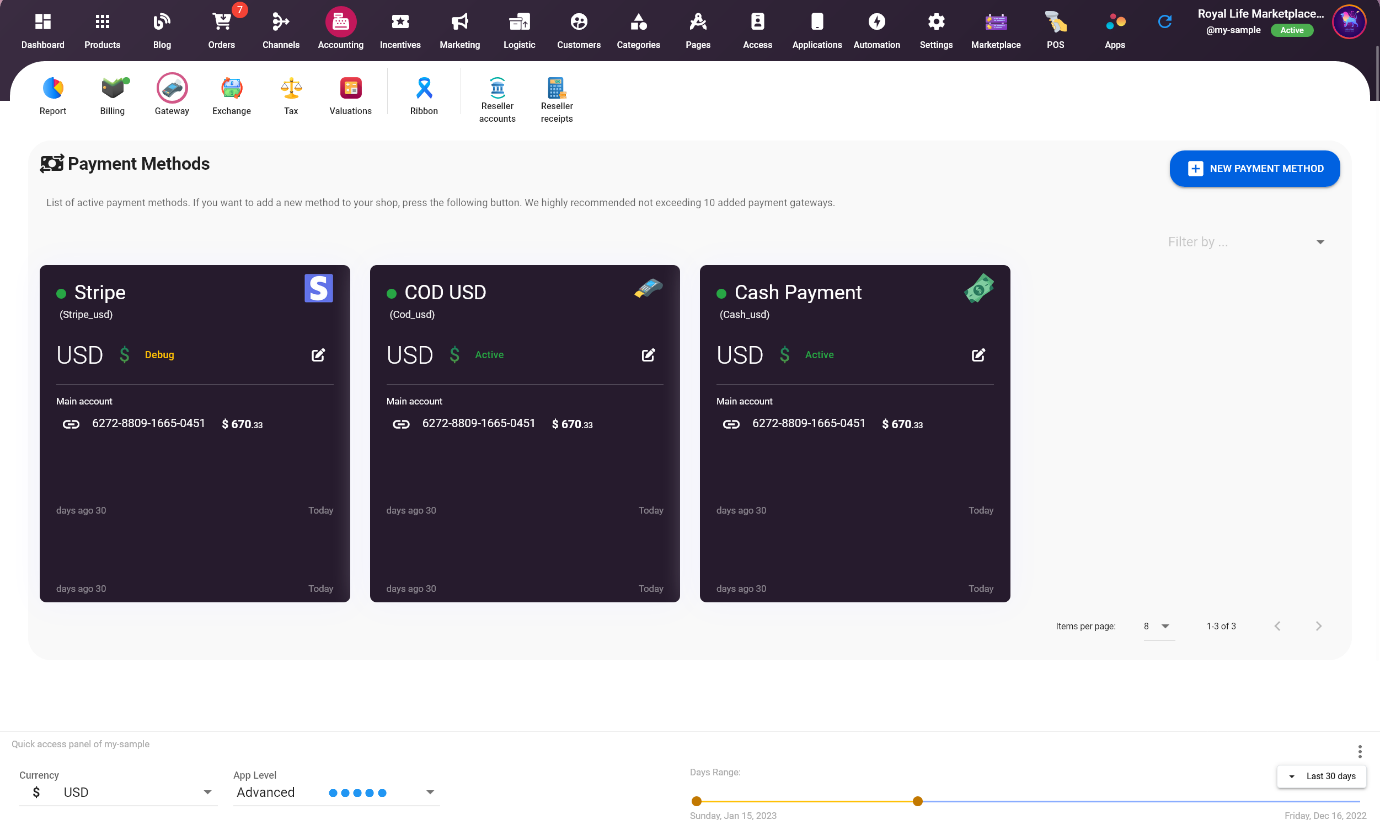
When you are on the gateway tab, you can select your currency from the available options. If your desired currency is not listed or if you plan to sell to other countries with an operational office there, you can click on the "CURRENCIES" button to add more options.

On the gateway tab, you will now be prompted to select your preferred payment service from the available options.
You will have the option to auto-connect your account (available only for Stripe) or manually input API keys. These keys can be obtained from the dashboard of your chosen payment provider (such as Stripe, PayPal, Razorpay, etc.). To access the keys, log in to your account on the provider's website.
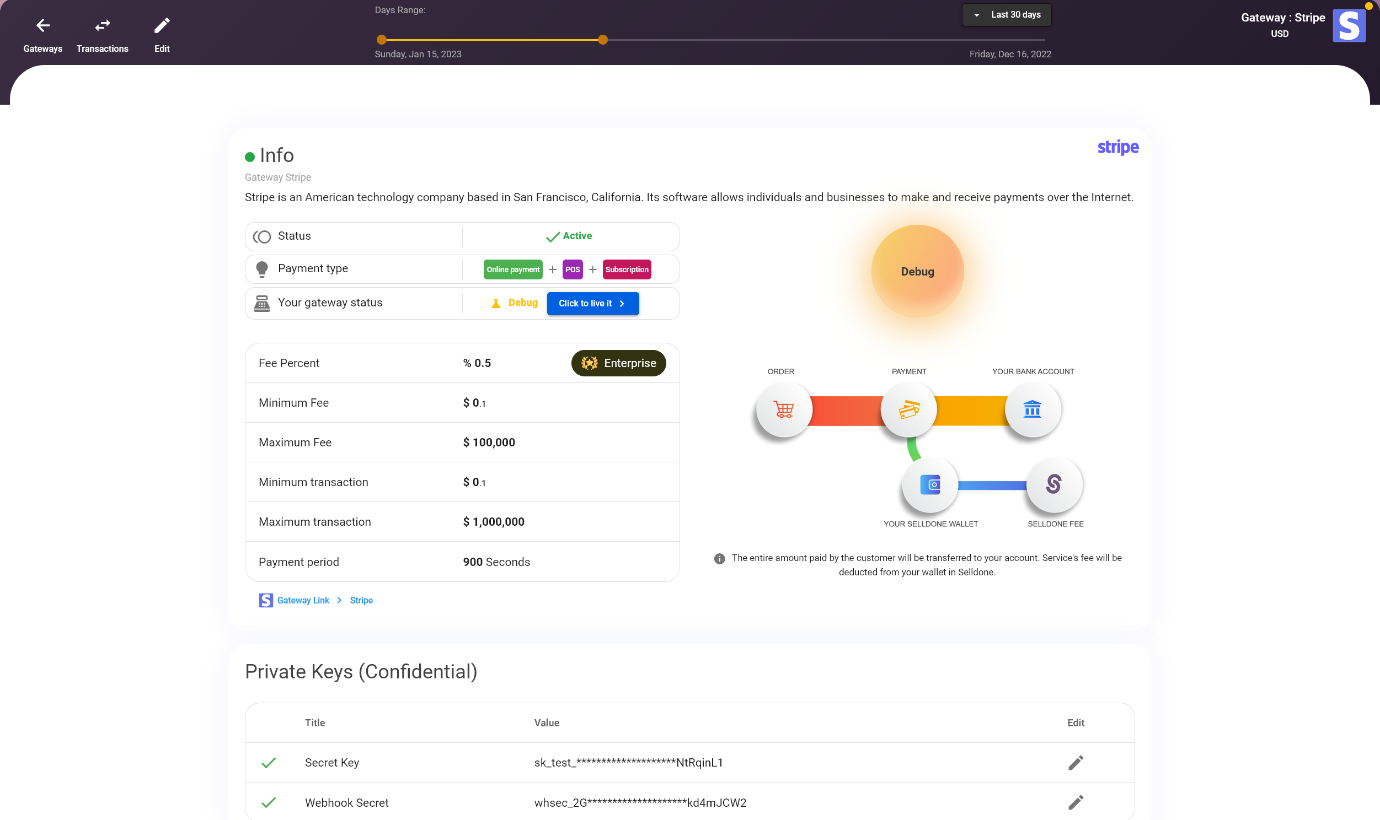
It is important to ensure that the correct mode, either "Debug" or "Live", is selected for the payment gateway. This can be found in the settings of the payment provider dashboard.
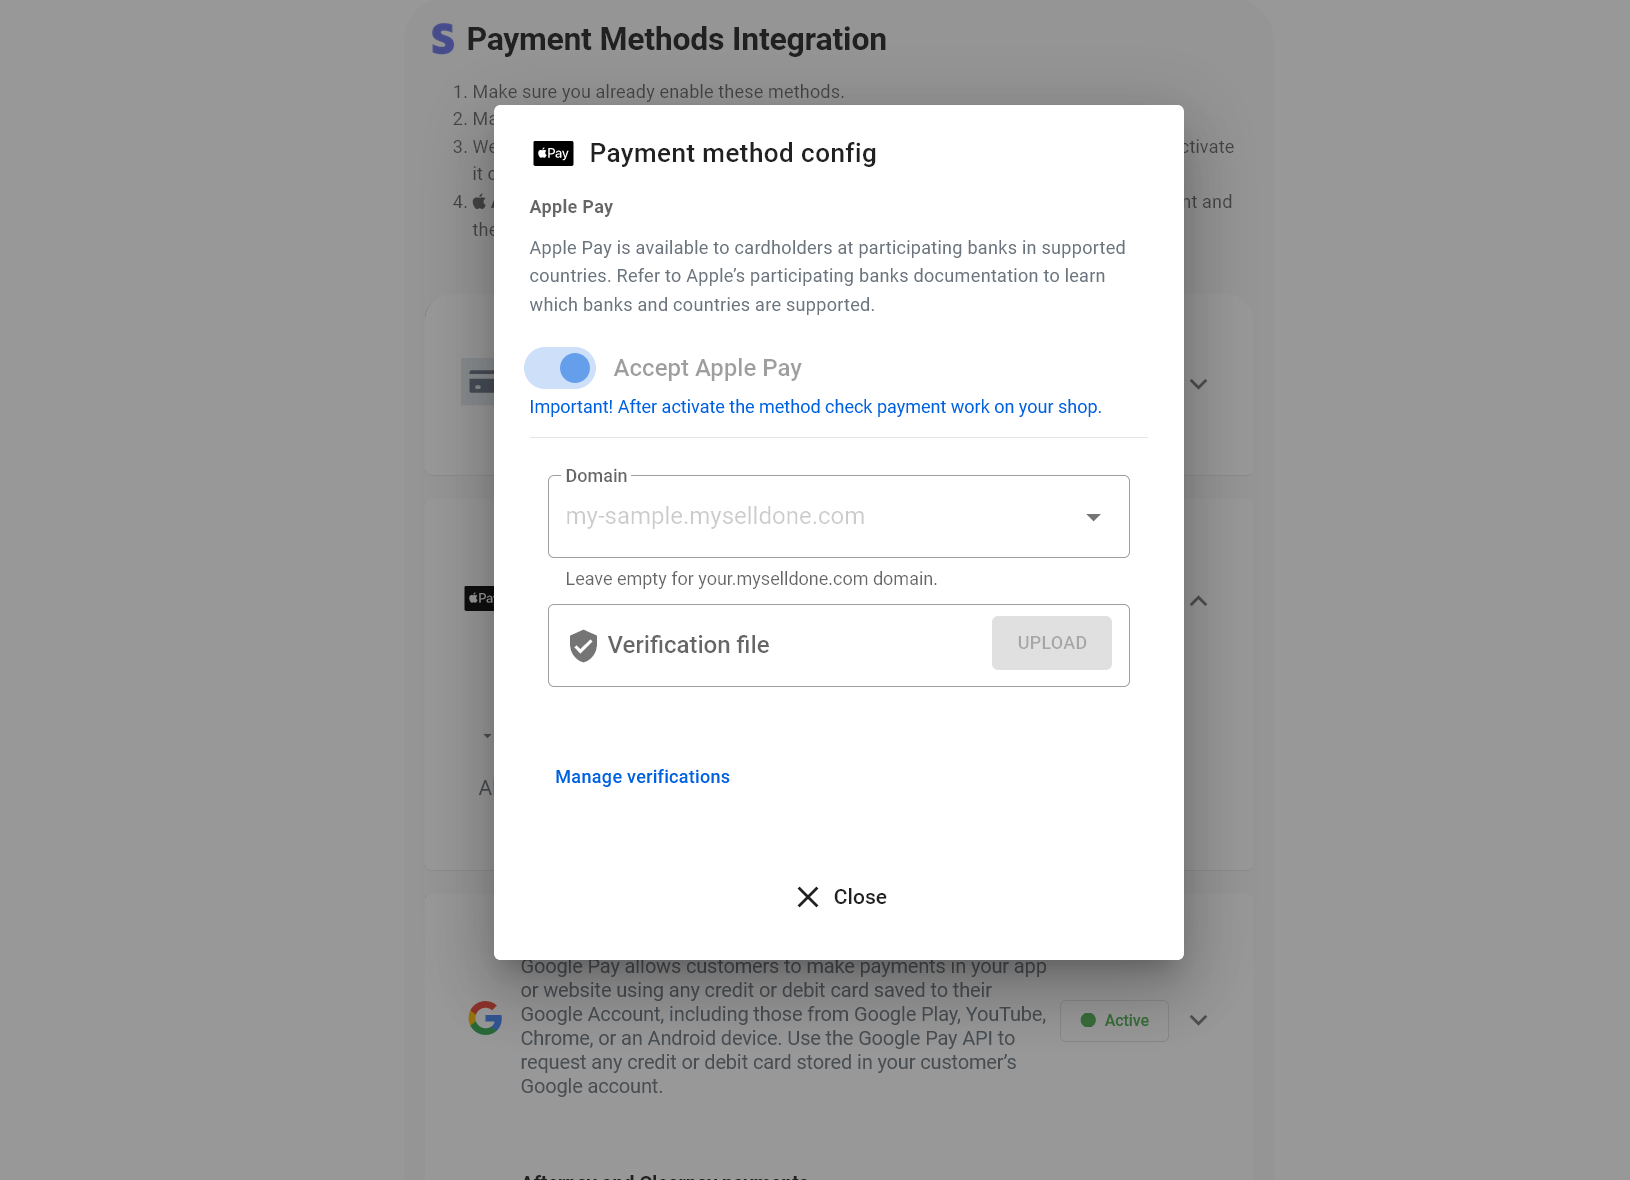
Activate Apple pay
You must verify your domain to activate Apple pay in your Marketplace. You can go to the Payment > Stripe > Settings > Edit tab to do this.
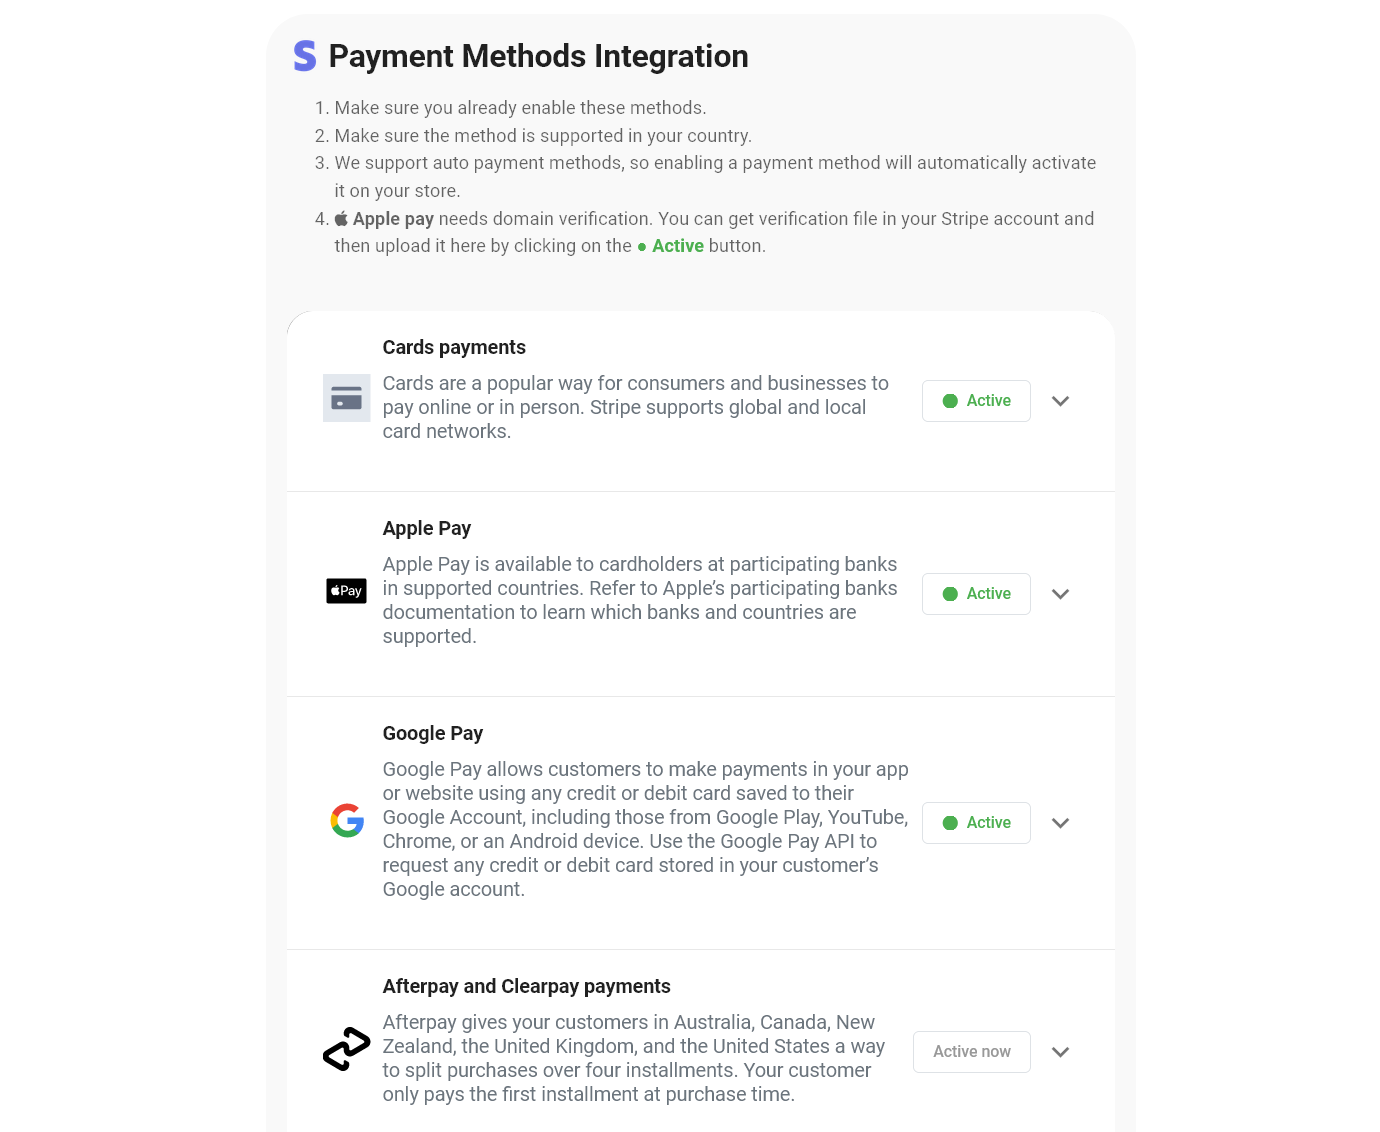
In the Stripe settings page, scroll down to locate the "Apple Pay" option. Once found, click on the "Active" button to enable the feature.
It's important to note that in the latest update of Selldone, the platform automatically activates payment methods in your shop, eliminating the need for manual activation (with the exception of Apple Pay). The system syncs data from Stripe automatically to ensure all eligible payment methods are visible to your customers.
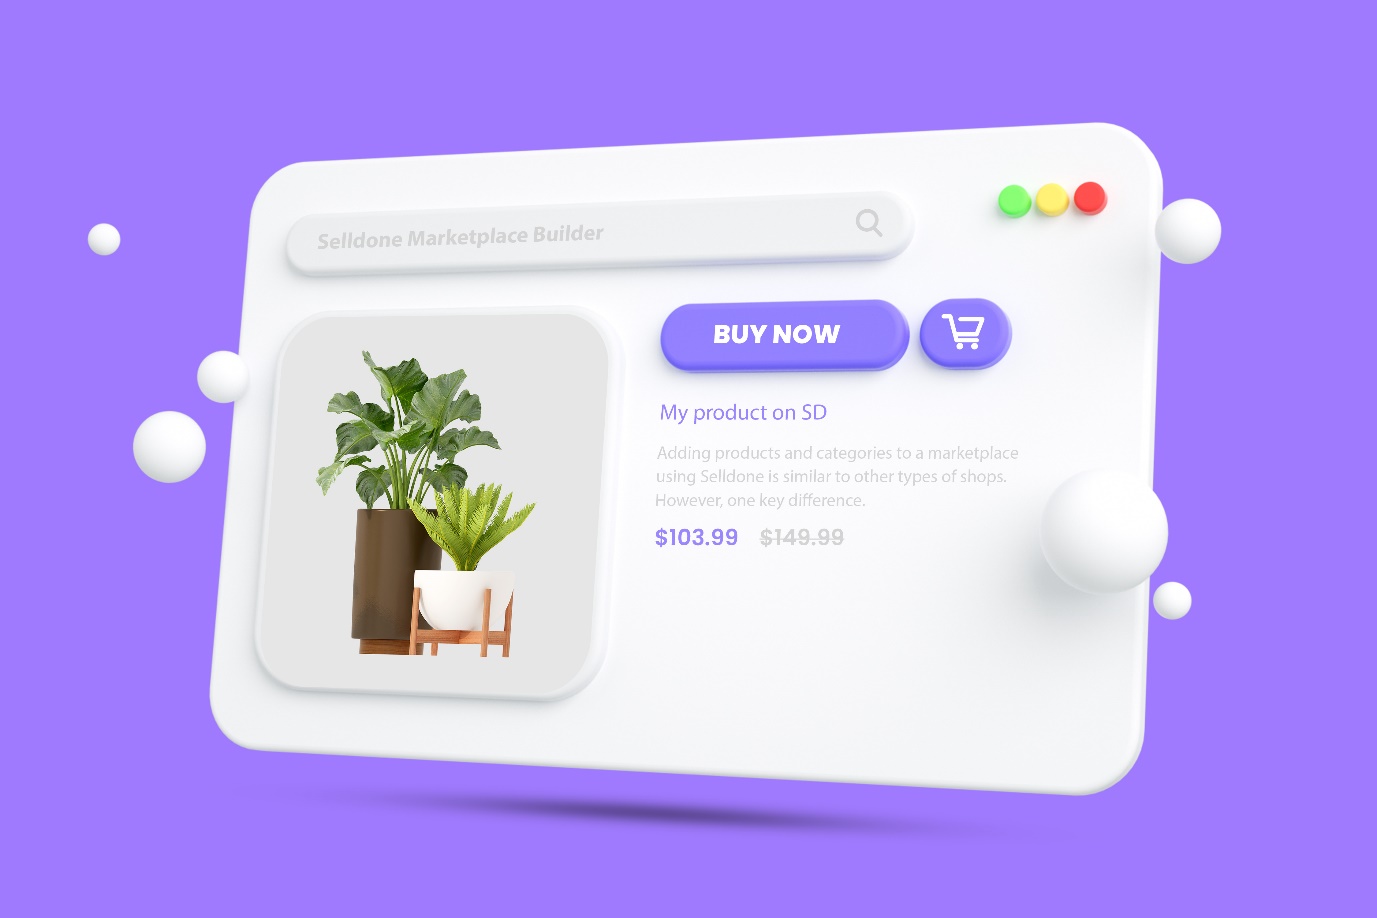
6. Add products
Adding products and categories to a marketplace using Selldone is similar to other types of shops. However, one key difference is that products in marketplaces have vendors. Each product can fall into one of the following scenarios:
1- Product is owned (or created) by the vendor, so the vendor can update it, but you can not assign other vendors to the product. The marketplace owner and the vendor can add this type of product. In this scenario, the Product / Vendor relation is 1:1.
2- Marketplace owns the product, Only the marketplace owner can add these products, and you can assign more than one vendor to each product. In this scenario, the relation between the product and vendors is 1:n.
Add physical products to my Marketplace
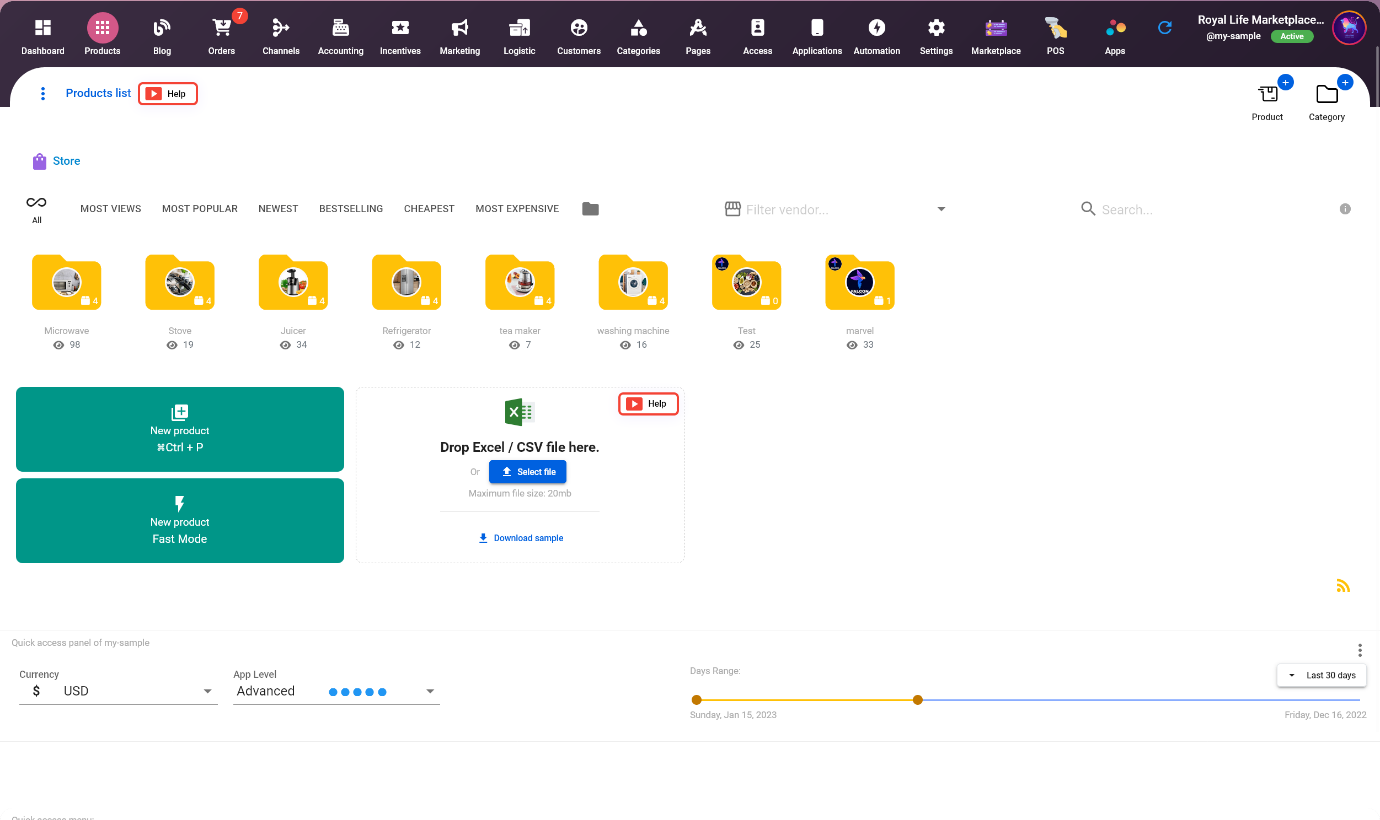
The most prevalent type of products sold in marketplaces are typically Physical products. To add a new product, navigate to the Shop > Products tab and click on the "New Product" button. Selldone also offers the option to import bulk products at once via an Excel file. To use this feature, you can download a sample Excel file, fill in the required information, and then import the file to the platform. This can save a lot of time and effort if you have a large number of products to add.
When adding a new product, the first step will be to select the type of product/vendor relation. It is important to note that this selection cannot be changed in the future. If you choose the "Multi vendors" option, you will be able to assign or remove vendors to the product. However, if you choose the "Single vendor" option, you will need to select the vendor as the owner of the product in this step. It is important to make a careful selection as it will determine how you can manage the product and vendors in the future.
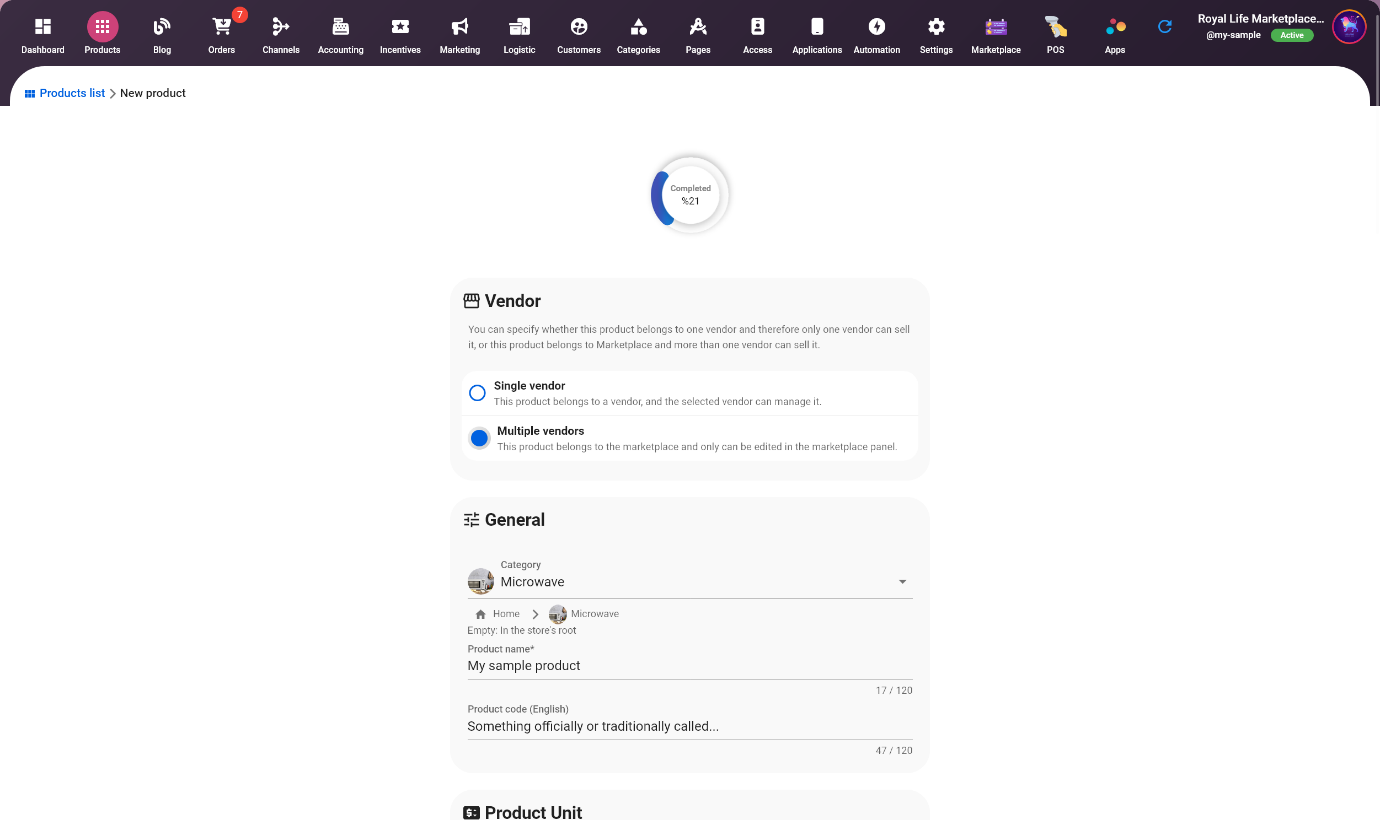
Product ⬌ Multi vendor [Marketplace is owner]
Multi-vendor per each product marketplaces are marketplaces where each product can have multiple vendors. These marketplaces offer several advantages such as:
- Increased product variety: With multiple vendors, the marketplace can offer a wider range of products, making it more attractive to customers.
- Reduced risk: With multiple vendors, the marketplace can rely on the sales of multiple vendors to reduce the risk of the marketplace.
- Increased competition: With multiple vendors, there is more competition which can lead to better prices and improved customer service.
However, there are also some disadvantages to this type of marketplace:
- Quality control: With multiple vendors, it can be difficult to maintain quality control over the products and vendors.
- Shipping and returns: With multiple vendors, coordinating shipping and returns can be more complicated and time-consuming.
- Brand consistency: With multiple vendors, it can be difficult to maintain consistency in the marketplace's branding.
Product ⬌ Single vendor [Vendor is owner]
Single-vendor per each product marketplaces are marketplaces where each product can only have one vendor. These marketplaces offer several advantages such as:
- Reduced Quality Control: With only one vendor, it can be easier to maintain quality control over the products and vendors.
- Simplified Shipping and Returns: With only one vendor, coordinating shipping and returns can be more simple and straightforward.
- Brand Consistency: With only one vendor, it can be easier to maintain consistency in the marketplace's branding.
However, there are also some disadvantages to this type of marketplace:
- Limited product variety: With only one vendor, the marketplace can offer a limited range of products, making it less attractive to customers.
- Increased risk: With only one vendor, the marketplace is reliant on the sales of that one vendor, increasing the risk for the marketplace.
- Reduced competition: With only one vendor, there is less competition which can lead to higher prices and poor customer service.
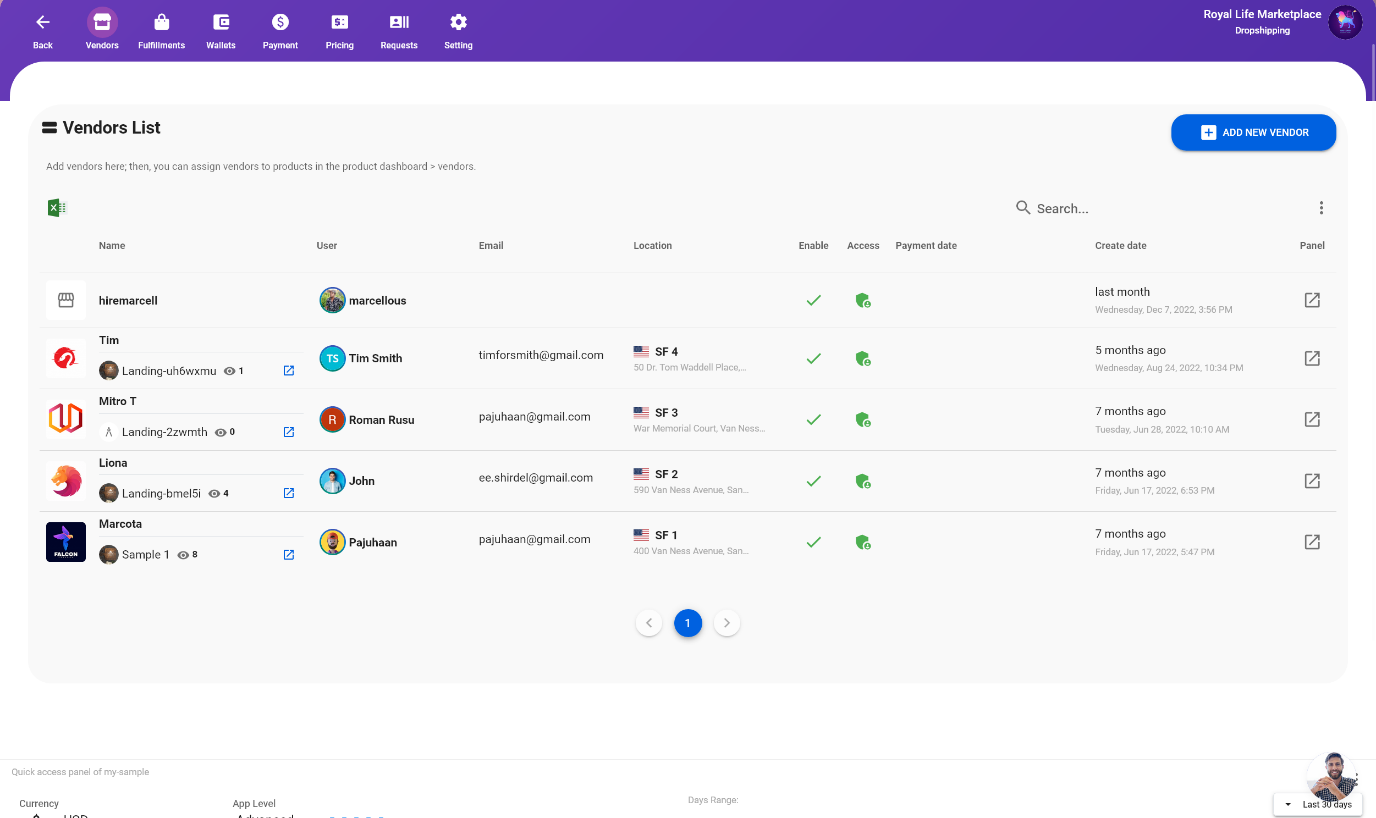
7. Add vendors
To manually add vendors to your marketplace, navigate to the Shop > Marketplace > Vendors tab and click on the "ADD NEW VENDOR" button.
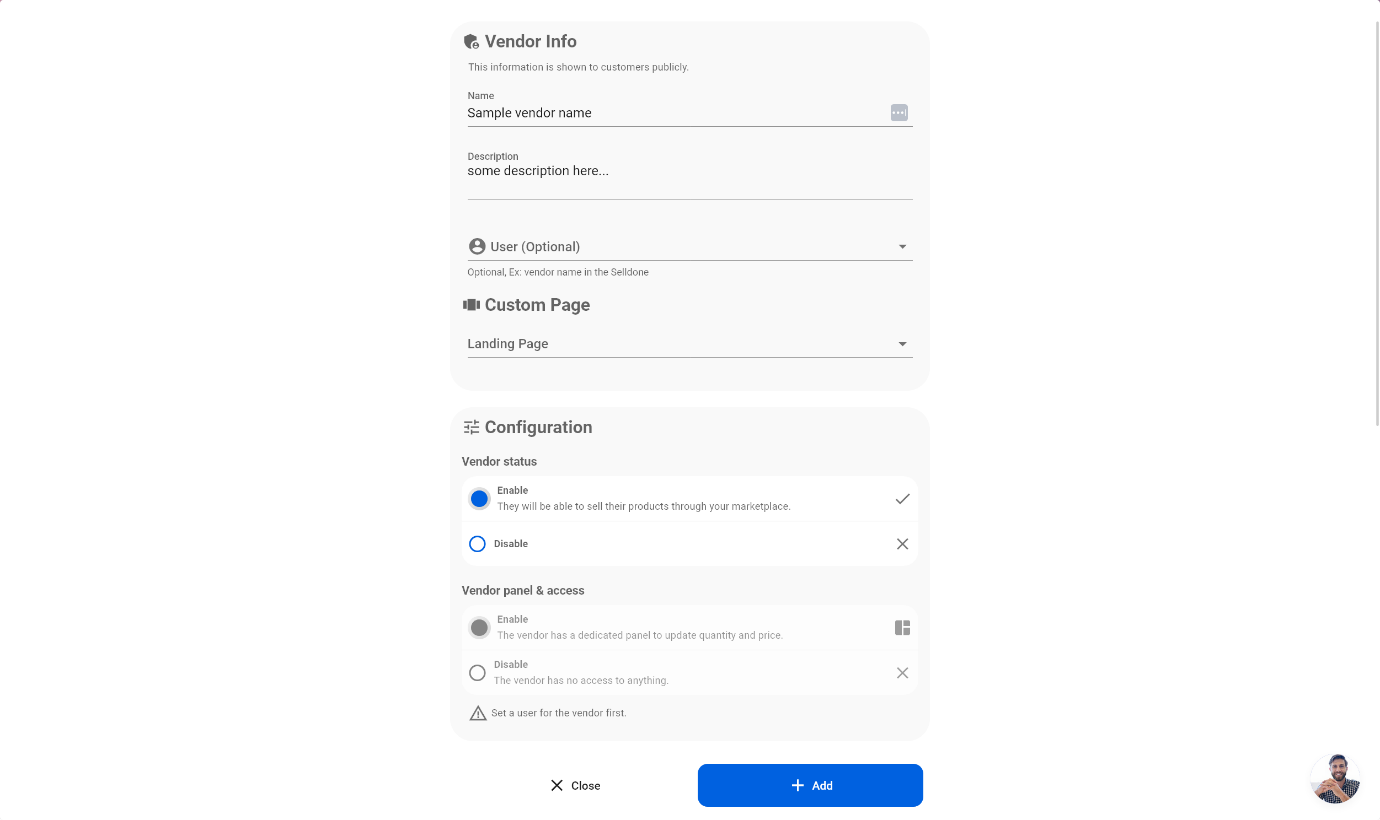
Vendor panel access
If we select a user, then this user will have access to the panel (If we enable the Vendor panel access). Vendors can access their panel via https://selldone.com/shuttle/vendors or directly on the marketplace website ex: my-domain .com/vendors.
Custom landing page for the vendor
Each vendor in your marketplace can have their own dedicated landing page. This feature is more advanced and is not recommended for beginners. By creating a custom landing page for a vendor, you can showcase a list of products offered by that specific vendor by filtering the products section by that vendor. This can help to improve the user experience and can help to increase sales for the vendors.
Onboarding vendors
Vendors can submit an application to become a vendor by filling out a form on the vendors panel, which can be found at "yourdomain/vendors". As marketplace owner, you can access these requests in the Shop > Marketplace > Requests tab. Selldone provides an option to create a vendor from the received requests with just two clicks, making the process easy and efficient.
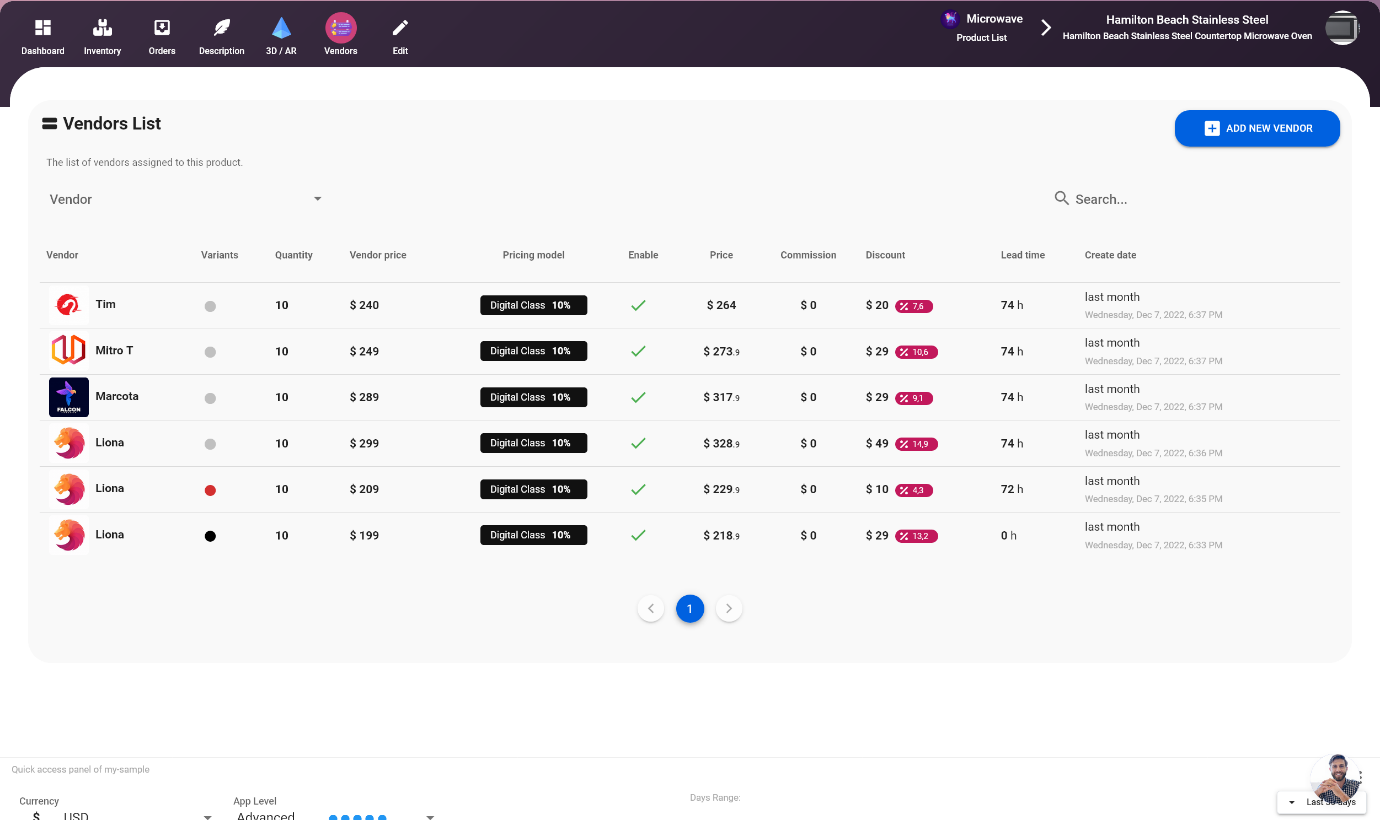
8. Assign vendor to the product
Now that vendors have been added to the marketplace, it's time to assign them to specific products. This includes setting pricing, inventory, discounts, lead time, and other properties. To assign vendors to products, navigate to the Product > Vendors tab and click on the "ADD NEW VENDOR" button. This will allow you to select the vendor from the list of vendors and assign them to the product.

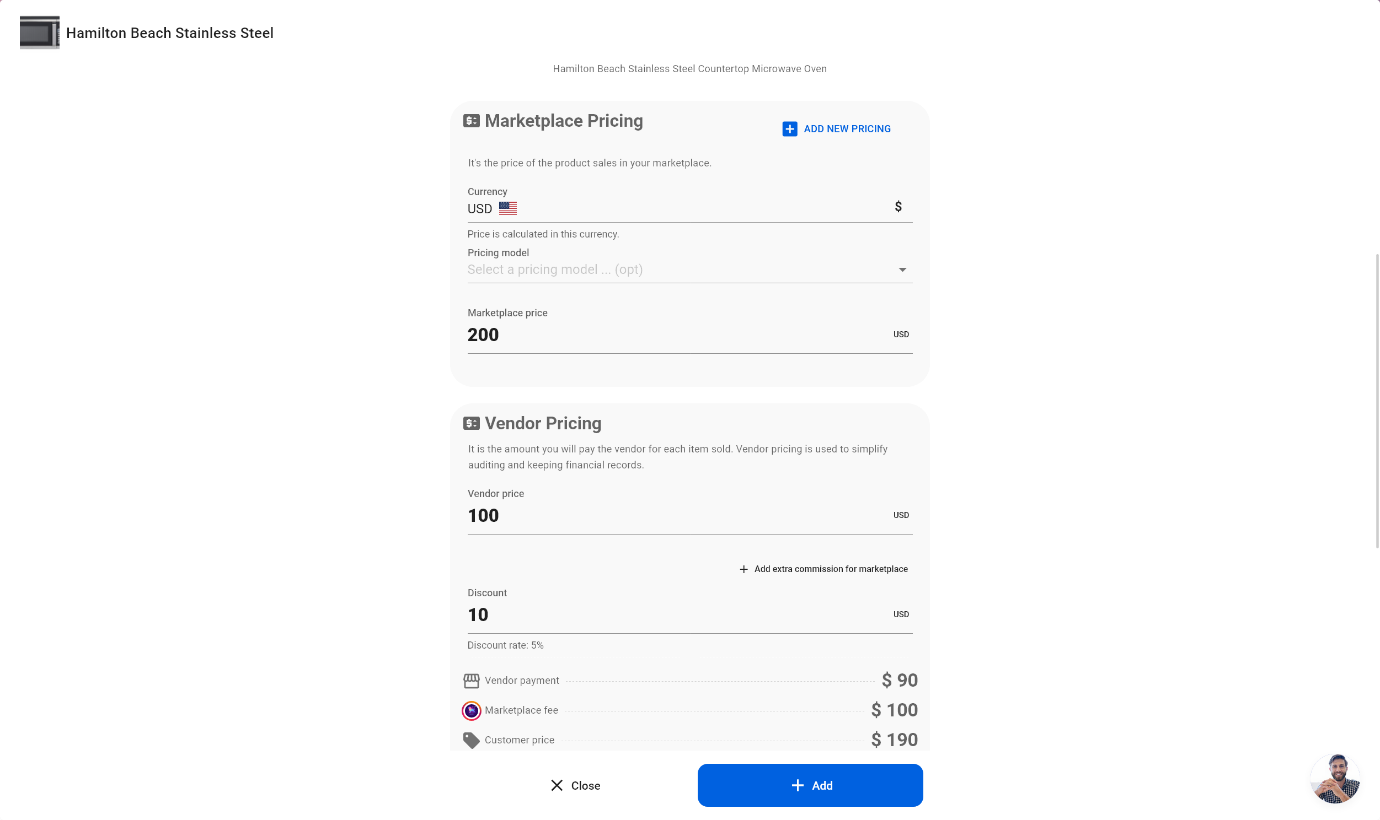
Static pricing in the Marketplace
In this scenario, the marketplace owner sets a fixed target price for the product and specifies the cost of the product for the vendor and the vendor's discount. All the values are automatically calculated and displayed, allowing the marketplace owner to have a clear understanding of the costs and profits associated with the product. This helps to ensure that the vendor is able to make a profit while also allowing the marketplace owner to make a profit as well.
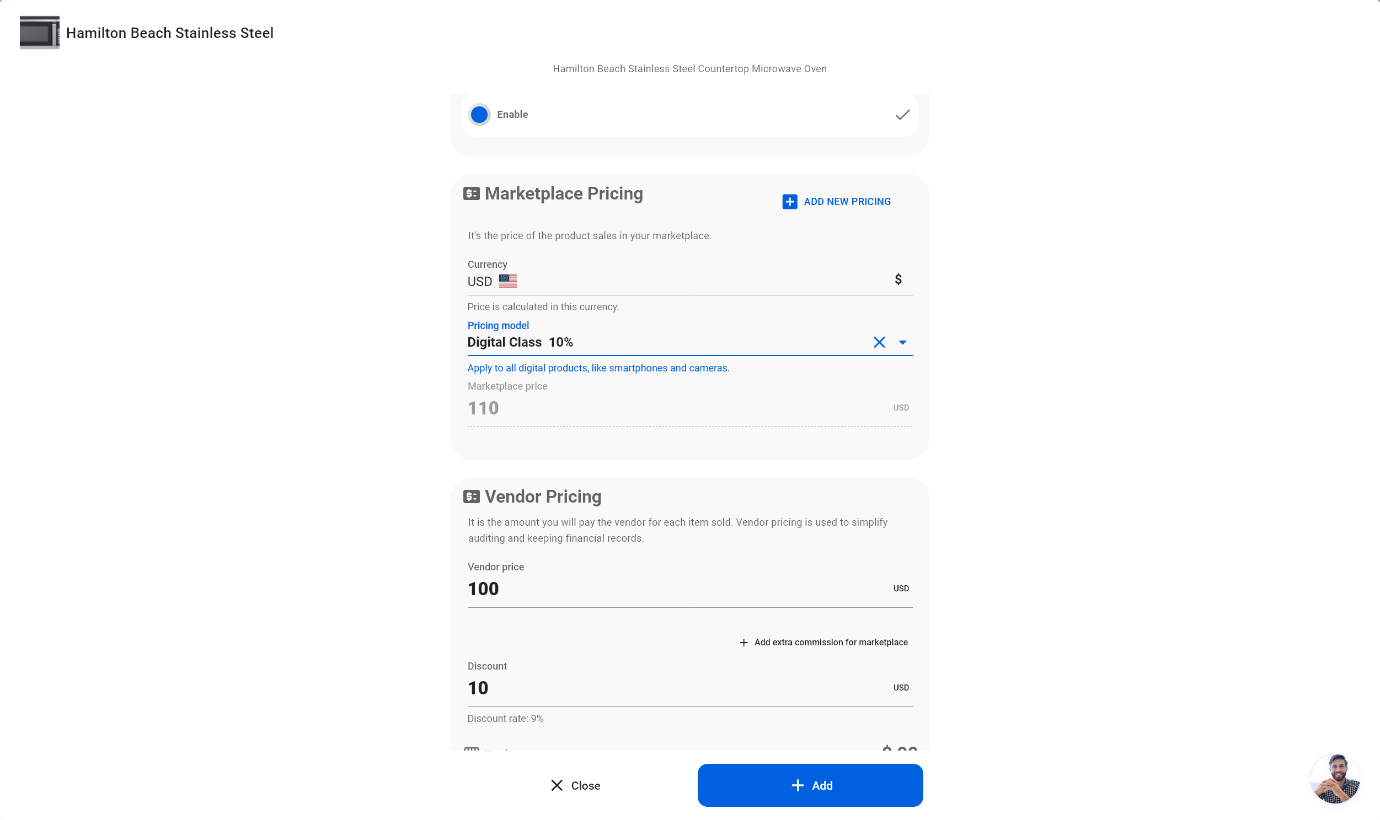
Dynamic pricing in the Marketplace, Using pricing models and simplifying pricing
As the number of products in your marketplace increases, managing pricing can become increasingly challenging. To address this, Selldone offers a dynamic pricing model. The concept is simple; you define a pricing model, such as "Digital class," and set a fixed marketplace commission, such as 10%. Then, during the process of assigning vendors to products, you can select the pricing model. With this dynamic pricing model in place, if the vendor's price changes, the marketplace price will be automatically recalculated and updated accordingly. This feature helps to streamline the pricing management process and ensures that prices remain competitive.
Once vendors have been assigned to products, the next step is to set their inventory and lead time (if applicable). If the product has multiple variants, then vendors should be assigned to each variant separately. This will allow you to track inventory and lead time for each variant and ensure that customers can purchase the product variant they want.
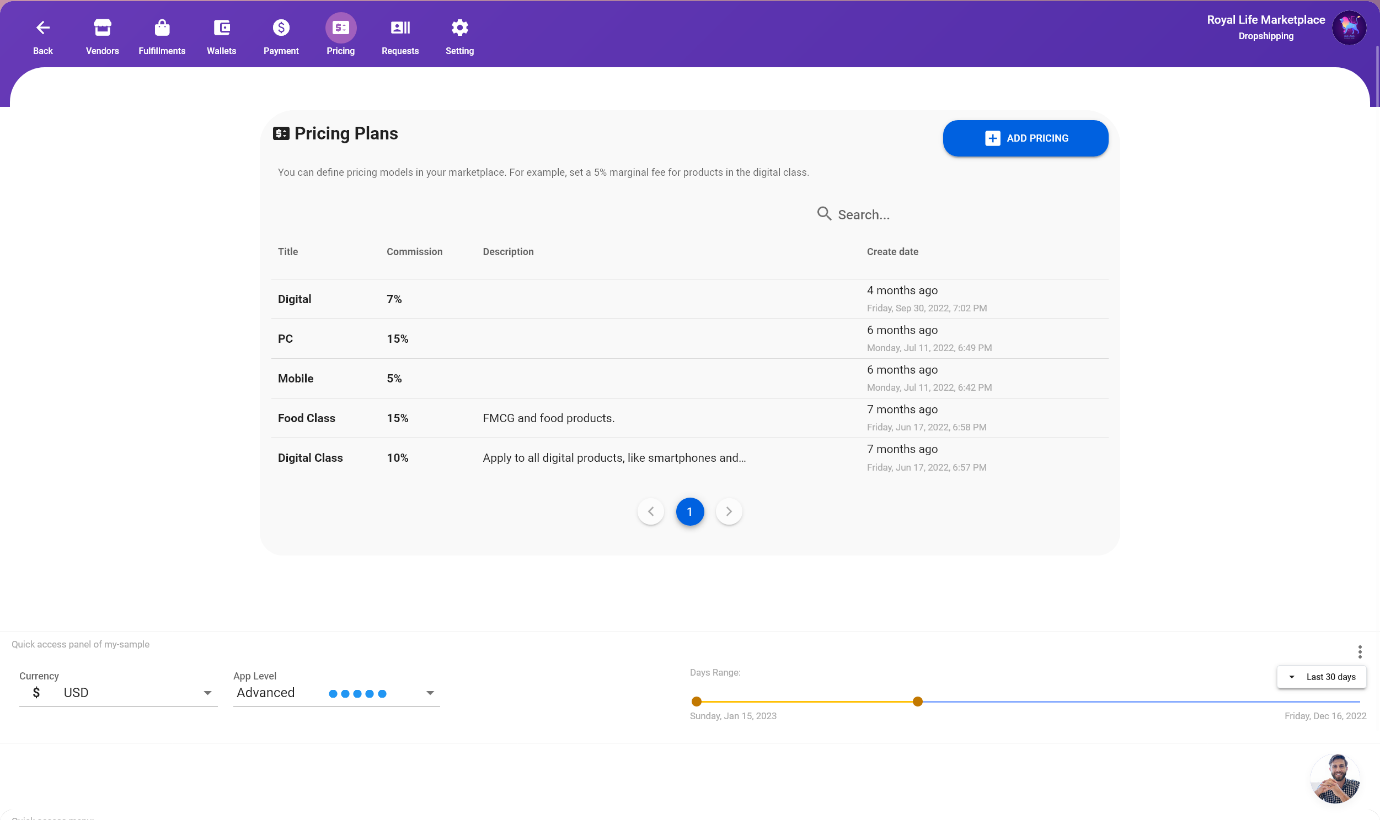
9. Managing marketplace pricing model
Selldone allows you to set dynamic pricing for products in your marketplace. To add, remove, and edit pricing models, navigate to the Shop > Marketplace > Pricing tab. This will give you access to the tools you need to manage the pricing models for your products and ensure that your prices are competitive.
10. Customize my Marketplace
Selldone offers a wide range of customization options for your marketplace. You can create fully custom internal pages using the drag-and-drop page builder. Additionally, you can customize the theme, header, colors, and overall user experience of your marketplace. These options are available through no-code tools, meaning they can be used visually without the concern of something breaking. This makes it easy to tailor the look and feel of your marketplace to match your brand and provide a unique experience for your customers.
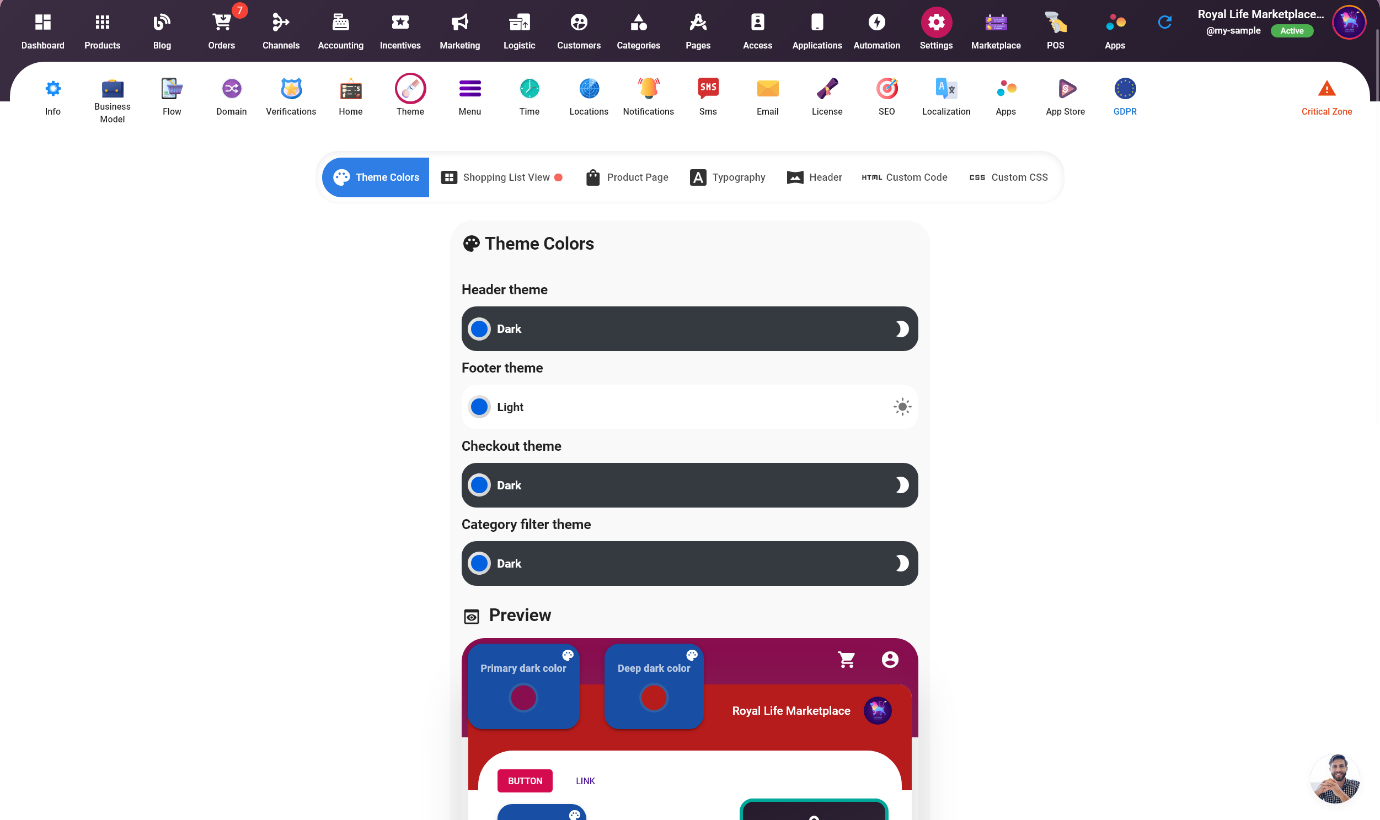
Customize theme, color plates, and fonts to match my brand
To customize the color palette, header, and typography of your marketplace, navigate to the Shop > Settings > Theme tab in Selldone. This tab provides access to various options that allow you to change the visual appearance of your marketplace. You can choose different color schemes, change the header design, and select different font styles to match your brand.
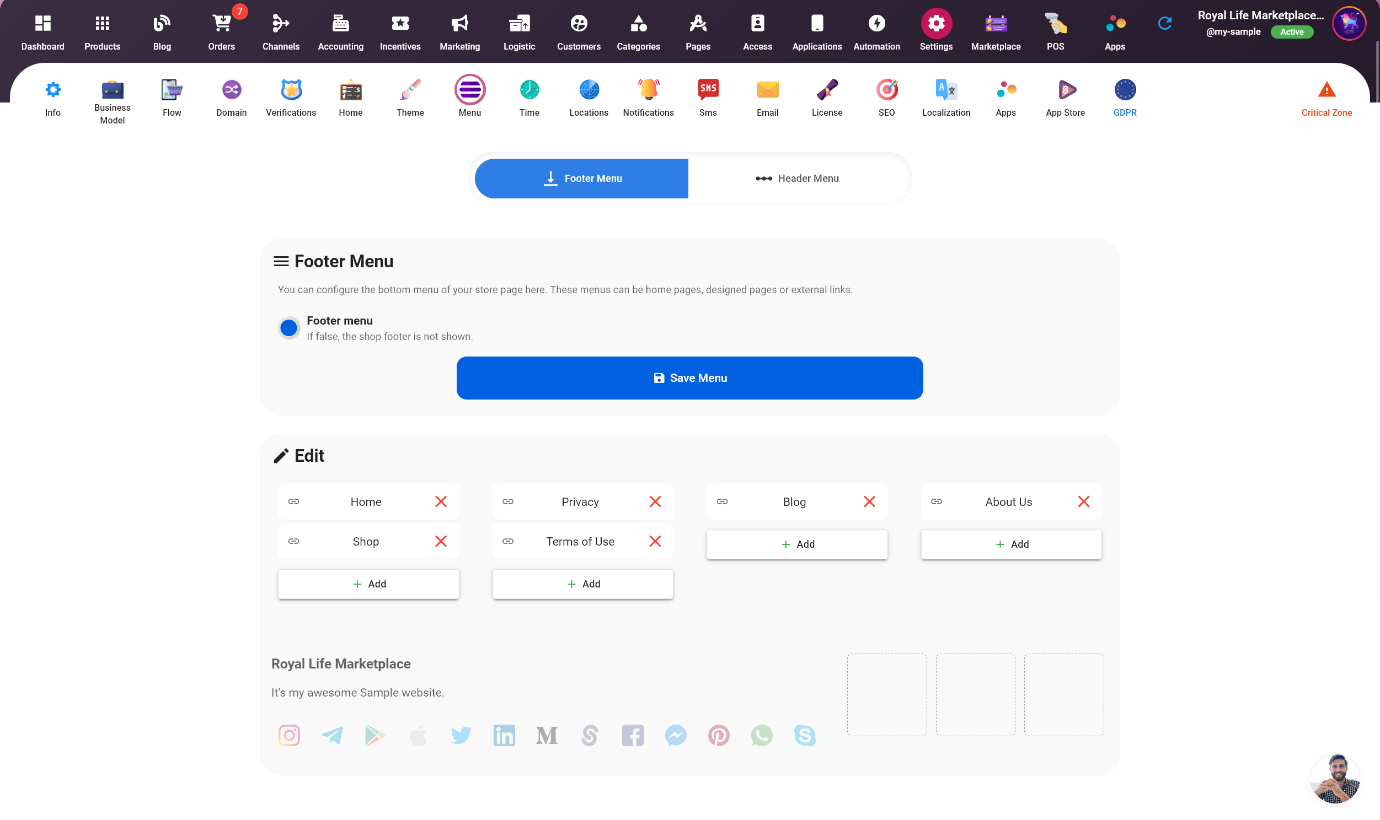
Customize header and footer menu
To customize the header and footer menu of your marketplace, navigate to the Shop > Settings > Menu tab. This tab provides access to options that allow you to change the layout and content of the header and footer menu. You can add new menu items, edit existing ones, and rearrange the menu structure to suit your needs.
Customize user experience
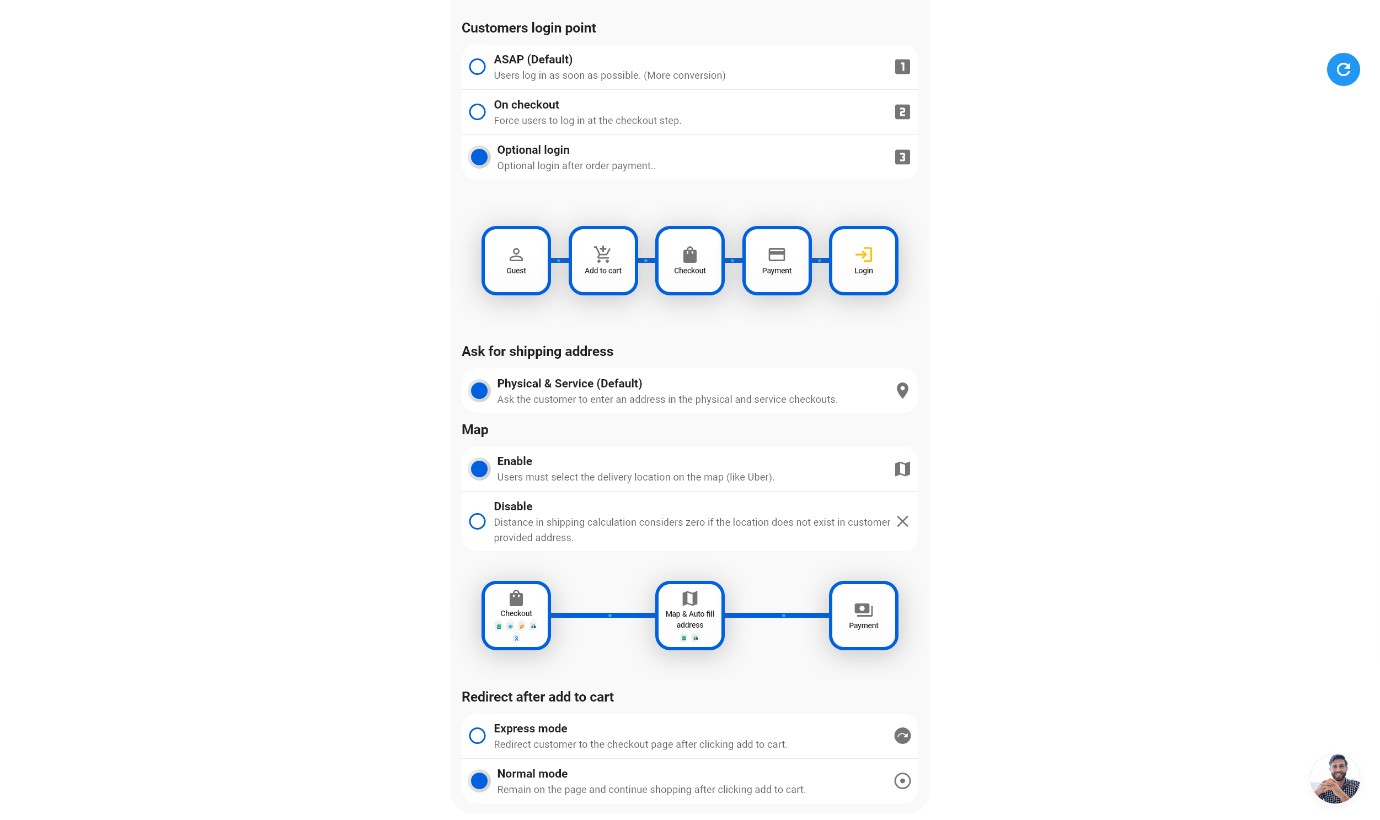
You can customize the way users log in to your store by navigating to the Shop > Settings > Flow tab in Selldone. This tab provides options that allow you to change the login flow and customize the login experience for your customers. You can add new login methods, customize existing ones, and manage the login flow to make it more user-friendly.
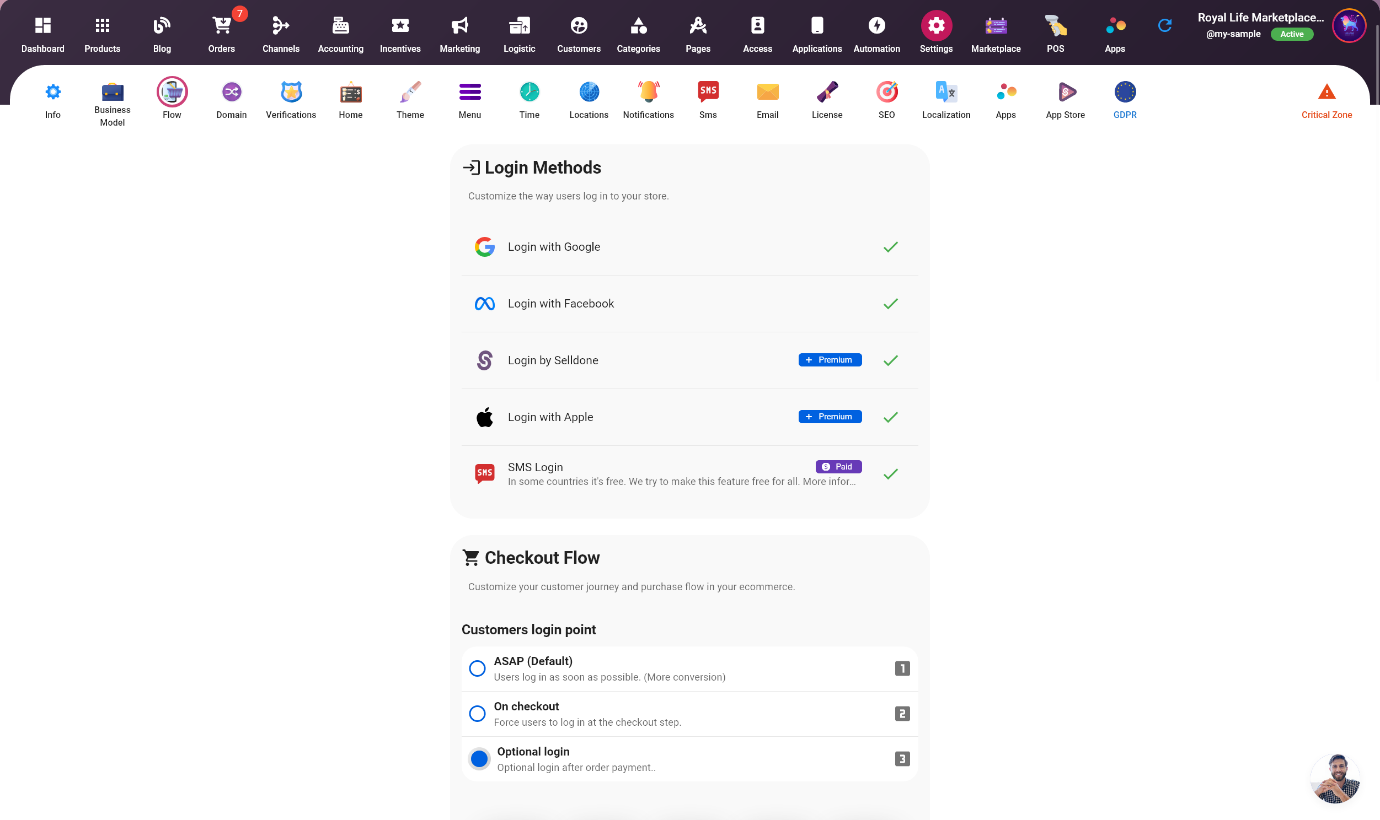
⚡ IMPORTANT: To have login with email and password, make sure to keep enabling Selldone.
In addition to customizing the login flow, Selldone allows you to also customize the customer journey and purchase flow in your ecommerce store. This can be done by navigating to the Shop > Settings > Flow tab, where you will find options to manage the flow of customers through your store, from browsing products to making a purchase. This can include customizing the checkout process, creating custom pages to help guide customers through the purchase journey, and setting up automatic email triggers to keep customers informed about their order status.
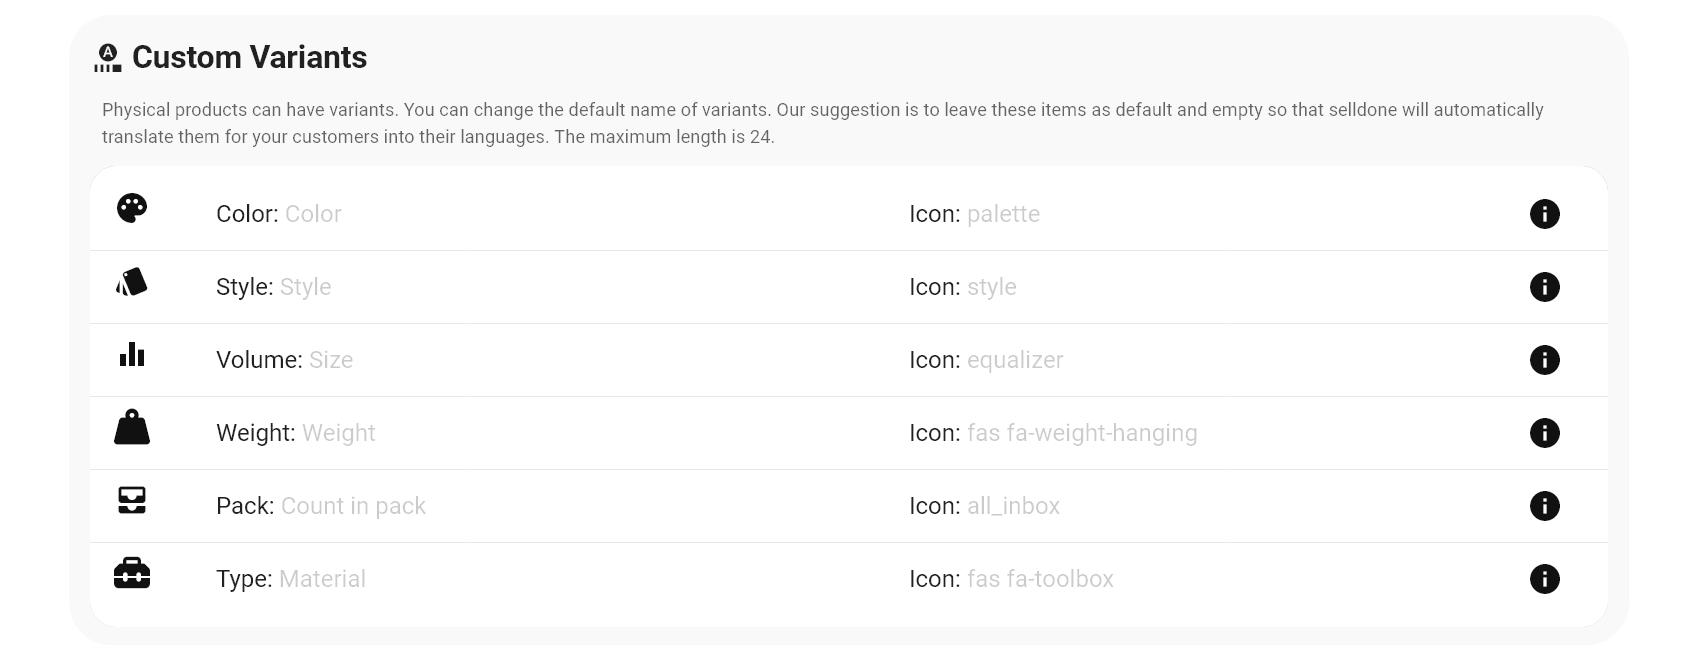
Change variants' names (color, style, ...)
Physical products can have variants, and in Selldone you can change the default name of these variants. However, it is recommended to leave them as default and empty so that Selldone can automatically translate them for your customers into their preferred languages. The maximum length for variant names is 24 characters. To change the default name of variants, go to the Shop > Settings > Business Model tab, and scroll down to the "Custom Variants" section. Here you will find the options to change the default names for each variant.
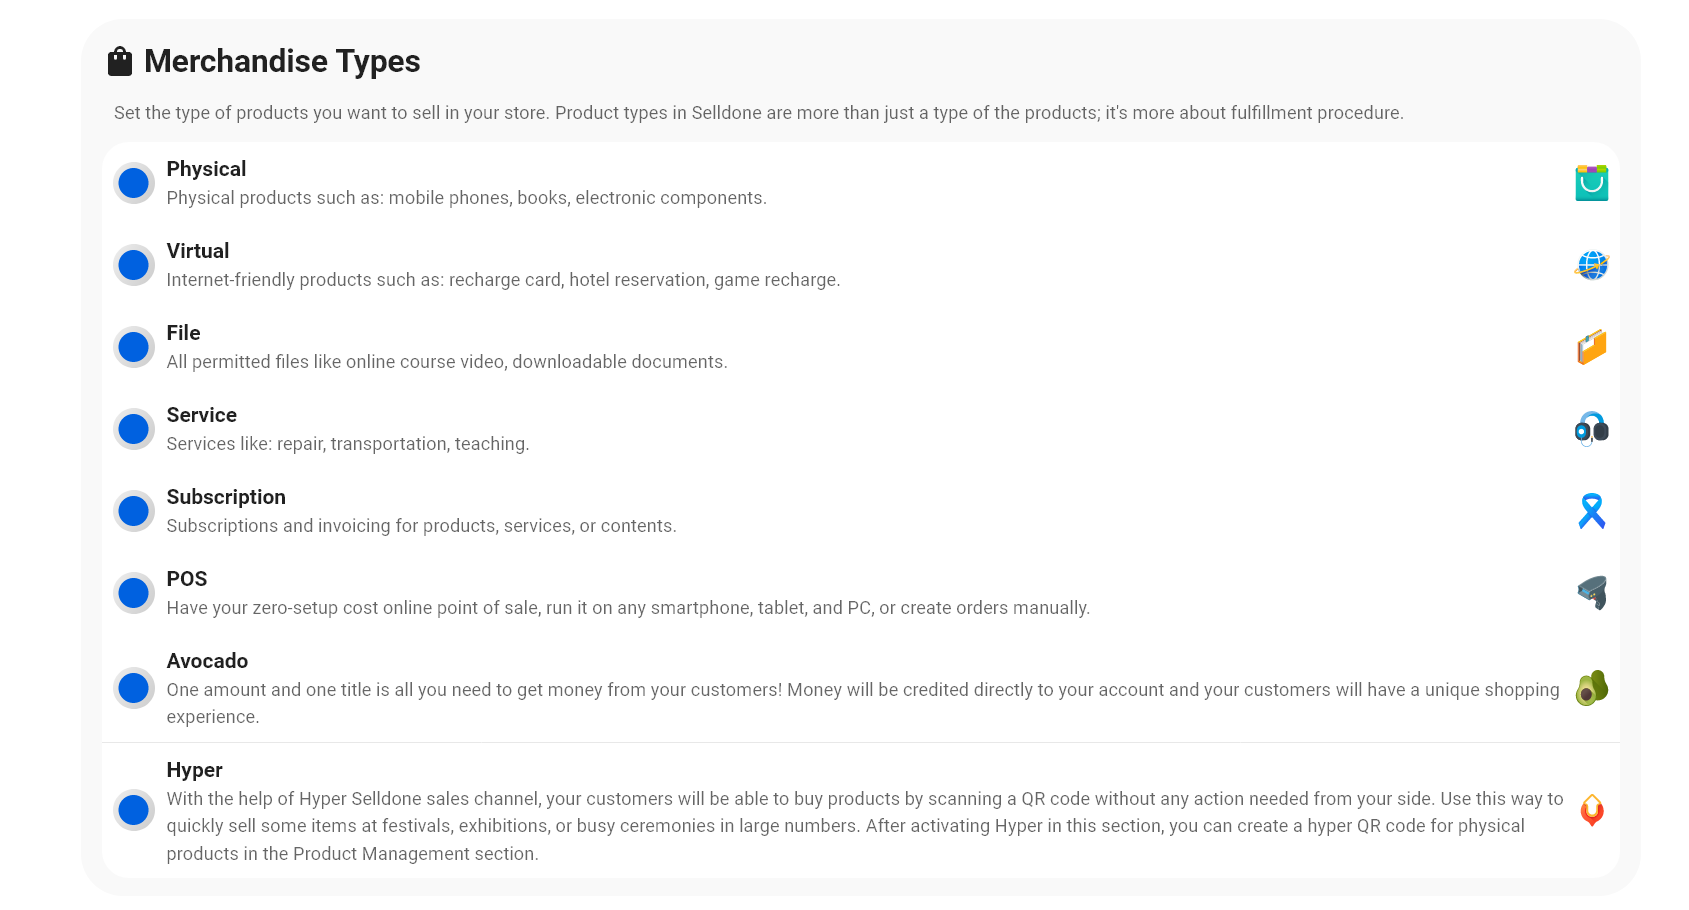
Change active product types
Selldone allows you to set the types of products you want to sell in your store. However, product types in Selldone go beyond just the type of product; it also includes the fulfillment procedure. This means you can set different types of products such as physical products, digital products, subscriptions, bookings, and services with different fulfillment procedures and inventory management. You can go to the Shop > Settings > Business Model > Product Types tab to access options for adding, editing, and managing product types in your store.
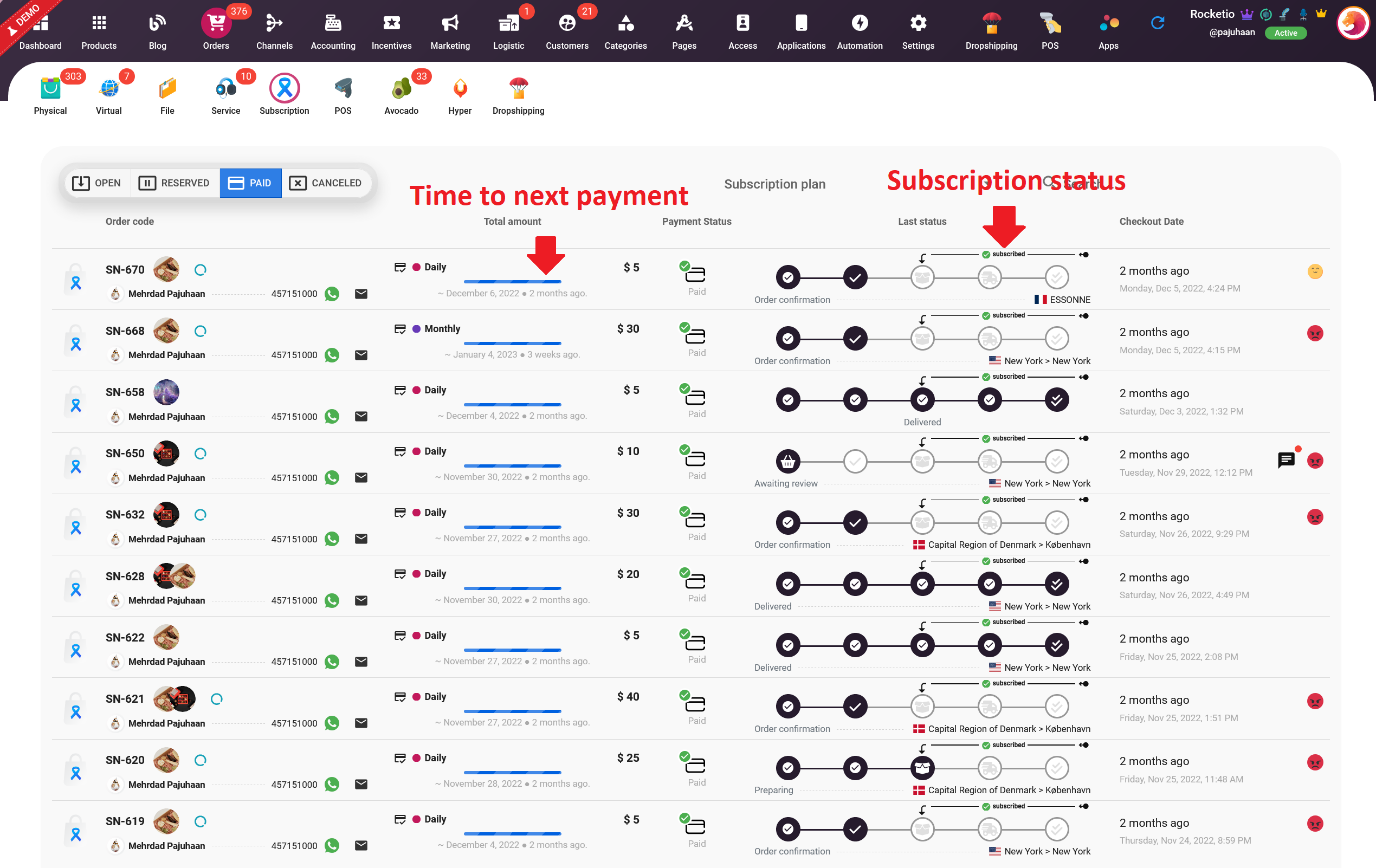
11. Receive orders
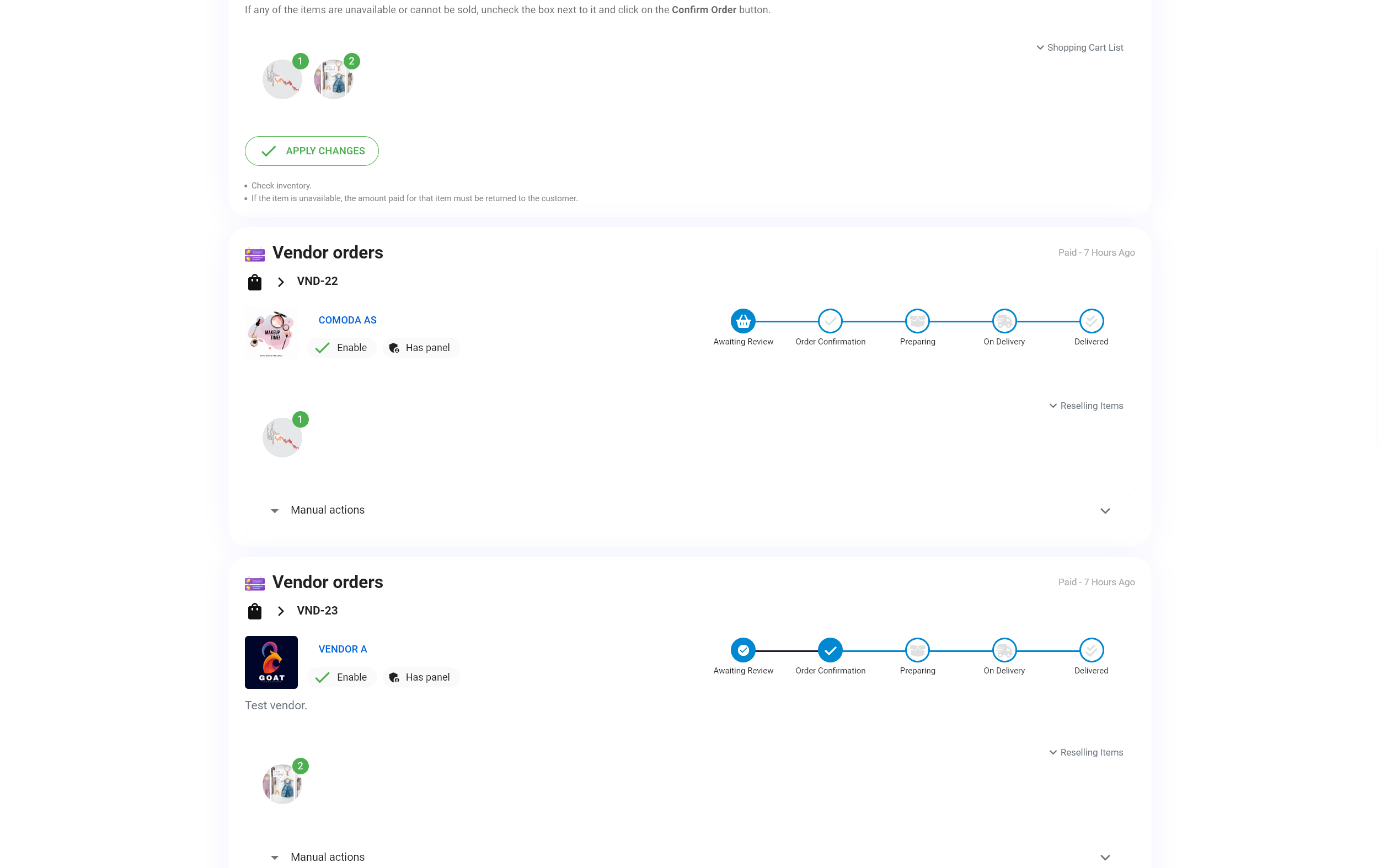
Orders placed on your marketplace will be received in the Shop > Orders tab, like normal shop orders. However, there is a key difference in that each order creates one or more vendor sub-orders (fulfillment). Each sub-order should be fulfilled by the corresponding vendor in their vendor panel. This allows vendors to manage their own fulfillment process, while also providing you with the ability to track and manage orders across multiple vendors.
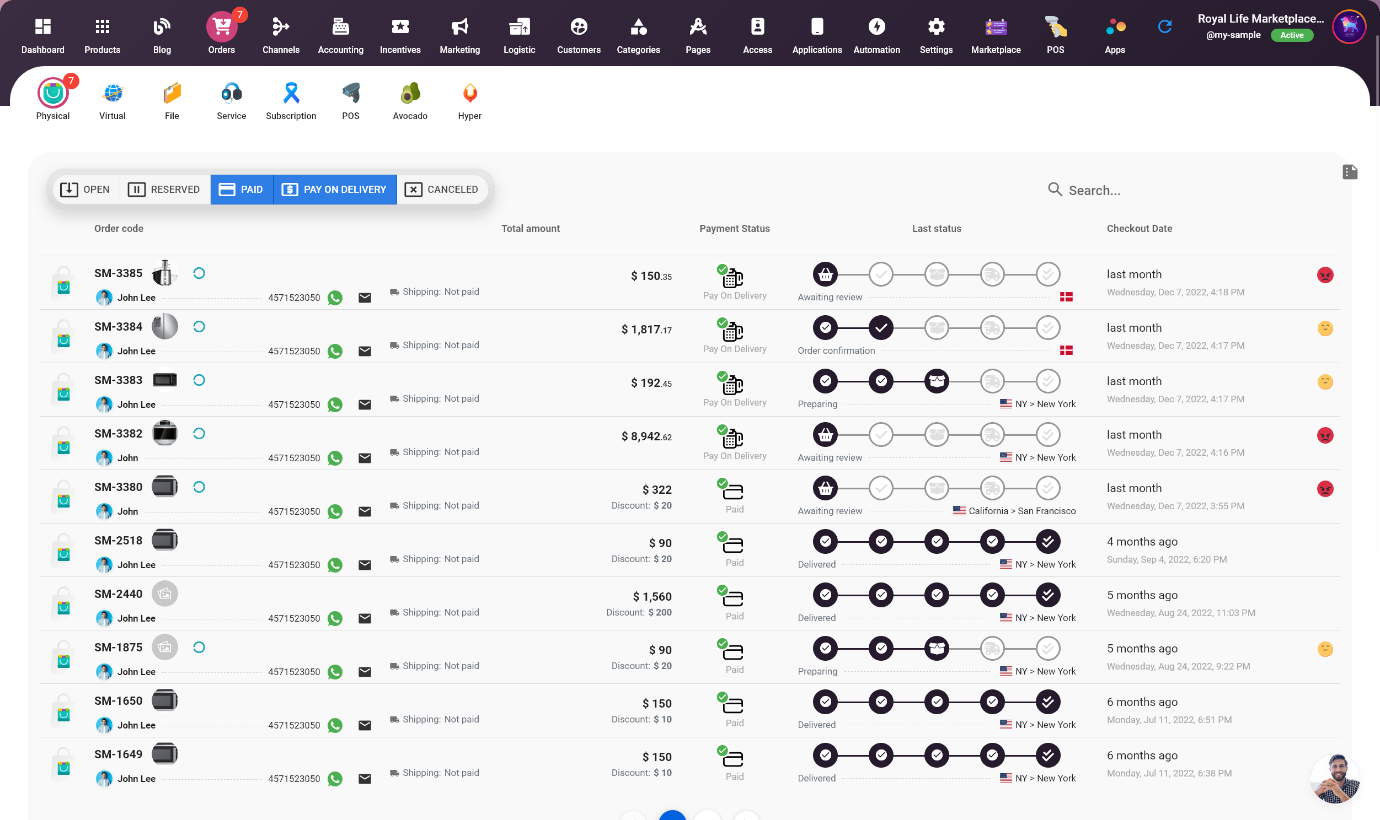
As a marketplace owner, it is important to keep track of the status of orders and update them as necessary. This is important because an order can involve multiple vendors and by keeping track of the status, you can ensure that everything is running smoothly and vendors are fulfilling their responsibilities. You can do this by navigating to the Shop > Orders tab, where you will be able to view and update the status of orders. By forcing this step, you can ensure that vendors are meeting their obligations and that the fulfillment process is proceeding as expected.
In this example, a customer creates an order with two products, each of which is from a different vendor. In this scenario, Selldone will create a sub-order for each vendor, allowing each vendor to manage their own fulfillment process separately. This allows for more efficient management of orders, as vendors can focus on fulfilling the products they are responsible for, rather than having to manage the entire order.
12. Setup shipping
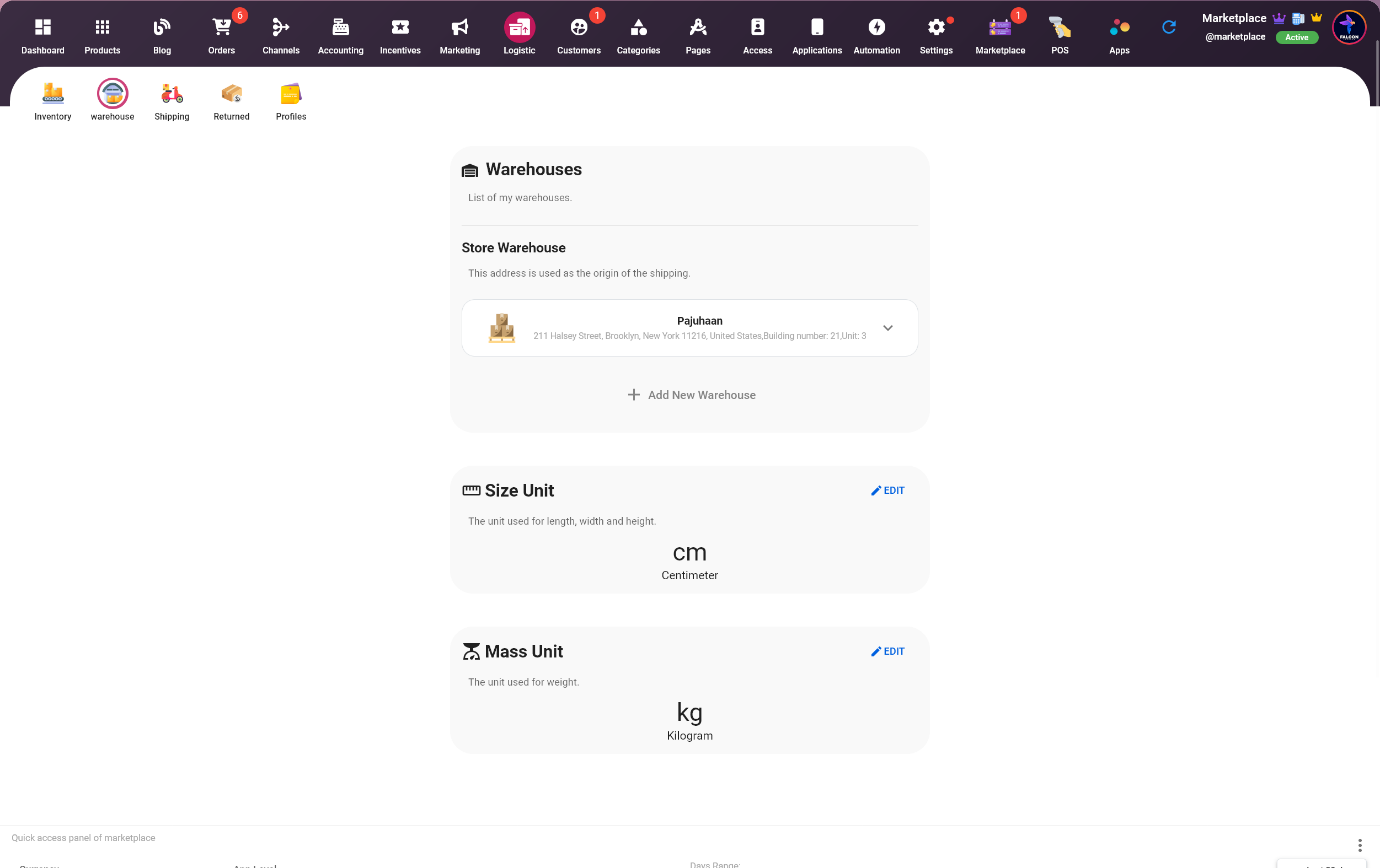
Setting up shipping rates in Selldone is simple and flexible. Before adding a shipping method, you need to select your warehouse (or store) location. This can be done by navigating to the Shop > Logistic > Warehouse tab. In this tab, you will be able to set your warehouse location and define your shipping zone. Once this is done, you can proceed to add shipping methods and set up shipping rates for your products.
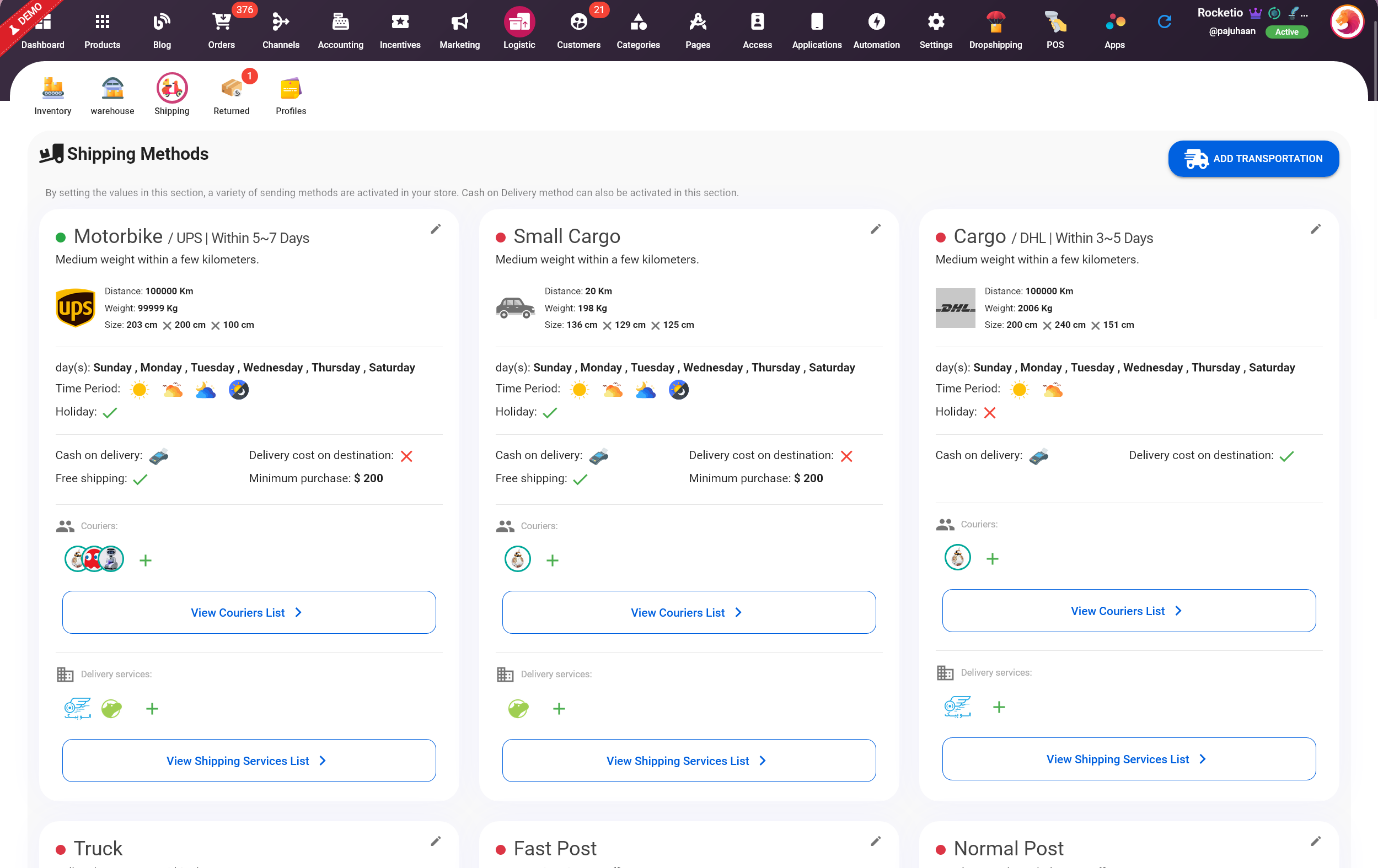
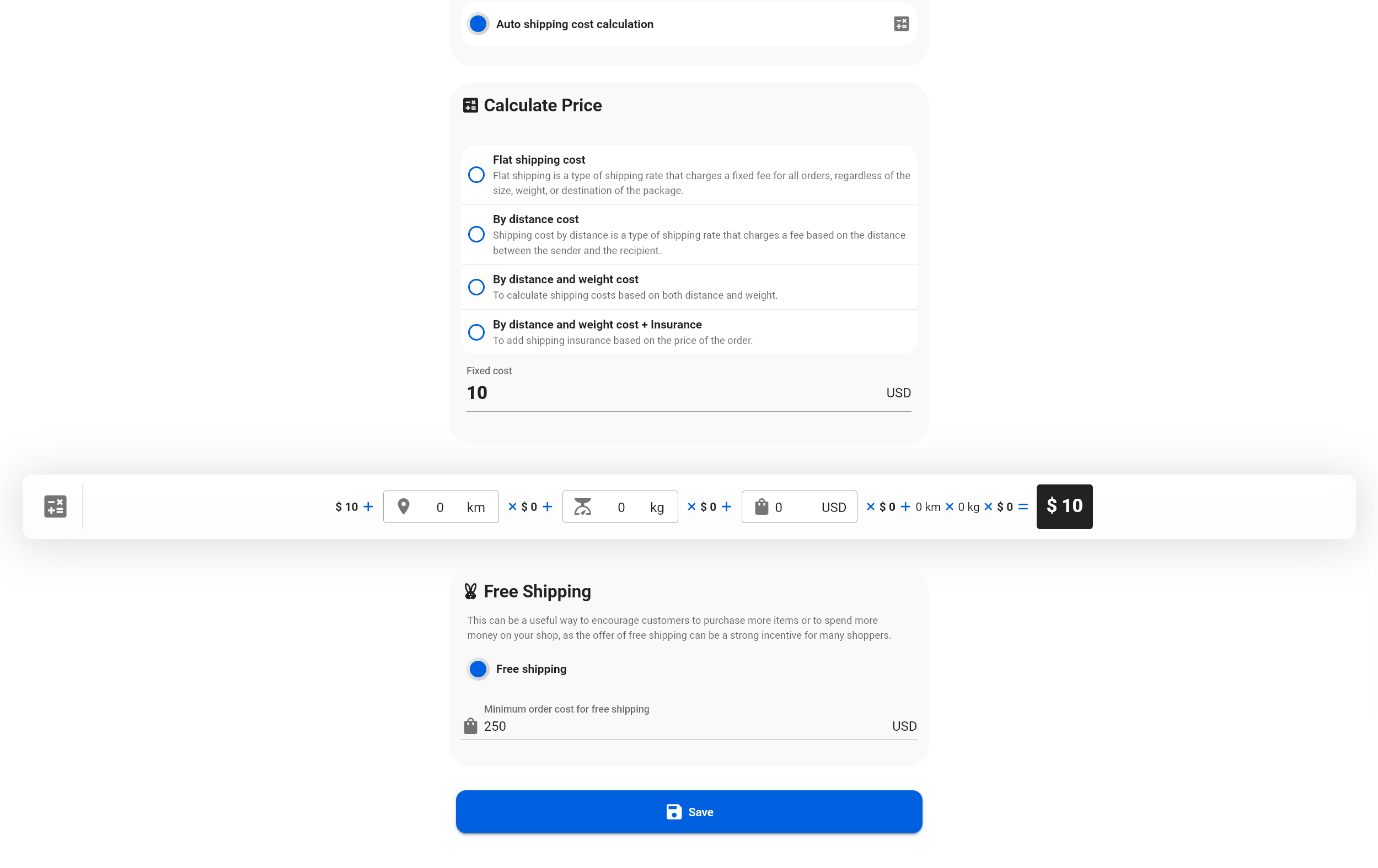
Selldone allows you to set global shipping rates for your marketplace. To do this, navigate to the Logistics > Shipping tab and select the "ADD TRANSPORTATION" button. This will take you to a form where you can add a shipping method, set shipping rates, and configure other shipping options. Once you have set up your shipping rates, they will apply to all products in your marketplace.
After adding a transportation method, you can customize it by clicking on it and navigating to the "Settings" tab. In this tab, you can set the title of the shipping method and change the default image. For example, you can set the title as DHL and add a custom logo for it. This allows you to brand your shipping methods and make them more recognizable to your customers.
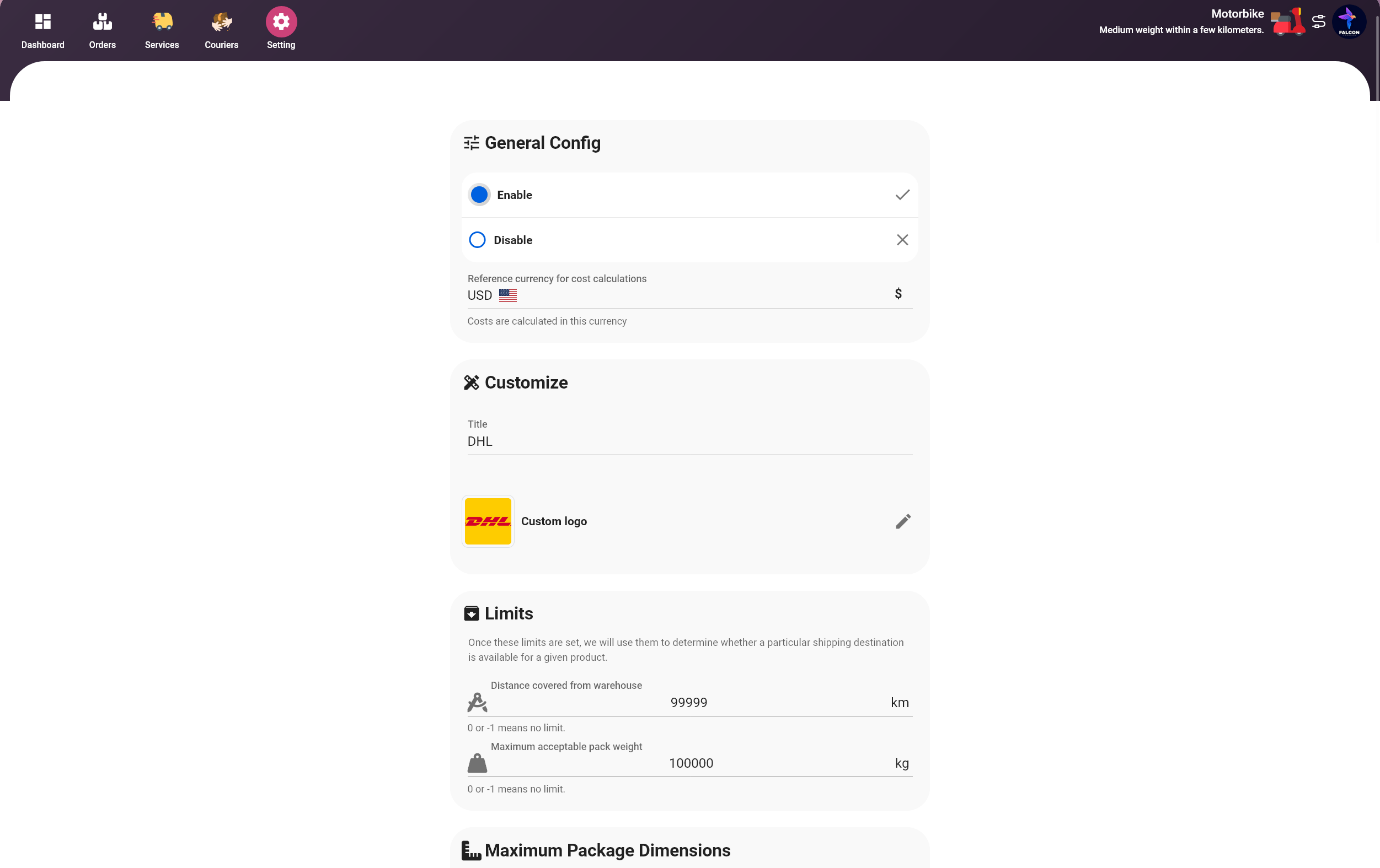
I recommend setting a large number (e.g. 99999) for distance, maximum weight, and package size limits when setting up shipping methods in order to avoid any trouble caused by misconfiguration. This will ensure that you can start selling fast without any problems and you can change it later if it's necessary.
Setup COD – Cash On Delivery
If you plan to accept cash on delivery (COD) payments for orders in your marketplace, it is important to have at least one transportation service with an active COD option. This will allow customers to choose COD as their payment method during the checkout process, and the transportation service with the active COD option will be used to fulfill the order. To enable COD on a transportation service, you can navigate to the "Shipping" tab in Selldone, select the transportation service, and enable the COD option in the settings.
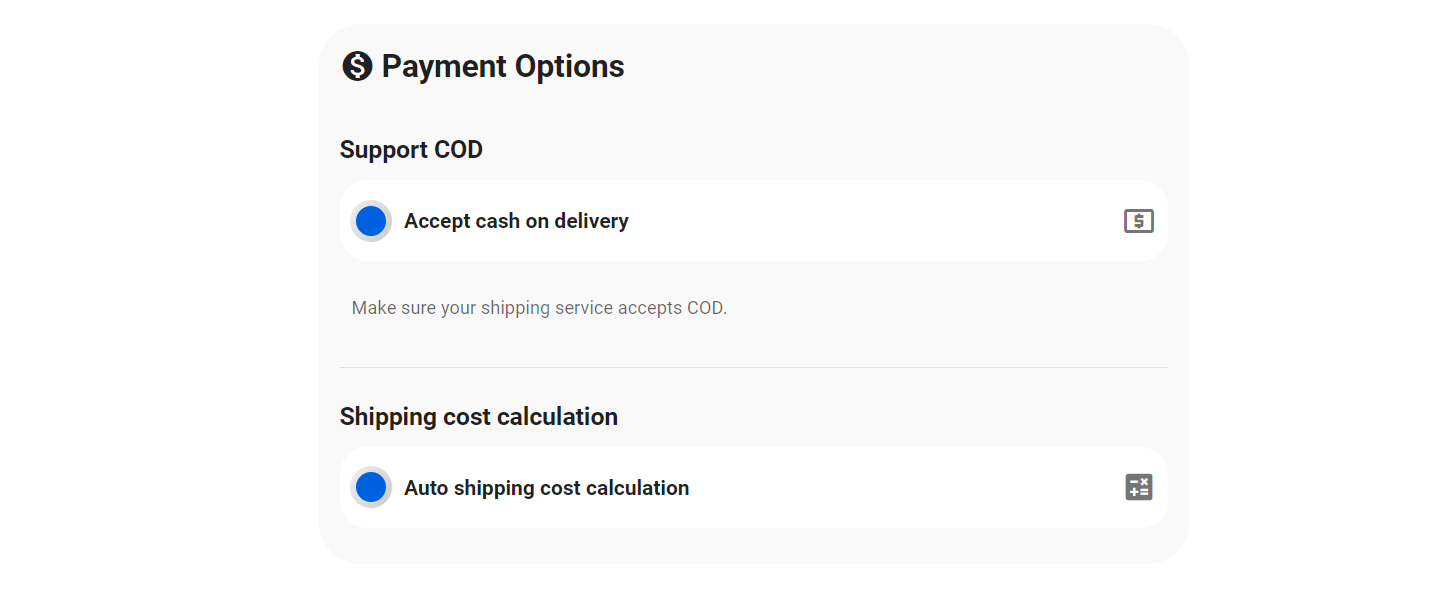
Setup fixed shipping rate
When starting your ecommerce, it is a good idea to set a fixed shipping rate, even if it is free. This will make it easy for you to manage shipping costs and will also make it easy for customers to understand the cost of shipping. Selldone offers many simple and advanced shipping cost calculation options, ranging from a flat shipping rate to more complex distance and weight-based calculations. You can choose the option that best suits your needs, and change it as your business grows.
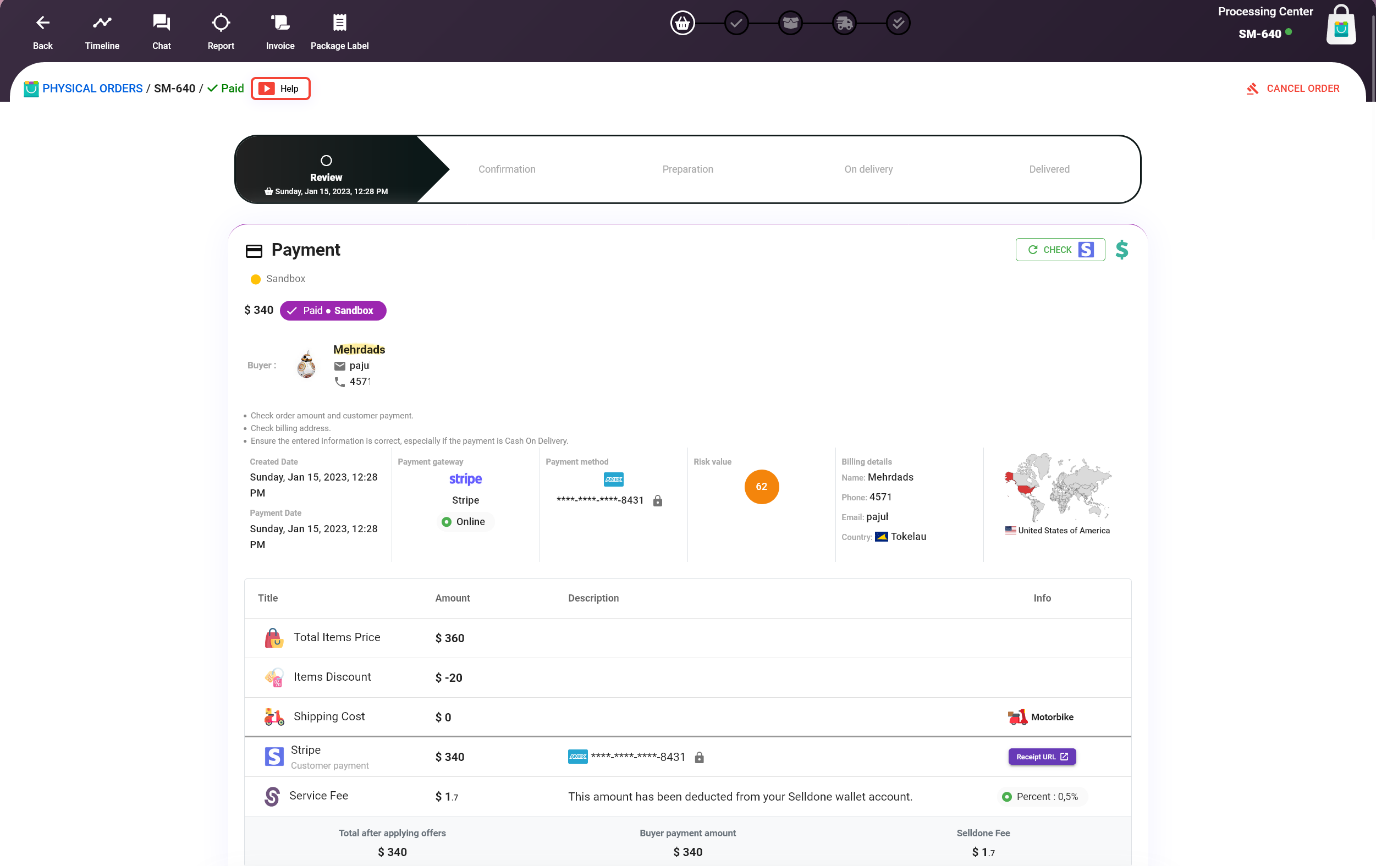
13. Marketplace and vendors accounting
After the first transaction, a virtual wallet will be created for the vendor in your Shop > Marketplace > Wallets. This includes placing an order or a top-up by the marketplace owner. The virtual wallet is a helpful tool to keep track of payments to vendors, ensuring that they receive the correct amount for their products and services. The virtual wallet will be accessible in the vendor's panel, where they can check their transactions and balance.
⚡ IMPORTANT: Always keep accounting manually to make sure everything is correct. Many complex situations like order canceling and refunding can make these values invalid.

SD allows setting up distribution fees for large enterprises. This feature is currently in BETA. In this scenario, vendors will be able to connect their Stripe account to the marketplace via Stripe Connect. This allows for more flexible and sophisticated payment management, and enables large enterprises to distribute funds to vendors in a more efficient and accurate way.
Stripe Connect for marketplaces
Stripe Connect is a platform that allows marketplaces to connect with vendors' Stripe accounts, allowing for the seamless transfer of funds between the marketplace and the vendors. As a marketplace owner, Stripe Connect enables you to handle payments and manage vendor payouts through one unified platform.
With Stripe Connect, vendors can connect their Stripe account to your marketplace, allowing you to process payments on their behalf and automatically transfer the funds to their Stripe account. This eliminates the need for vendors to handle their own payments and payouts, and allows you as the marketplace owner to have more control over the financial aspect of your marketplace. Stripe Connect also allows marketplace owners to set up a marketplace commission on payments, so you can take a percentage of each transaction as a fee. This is a great way to increase revenue and make a profit from your marketplace.
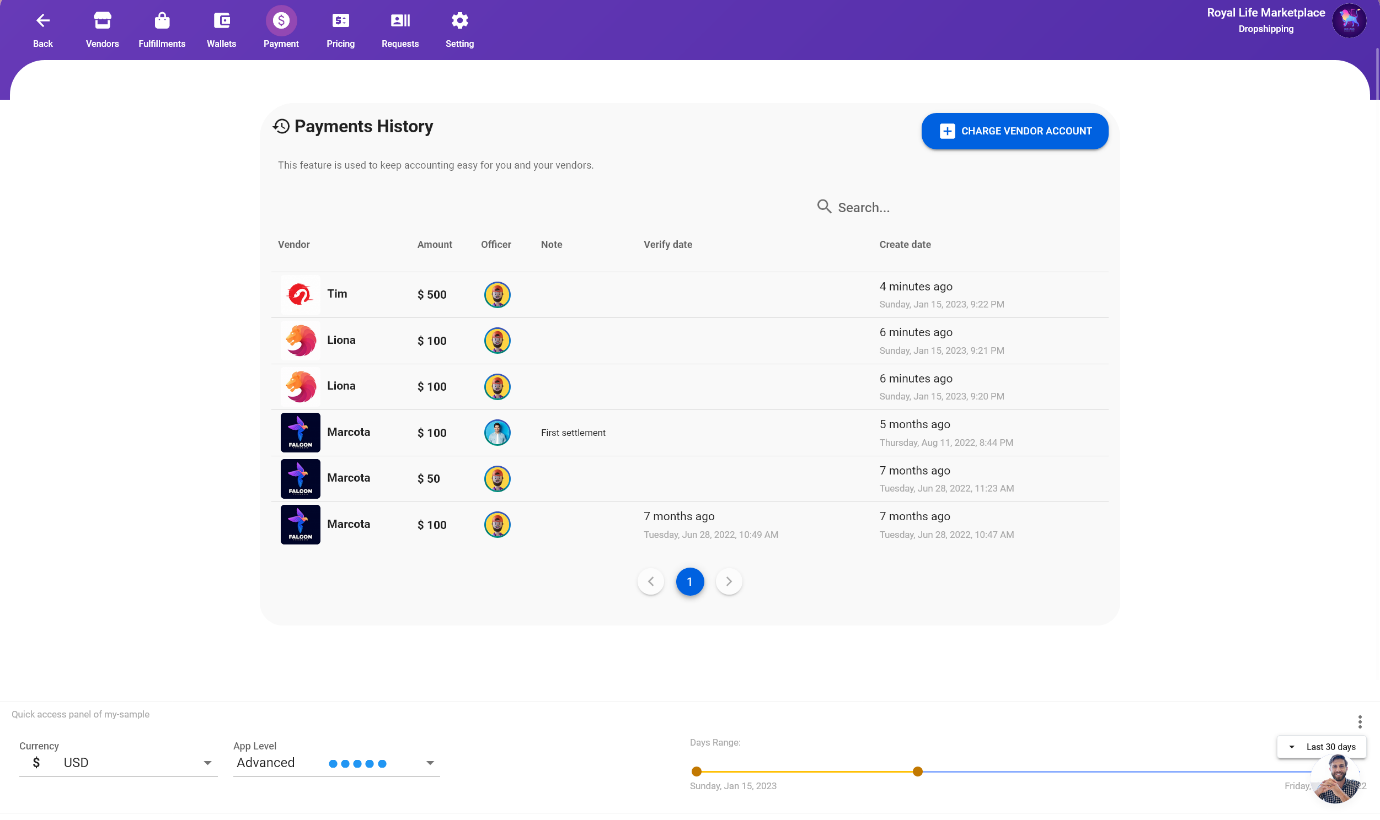
14. Add payment for a vendor - Keep all in/out records
After paying a vendor, it is recommended to manually record the transaction in the Shop > Marketplace > Payment tab. This can be done by clicking the "CHARGE VENDOR ACCOUNT" button. This will allow you to keep track of the payments made to vendors, ensuring that all transactions are accurate and up-to-date. This step is important to have an overview of the payments, and can be helpful for accounting or tax purposes.
15. Marketplace settings
You can customize and configure your marketplace settings in Selldone by navigating to the Shop > Marketplace > Settings section. This section allows you to change various settings such as commission, vendor approval process, vendor account management, and more. It's a one-stop location for managing all the settings and preferences for your marketplace and it gives you full control over how your marketplace operates.
Enable/disable the marketplace
Disabling your marketplace in Selldone will deactivate certain functionality, such as the ability for vendors to sell their products, and for customers to purchase items. However, if you would like to completely shut down your marketplace, you will need to disable your store in the settings. This will make your marketplace inaccessible to both vendors and customers and will prevent any further transactions from taking place..
Vendors access
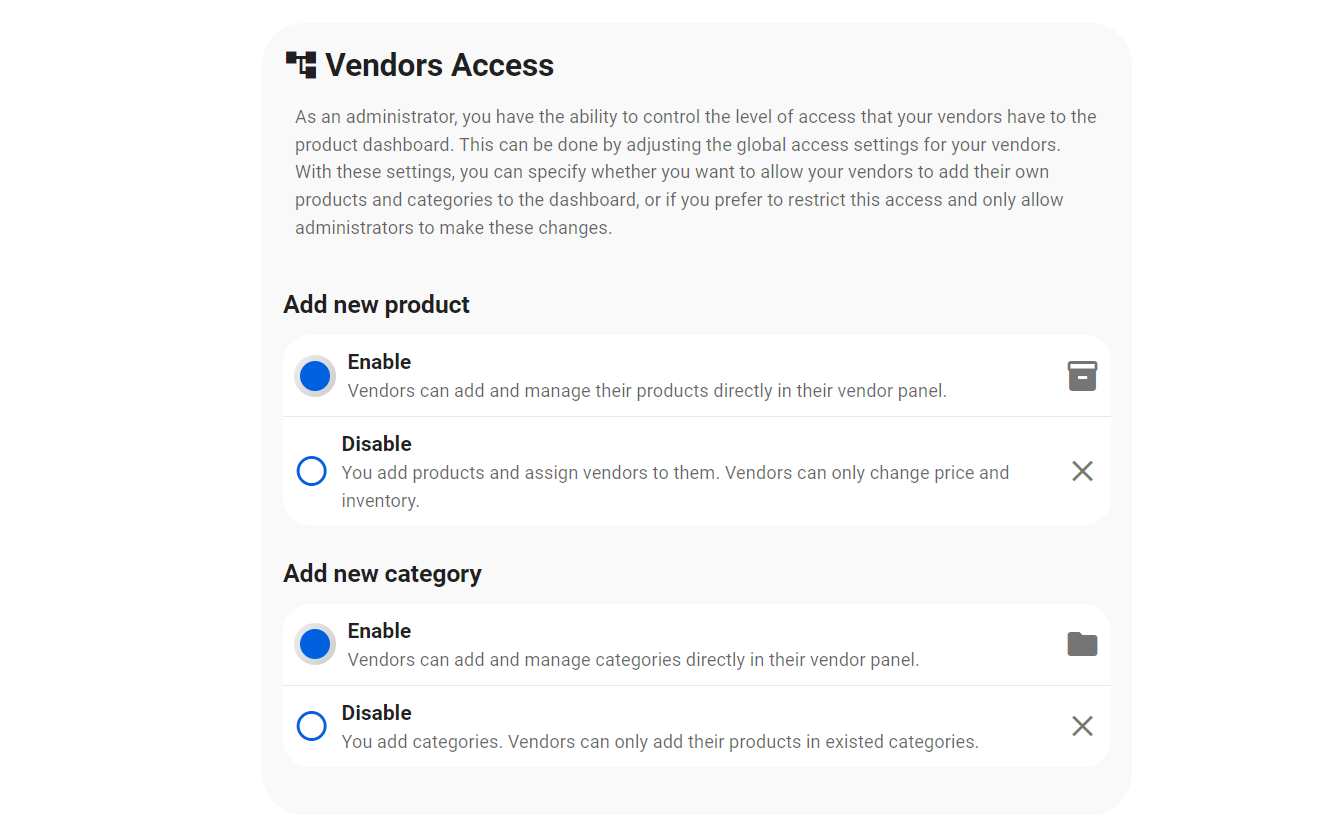
As an administrator, you have the ability to control the level of access that your vendors have to the product dashboard in Selldone. This can be done by adjusting the global access settings for your vendors. With these settings, you can specify whether you want to allow vendors to add their own products and categories to the dashboard, or if you prefer to restrict this access and only allow administrators to make these changes. This allows you to have more control over the products and categories that are displayed on your marketplace and ensures that the content is aligned with your business objectives.
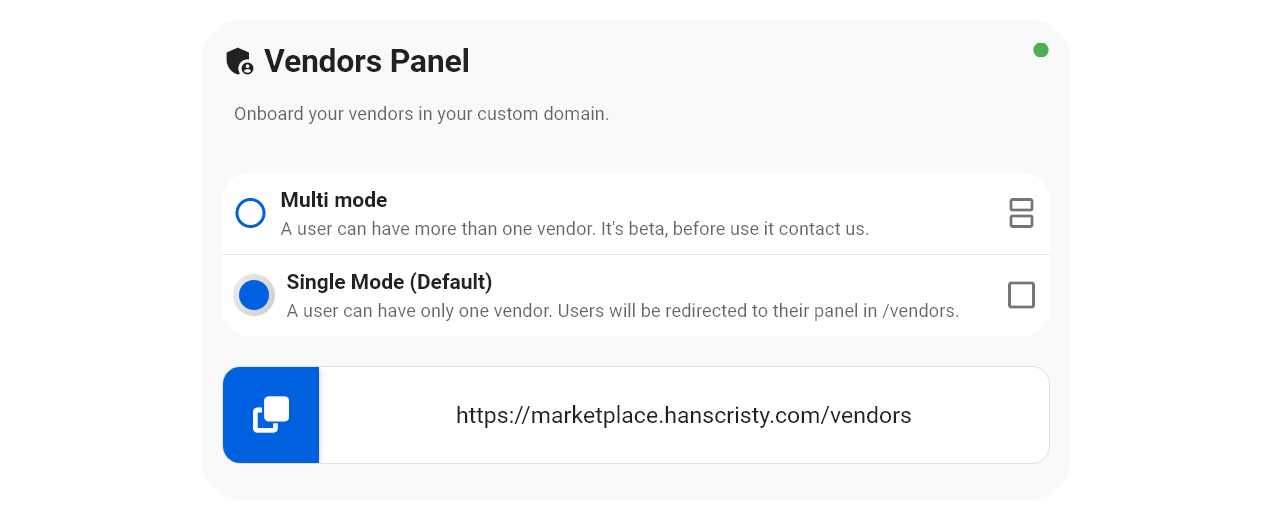
Vendors Panel
You have the option to set whether each user can have multiple vendors or just one vendor in your marketplace. This can be set in the user management settings. This allows you to control how many vendors each user can have and therefore have more control over the number of vendors that are selling on your marketplace.
I will complete it...
Make Your Business Online By The Best No—Code & No—Plugin Solution In The Market.
30 Day Money-Back Guarantee
Create Your E-commerce Store Start now — it's freeSay goodbye to your low online sales rate!
FAQ
What are the benefits of having a Multi-Vendors Marketplace?
- Increased product variety for customers
- Multiple revenue streams for the marketplace owner
- Easier vendor management and payments
- Lower overhead costs for vendors
How do vendors get paid on a Multi-Vendors Marketplace?
Vendors can get paid through various payment gateway options such as PayPal or Stripe, or through a virtual wallet system set up by the marketplace.
What are the main challenges of setting up a multi-vendor marketplace?
- Managing the influx of vendors and products
- Ensuring vendor compliance with marketplace policies
- Managing vendor payouts and commissions
- Providing support to vendors and customers
- Implementing a robust payment and shipping system
What are the key considerations when choosing a platform for my multi-vendor marketplace?
- Scalability
- Customizability
- Vendor management tools
- Integration with payment and shipping providers
- Cost and pricing structure
How can I attract and onboard high-quality vendors for my marketplace?
- Creating a detailed and clear vendor agreement and onboarding process
- Providing support and resources to help vendors succeed
- Implementing a system for vendor reviews and ratings
- Creating a strong brand and reputation for the marketplace
- Networking, attending trade shows and marketplaces events and reaching out to potential vendors who sell complementary products or services
- Offering incentives such as lower commission rates or exclusive promotions for high-performing vendors
- Creating a referral program for current vendors to refer other potential high-quality vendors
What are some ways to ensure a great customer experience on my multi-vendor marketplace?
- Providing clear and detailed product information, including multiple high-quality images and accurate descriptions
- Implementing a system for customer reviews and ratings
- Providing excellent customer service and support
- Ensuring vendors are meeting a high level of quality standards for their products and services
- Providing a seamless and easy-to-use checkout process
- Offering a variety of shipping and payment options
- Providing a hassle-free return and refund policy
- Regularly gathering customer feedback and using it to improve the marketplace experience
What are some common red flags to look out for when vetting vendors?
- A lack of clear contact information or a history of changes in contact information
- Unusually low prices or unrealistic profit margins
- Poor quality product images or descriptions
- Poor customer reviews or ratings
- Requests for payment outside of the established marketplace platform
How can I verify the identity of a vendor?
- Requesting and verifying government-issued identification
- Verifying business registration and tax information
- Checking for a physical storefront or business location
- Asking for references or contacting previous customers
How can I protect my marketplace and customers from fraud?
- Implementing fraud detection and prevention tools
- Monitoring for suspicious activity on the marketplace
- Regularly reviewing and updating vendor information
- Working with law enforcement or legal experts if fraud is suspected
What should I do if I suspect a vendor of fraudulent activity?
- Immediately disabling the vendor's account
- Notifying customers of any potential fraud
- Investigating the vendor's activity and gathering evidence
- Contacting the appropriate authorities and legal experts as needed