
Setup Facebook Pixel with Full Events for Ecommerce Without Plugin [Comprehensive Guide]
This guide provides a detailed, step-by-step walkthrough for setting up Facebook Pixel with full event tracking for your ecommerce website—without using any plugins. Whether you’re running ads on Facebook, Instagram, or other Meta platforms, this setup enables you to track user interactions, optimize your ad spend, and build effective remarketing campaigns. Read on for the complete guide, including useful tips and troubleshooting advice.
Introduction to Facebook Pixel and Its Benefits
What is Facebook Pixel?
Facebook Pixel is a snippet of JavaScript code that you add to your website. It helps you measure, optimize, and build audiences for your ad campaigns by tracking the actions visitors take on your site. This data is invaluable for:
- Conversion Tracking: Understand which actions (like purchases or sign-ups) result from your ads.
- Remarketing: Re-engage visitors who have shown interest in your products.
- Audience Building: Create custom audiences based on website behavior.
- Optimizing Ads: Adjust your ad strategies to target the most valuable segments of your audience.
Using Facebook Pixel is especially critical if you run ads on Meta platforms such as Facebook and Instagram, as it allows you to attribute conversions accurately and improve your overall ad performance.
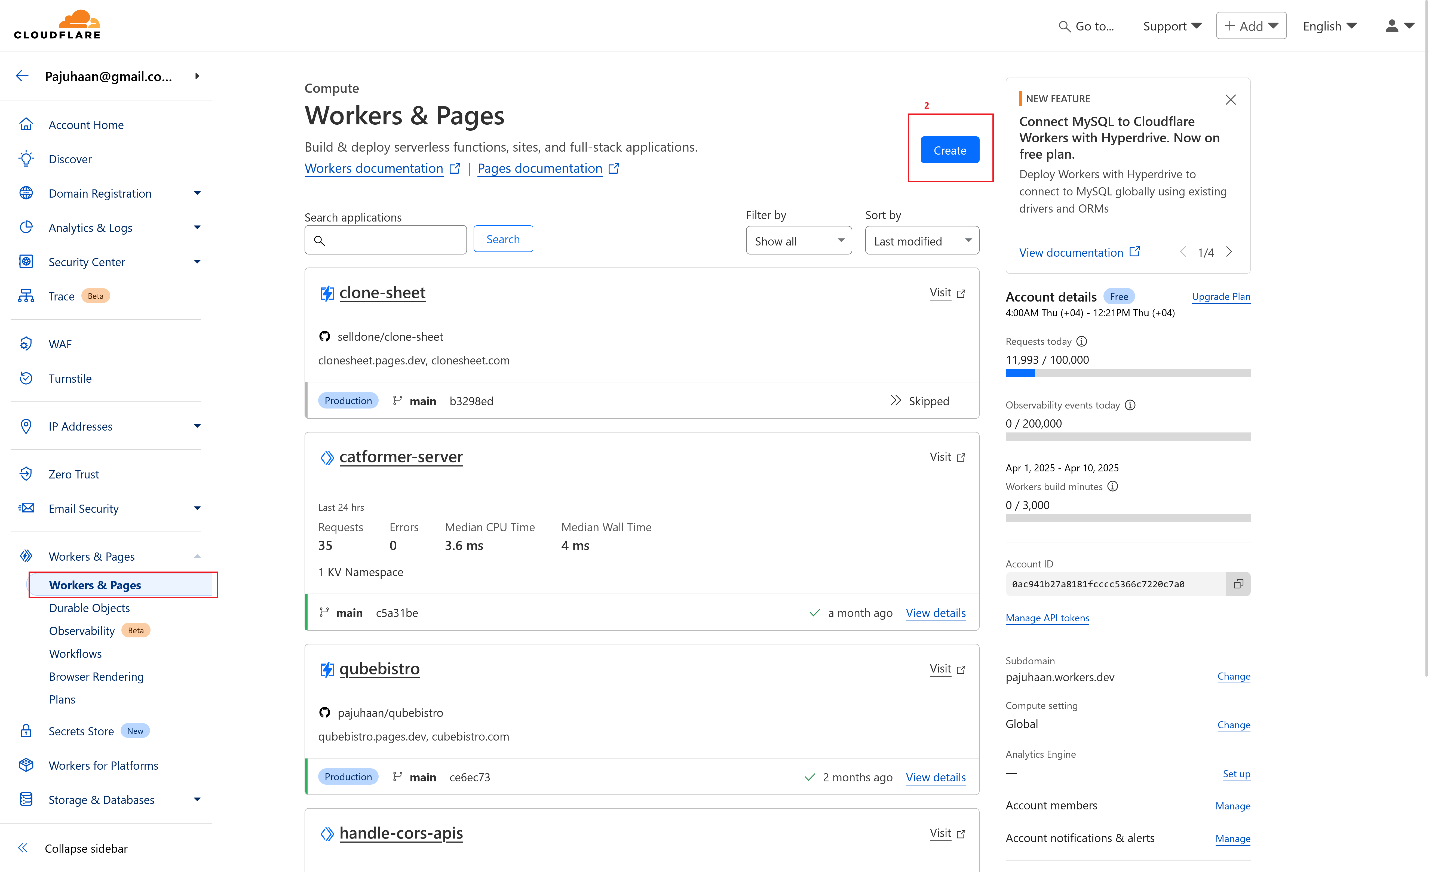
Step 1: Create a Facebook Pixel
Access the Facebook Pixel Panel:
- Navigate to the new Facebook Pixel panel at Facebook Pixel Creation.
- Click on the Connect Data button.
- Select “Web” as your data source.

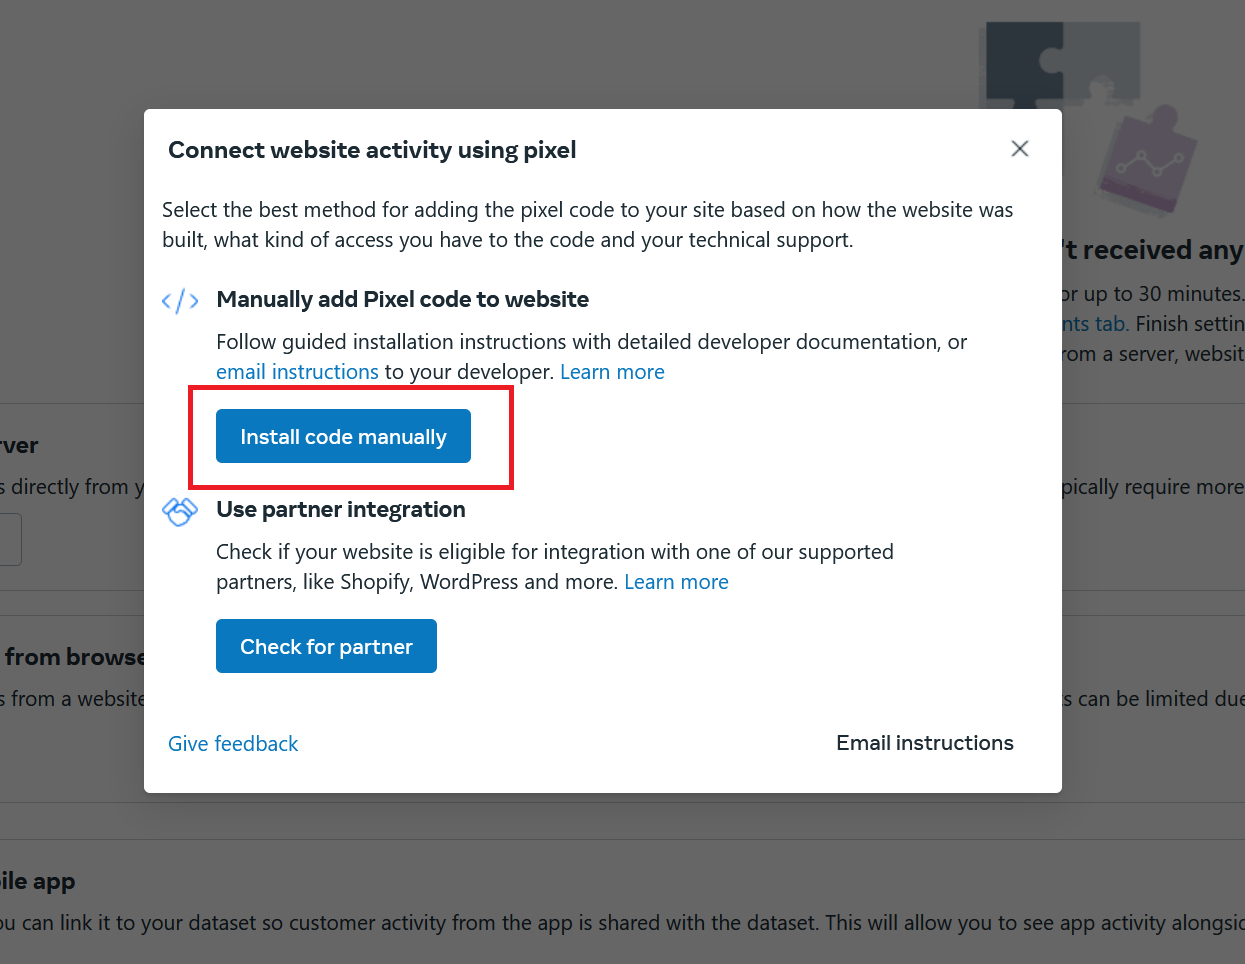
Step 2: Add the Pixel to Your Website
After creating your Pixel, you need to integrate it with your website. There are two primary options available:
Option 1: Copy “Dataset ID”
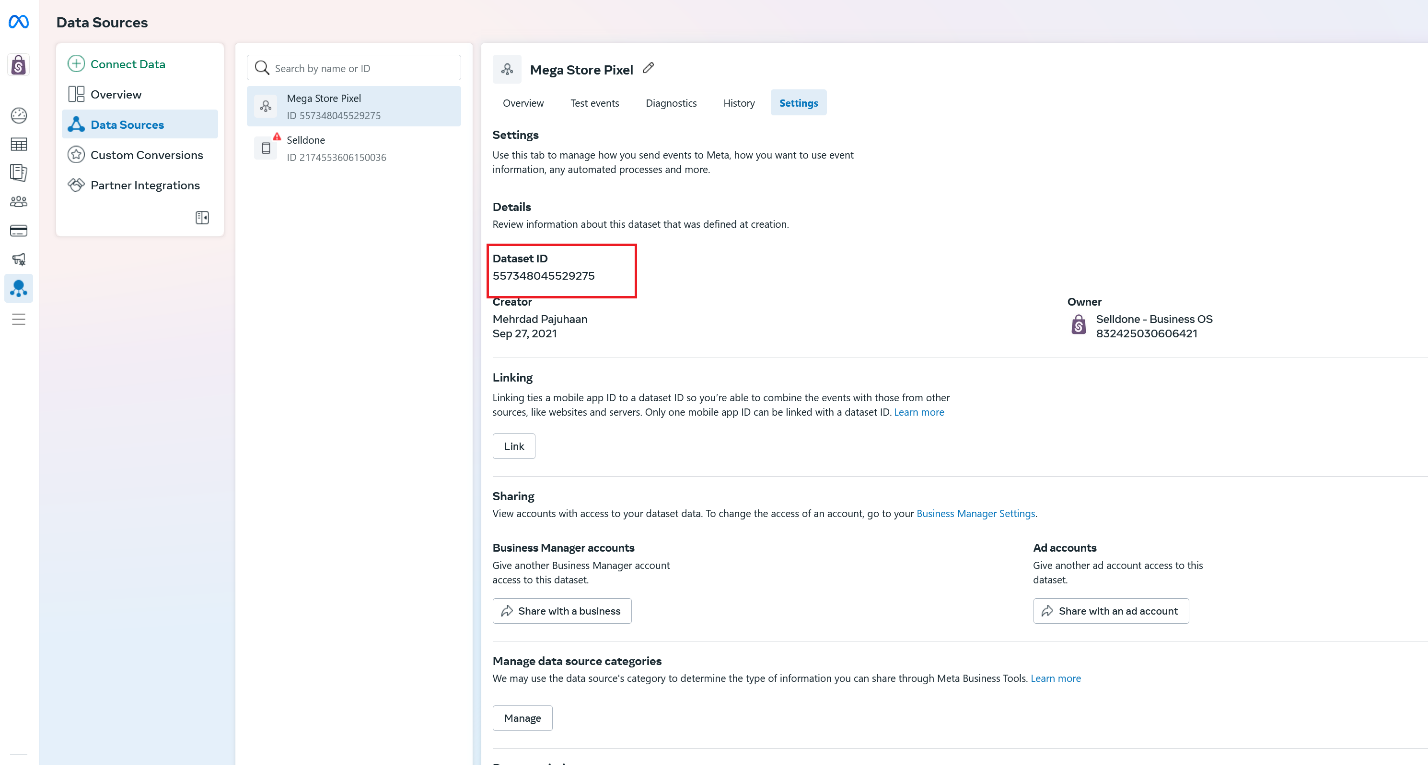
Find the Dataset ID:
- Go to Facebook Events Manager > Data Sources > Settings.
- Copy the Dataset ID provided.
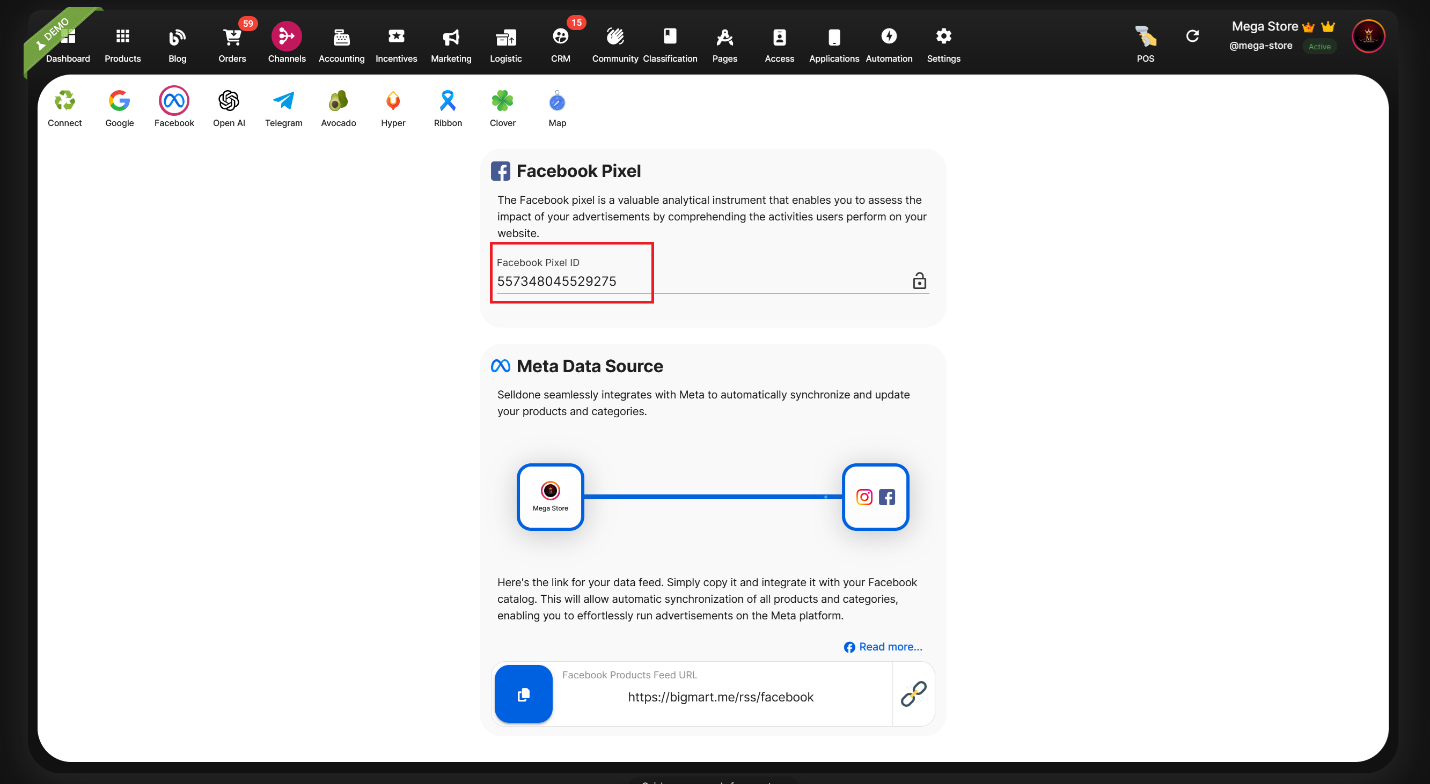
Paste the Dataset ID in Your Shop Dashboard:
- Log in to your Selldone Shop Dashboard.
- Navigate to Channels > Facebook.
- Paste the Dataset ID into the Pixel ID field and click Save.
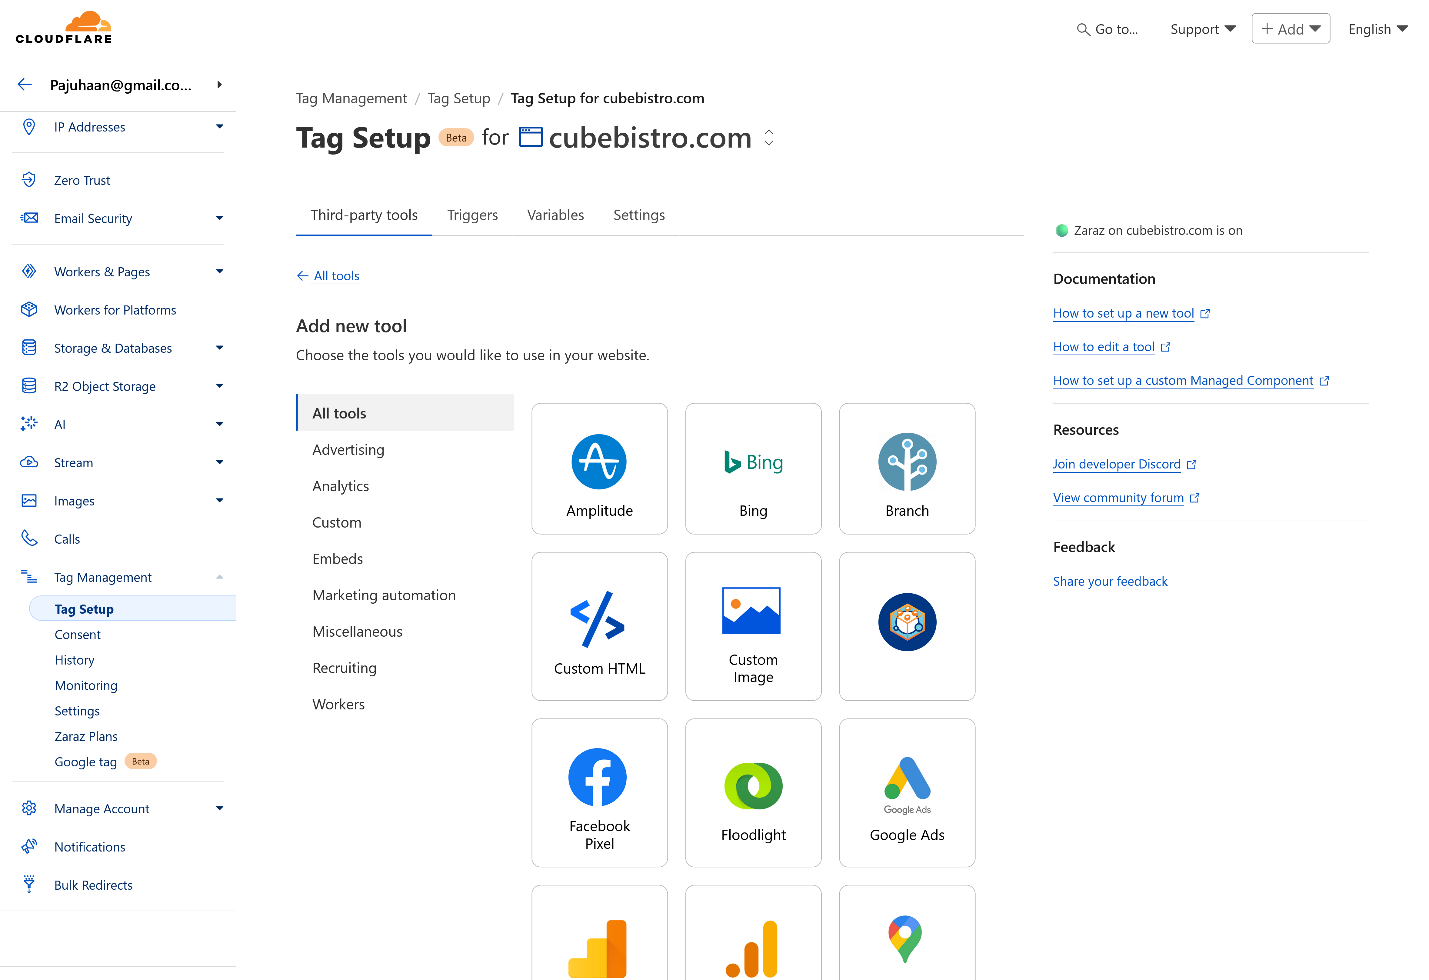
Option 2: Paste Raw HTML Code or Use Cloudflare Zaraz
- Raw HTML Code Integration: You can also paste the raw HTML code provided by Facebook directly into your website’s header.
- Using Cloudflare Zaraz: For an alternative, consider using Cloudflare Zaraz. This tool not only helps in setting up your Pixel but also enhances server-side tracking. For detailed instructions, refer to this guide:How to Monitor Your Ecommerce Performance with Cloudflare-Zaraz (And Why We Use Server-Side Analytics)
Step 3: Complete the Pixel Setup
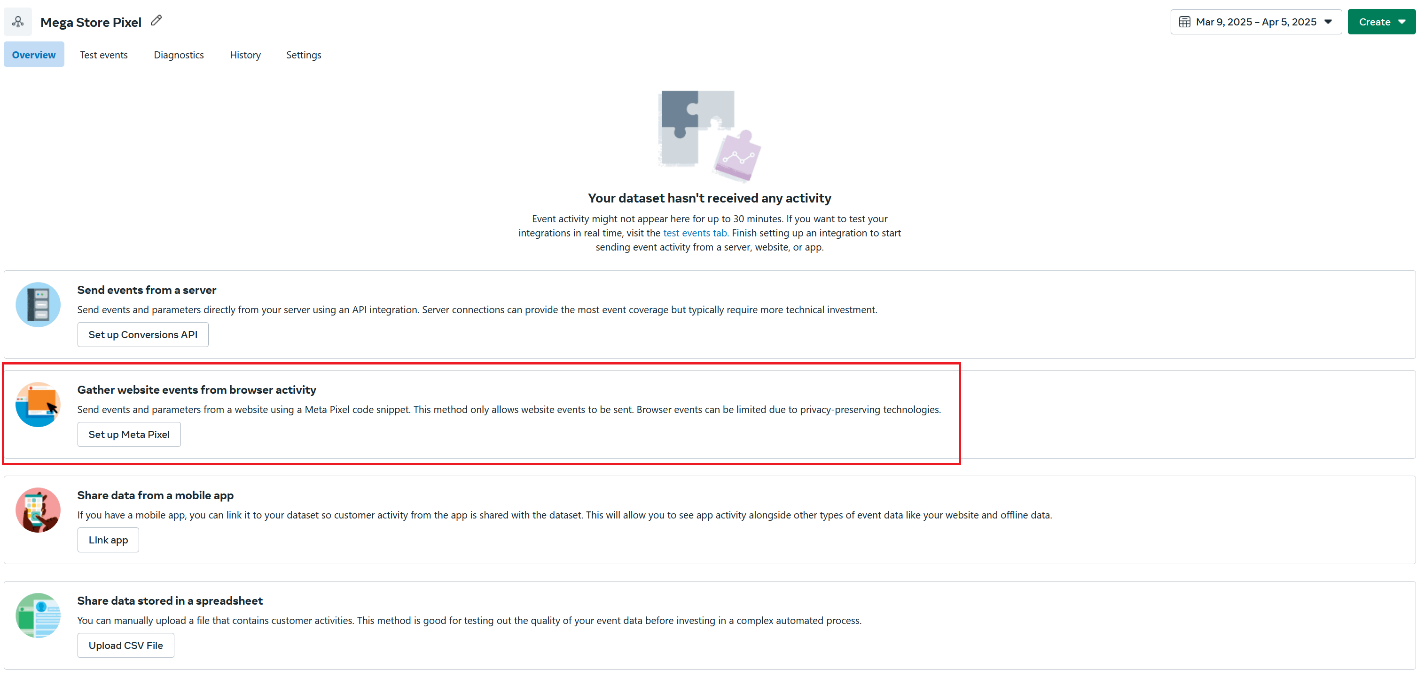
Gather Website Events from Browser Activity
Method:
Use the “Gather website events from browser activity” option. This method sends events from the client’s browser rather than the server, helping to comply with privacy regulations.
⚡ Important Consideration:
Most browsers block Facebook events by default. To overcome this, you can use Cloudflare Zaraz to gather and send events server-side while also managing cookie consent and privacy policies. More details are available in the Zaraz guide:Cloudflare Zaraz for Ecommerce Tracking
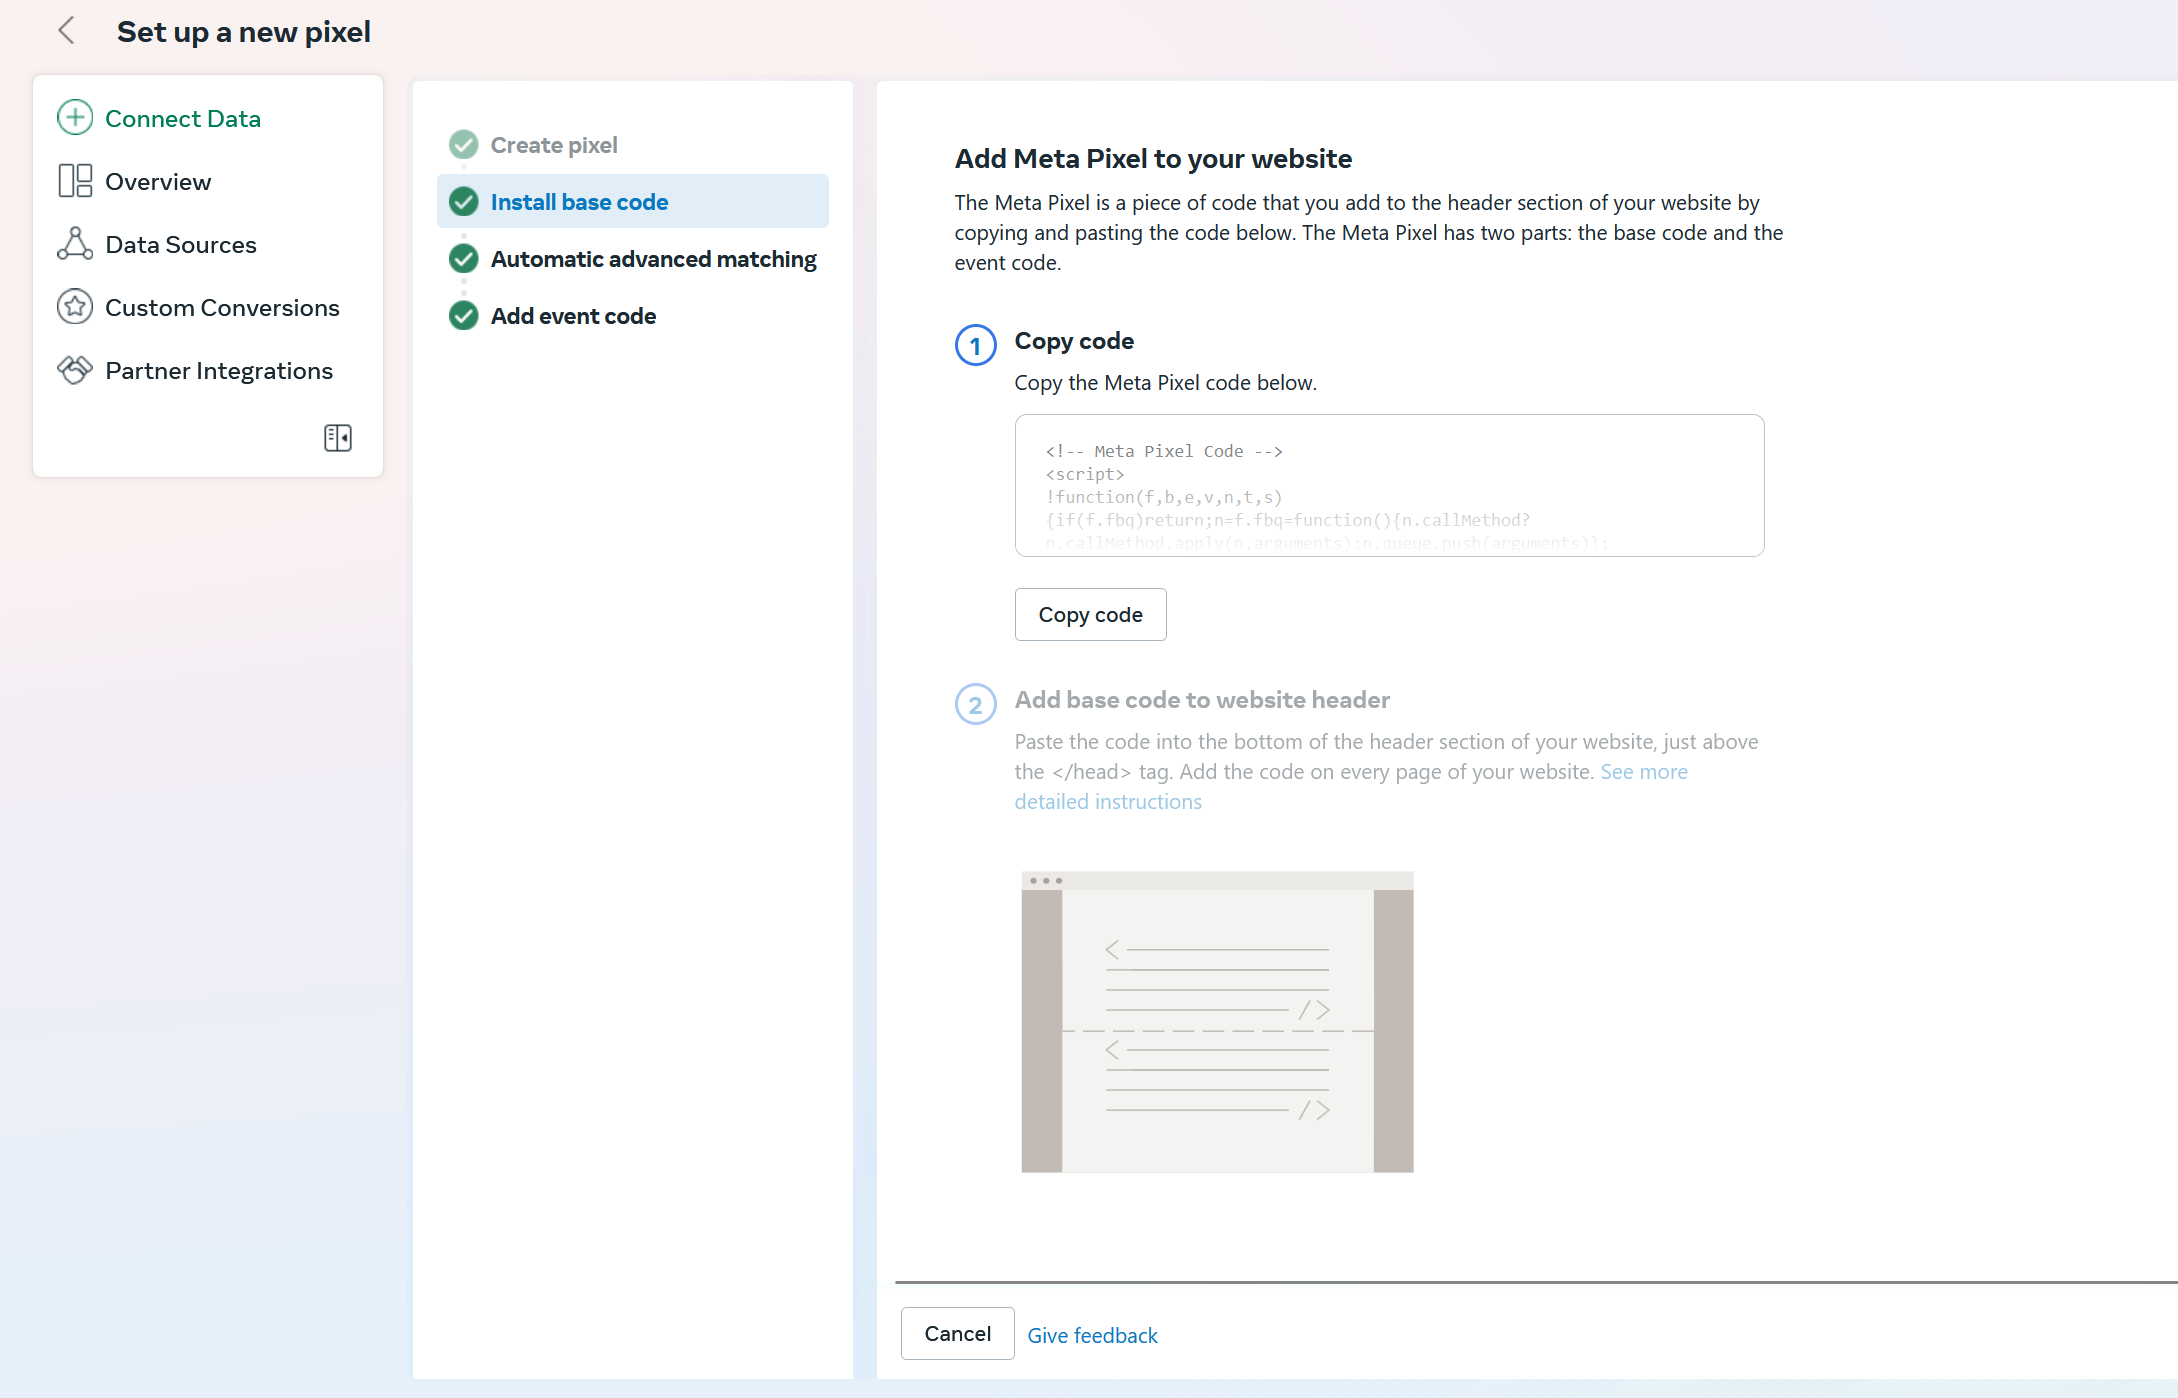
Setup Pixel | Install Base Code
Installation:
You will receive an HTML code snippet to place in your website’s header.
Note: If you have already set your Pixel ID in your Selldone Shop, you do not need to add this base code. However, if you wish to install it manually, refer to the detailed instructions in the Zaraz guide.
Setup Pixel | Automatic Advanced Matching
Advanced Matching:
This feature lets you use customer information (like email addresses or phone numbers) already provided to your business. Facebook hashes this data and matches it with its users, enhancing conversion attribution and remarketing capabilities.
Configuration:
Select the information you wish to collect. This data is not sent by default to protect privacy—enable only what is necessary for your tracking and marketing needs.
Setup Pixel | Add Event Code
- Event Tracking: You typically do not need to add any custom event code, as Selldone Shop pre-defines standard and professional ecommerce events. However, if desired, you can manually enter your page addresses, select elements, and define new events.
- Pre-Defined Events: These are automatically set up in Selldone Shop:
|
Event Name |
Description |
|
ViewContent |
Someone viewed a product on your website. Measures product clicks and product detail views. |
|
AddToCart |
Someone added a product to their cart on your website. |
|
Purchase |
Someone purchased a product on your website. |
Extra Pre-Defined Events by Selldone:
- ♾ ProductImpressions: Measures product impressions by pushing the product list details.
- ♾ RemoveFromCart: Measures the removal of a product from the shopping cart.
- ♾ ViewCart: Represents Step 1 in the checkout process.
- ♾ InitiateCheckout: Represents Step 2 of the checkout process.
- ♾ AddPaymentInfo: Represents Step 3 of the checkout process.
Debugging and Testing Your Facebook Pixel
Debug Events in Your Live Store
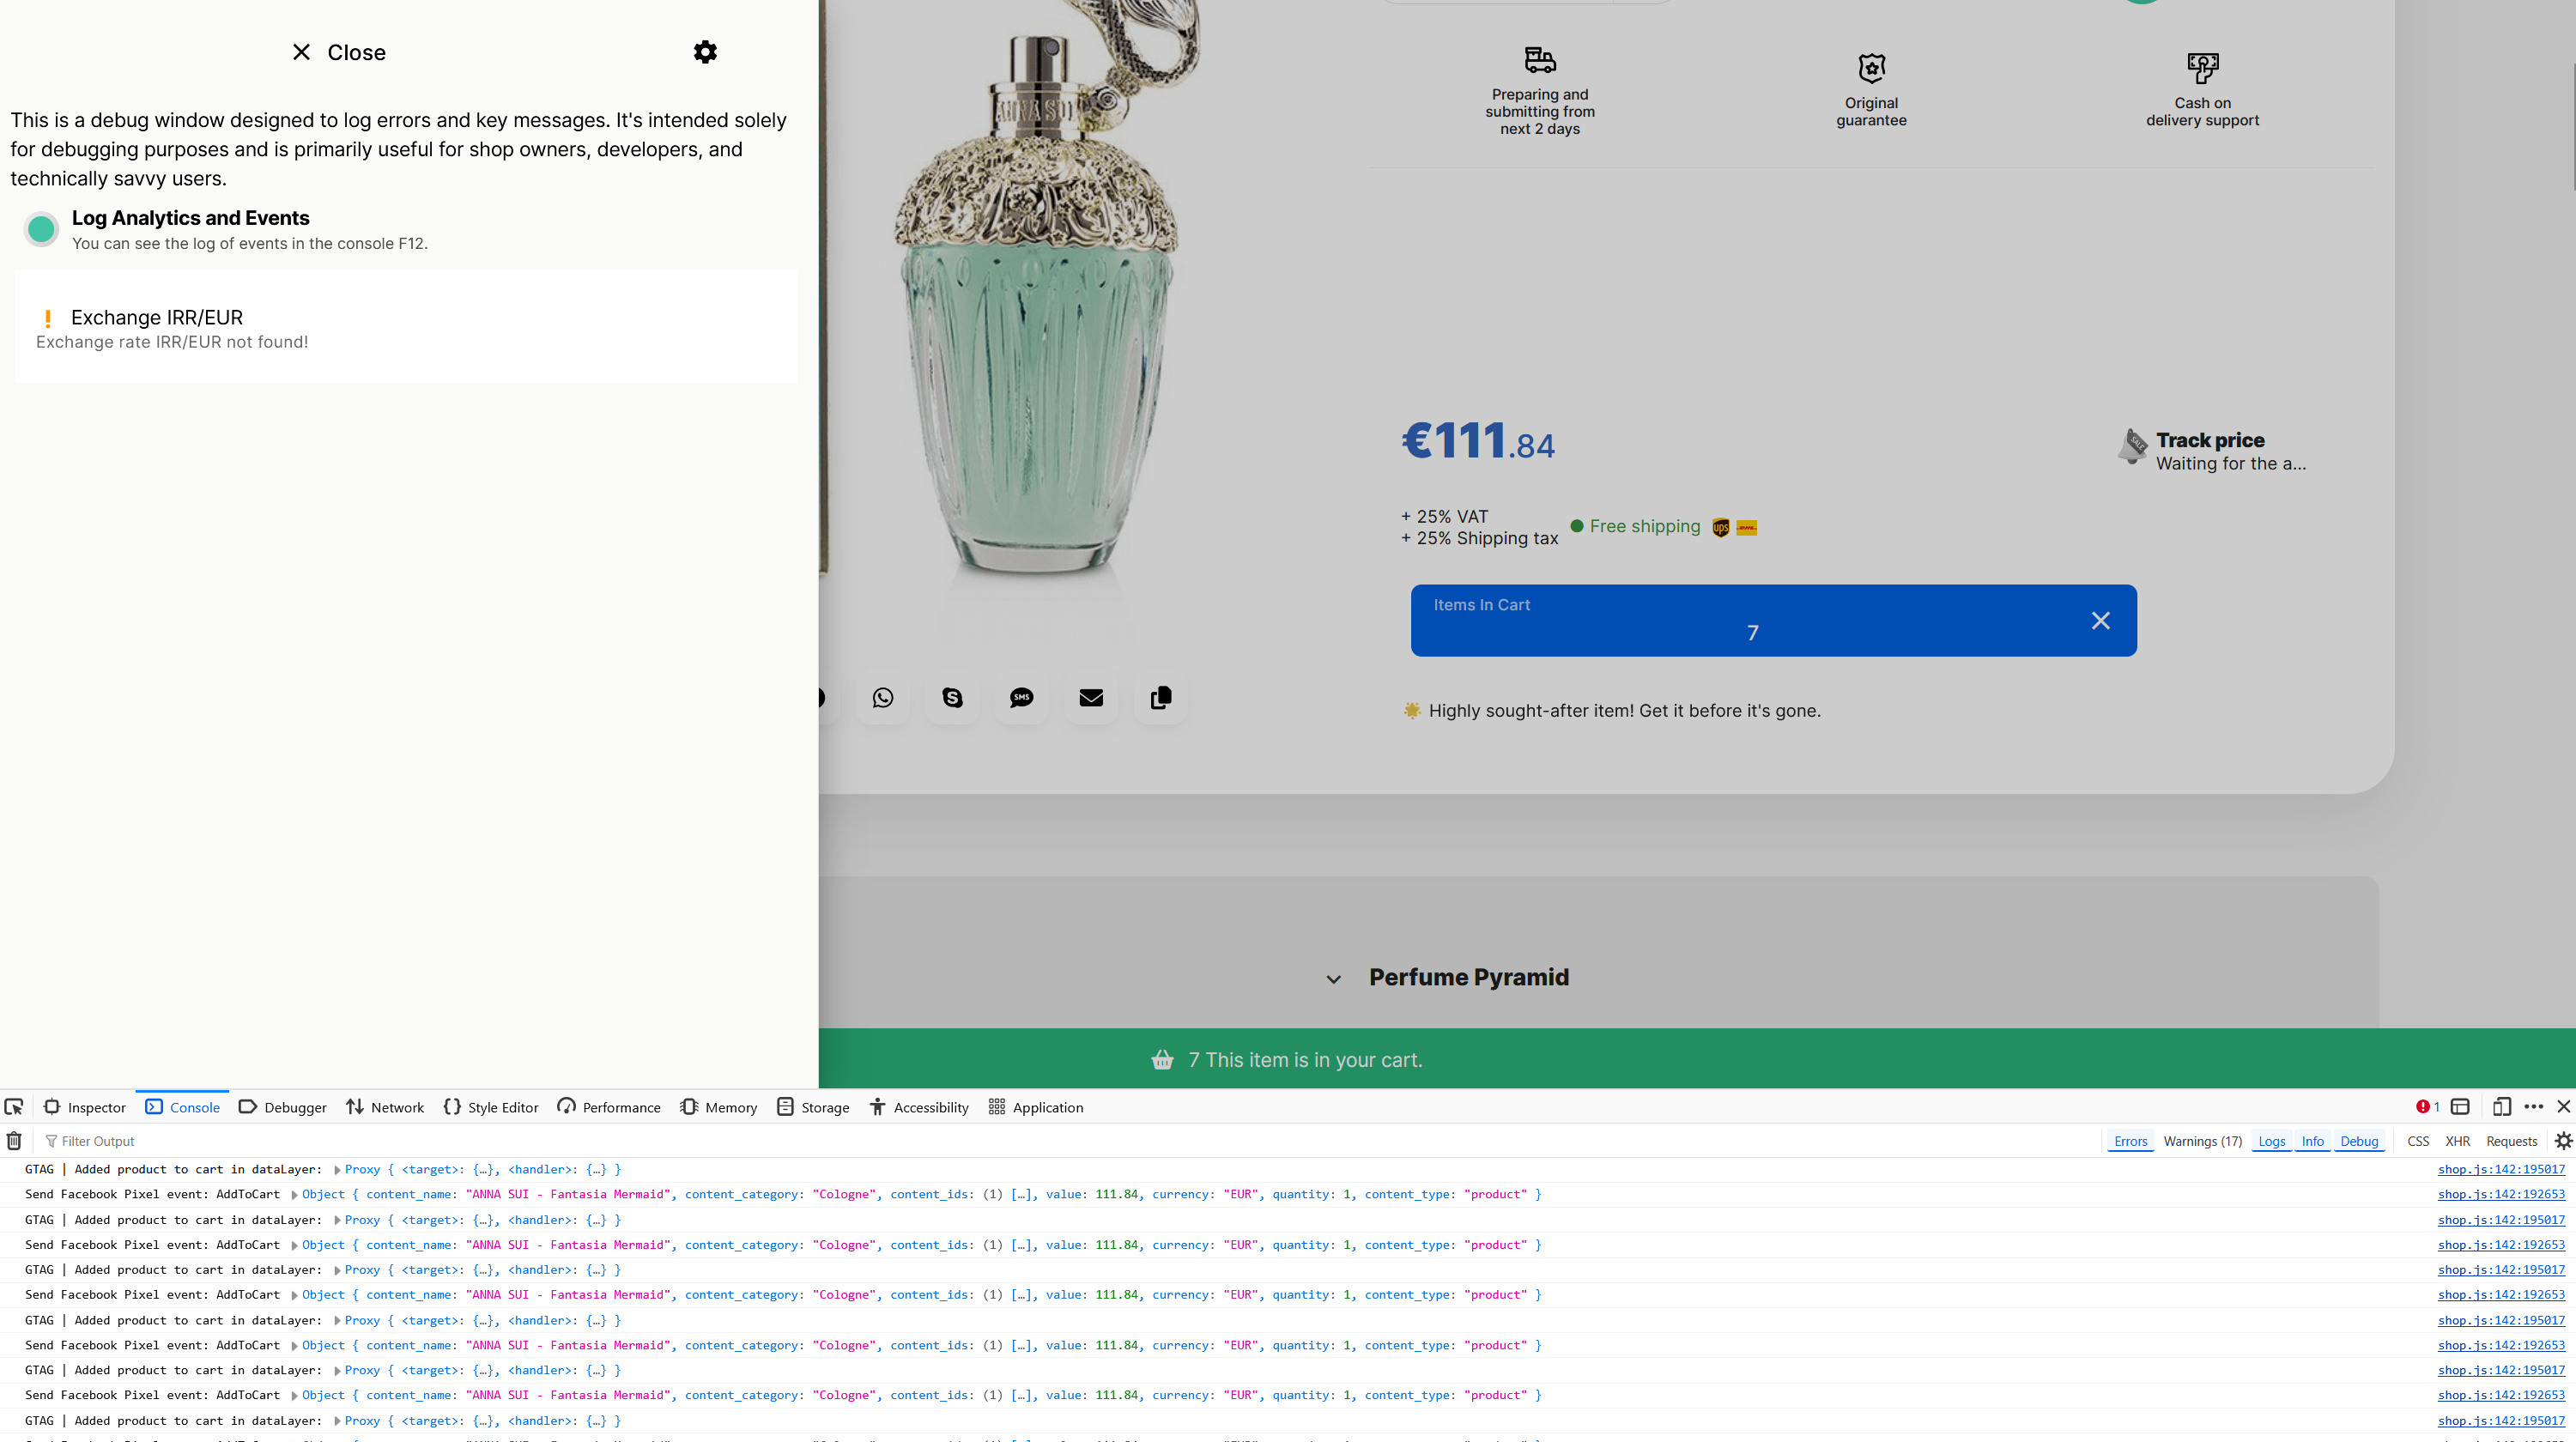
Enable Debug Mode:
- On your website, press Ctrl + D to bring up the debug menu.
- Select “Log Analytics and Events”.
View Console Logs:
- Press F12 to open your browser’s developer console.
- Navigate to a product page and click Add to Cart.
You should see logs for both GTAG and Facebook Pixel events.
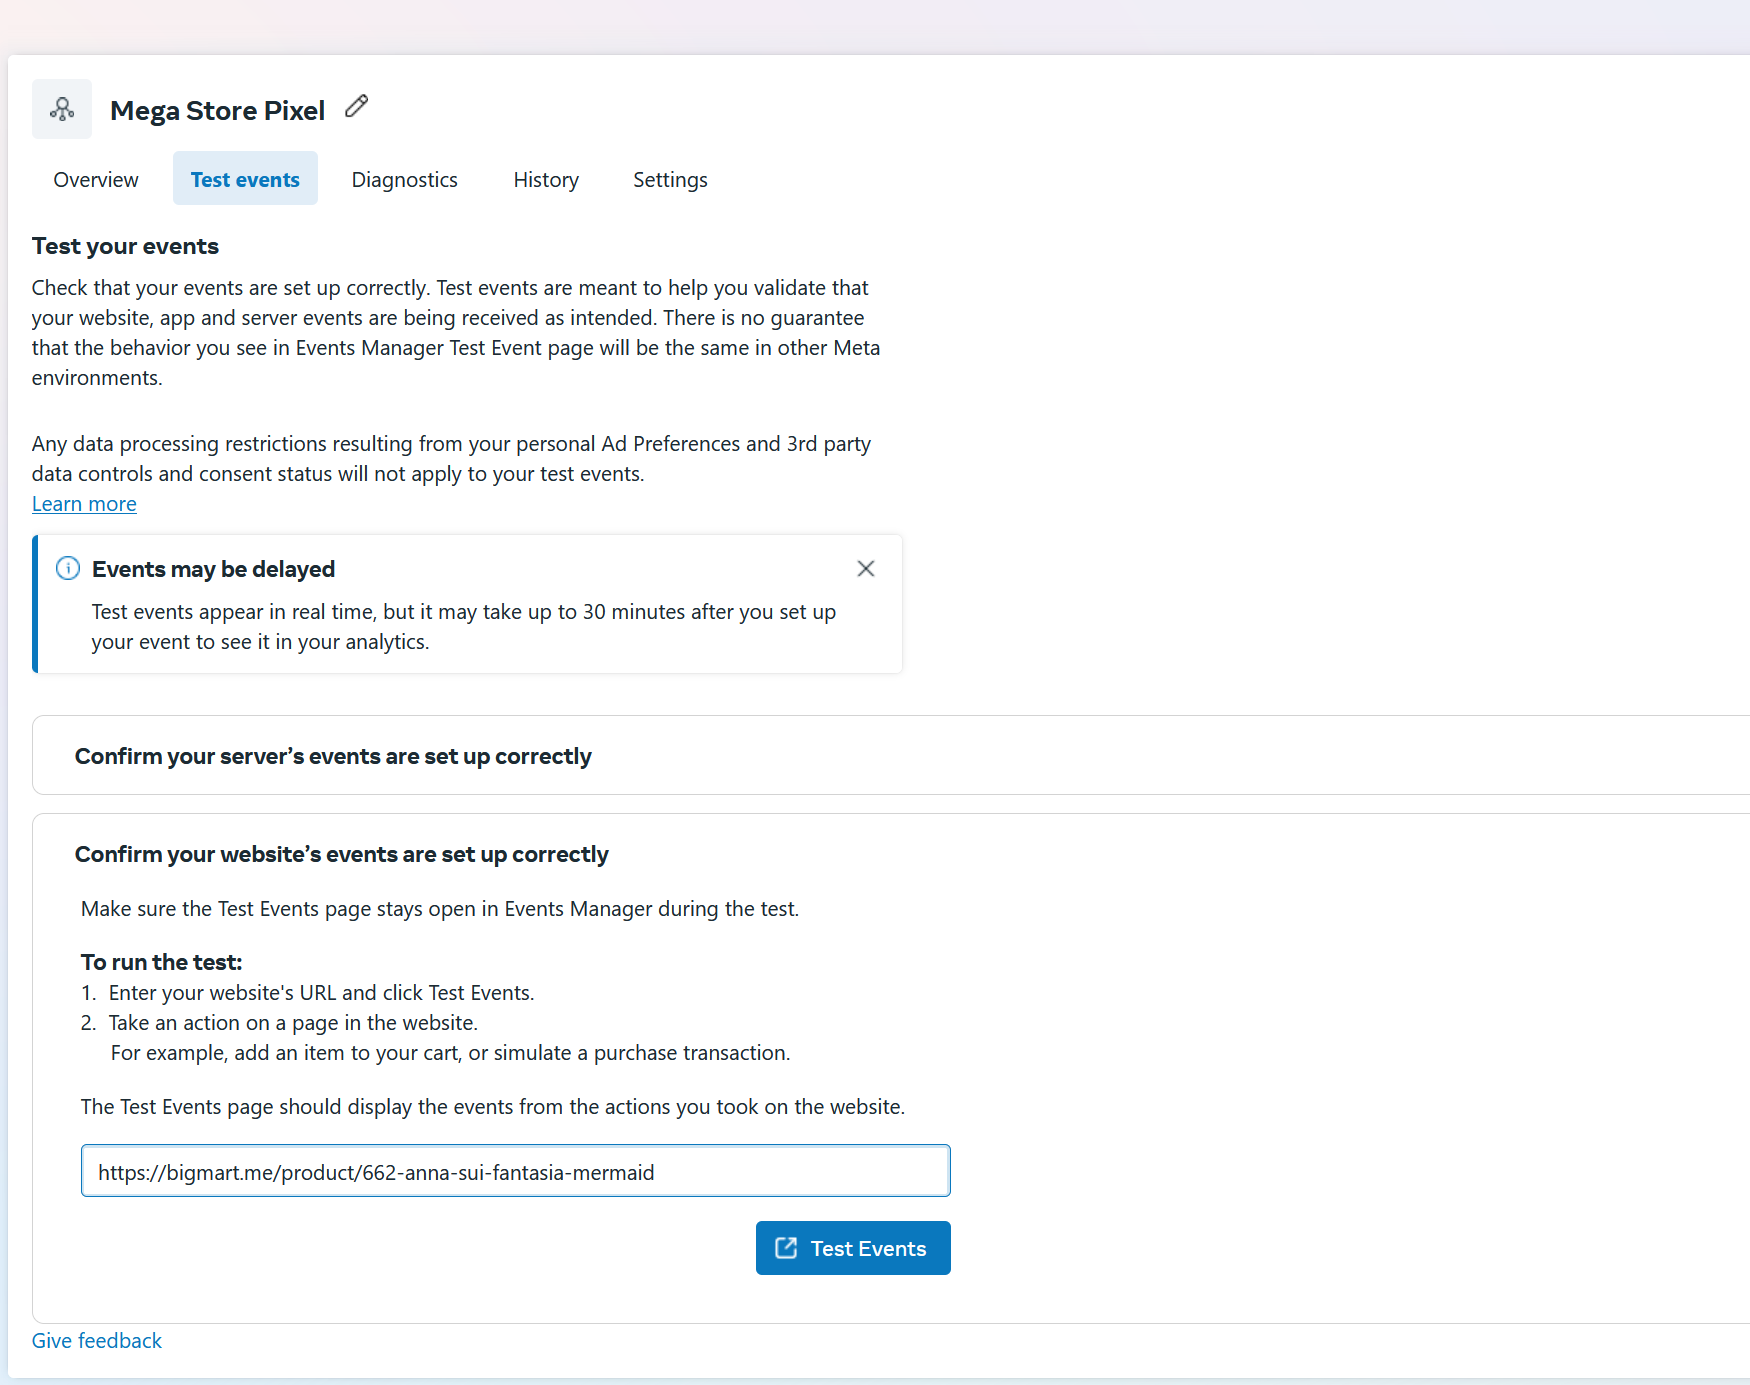
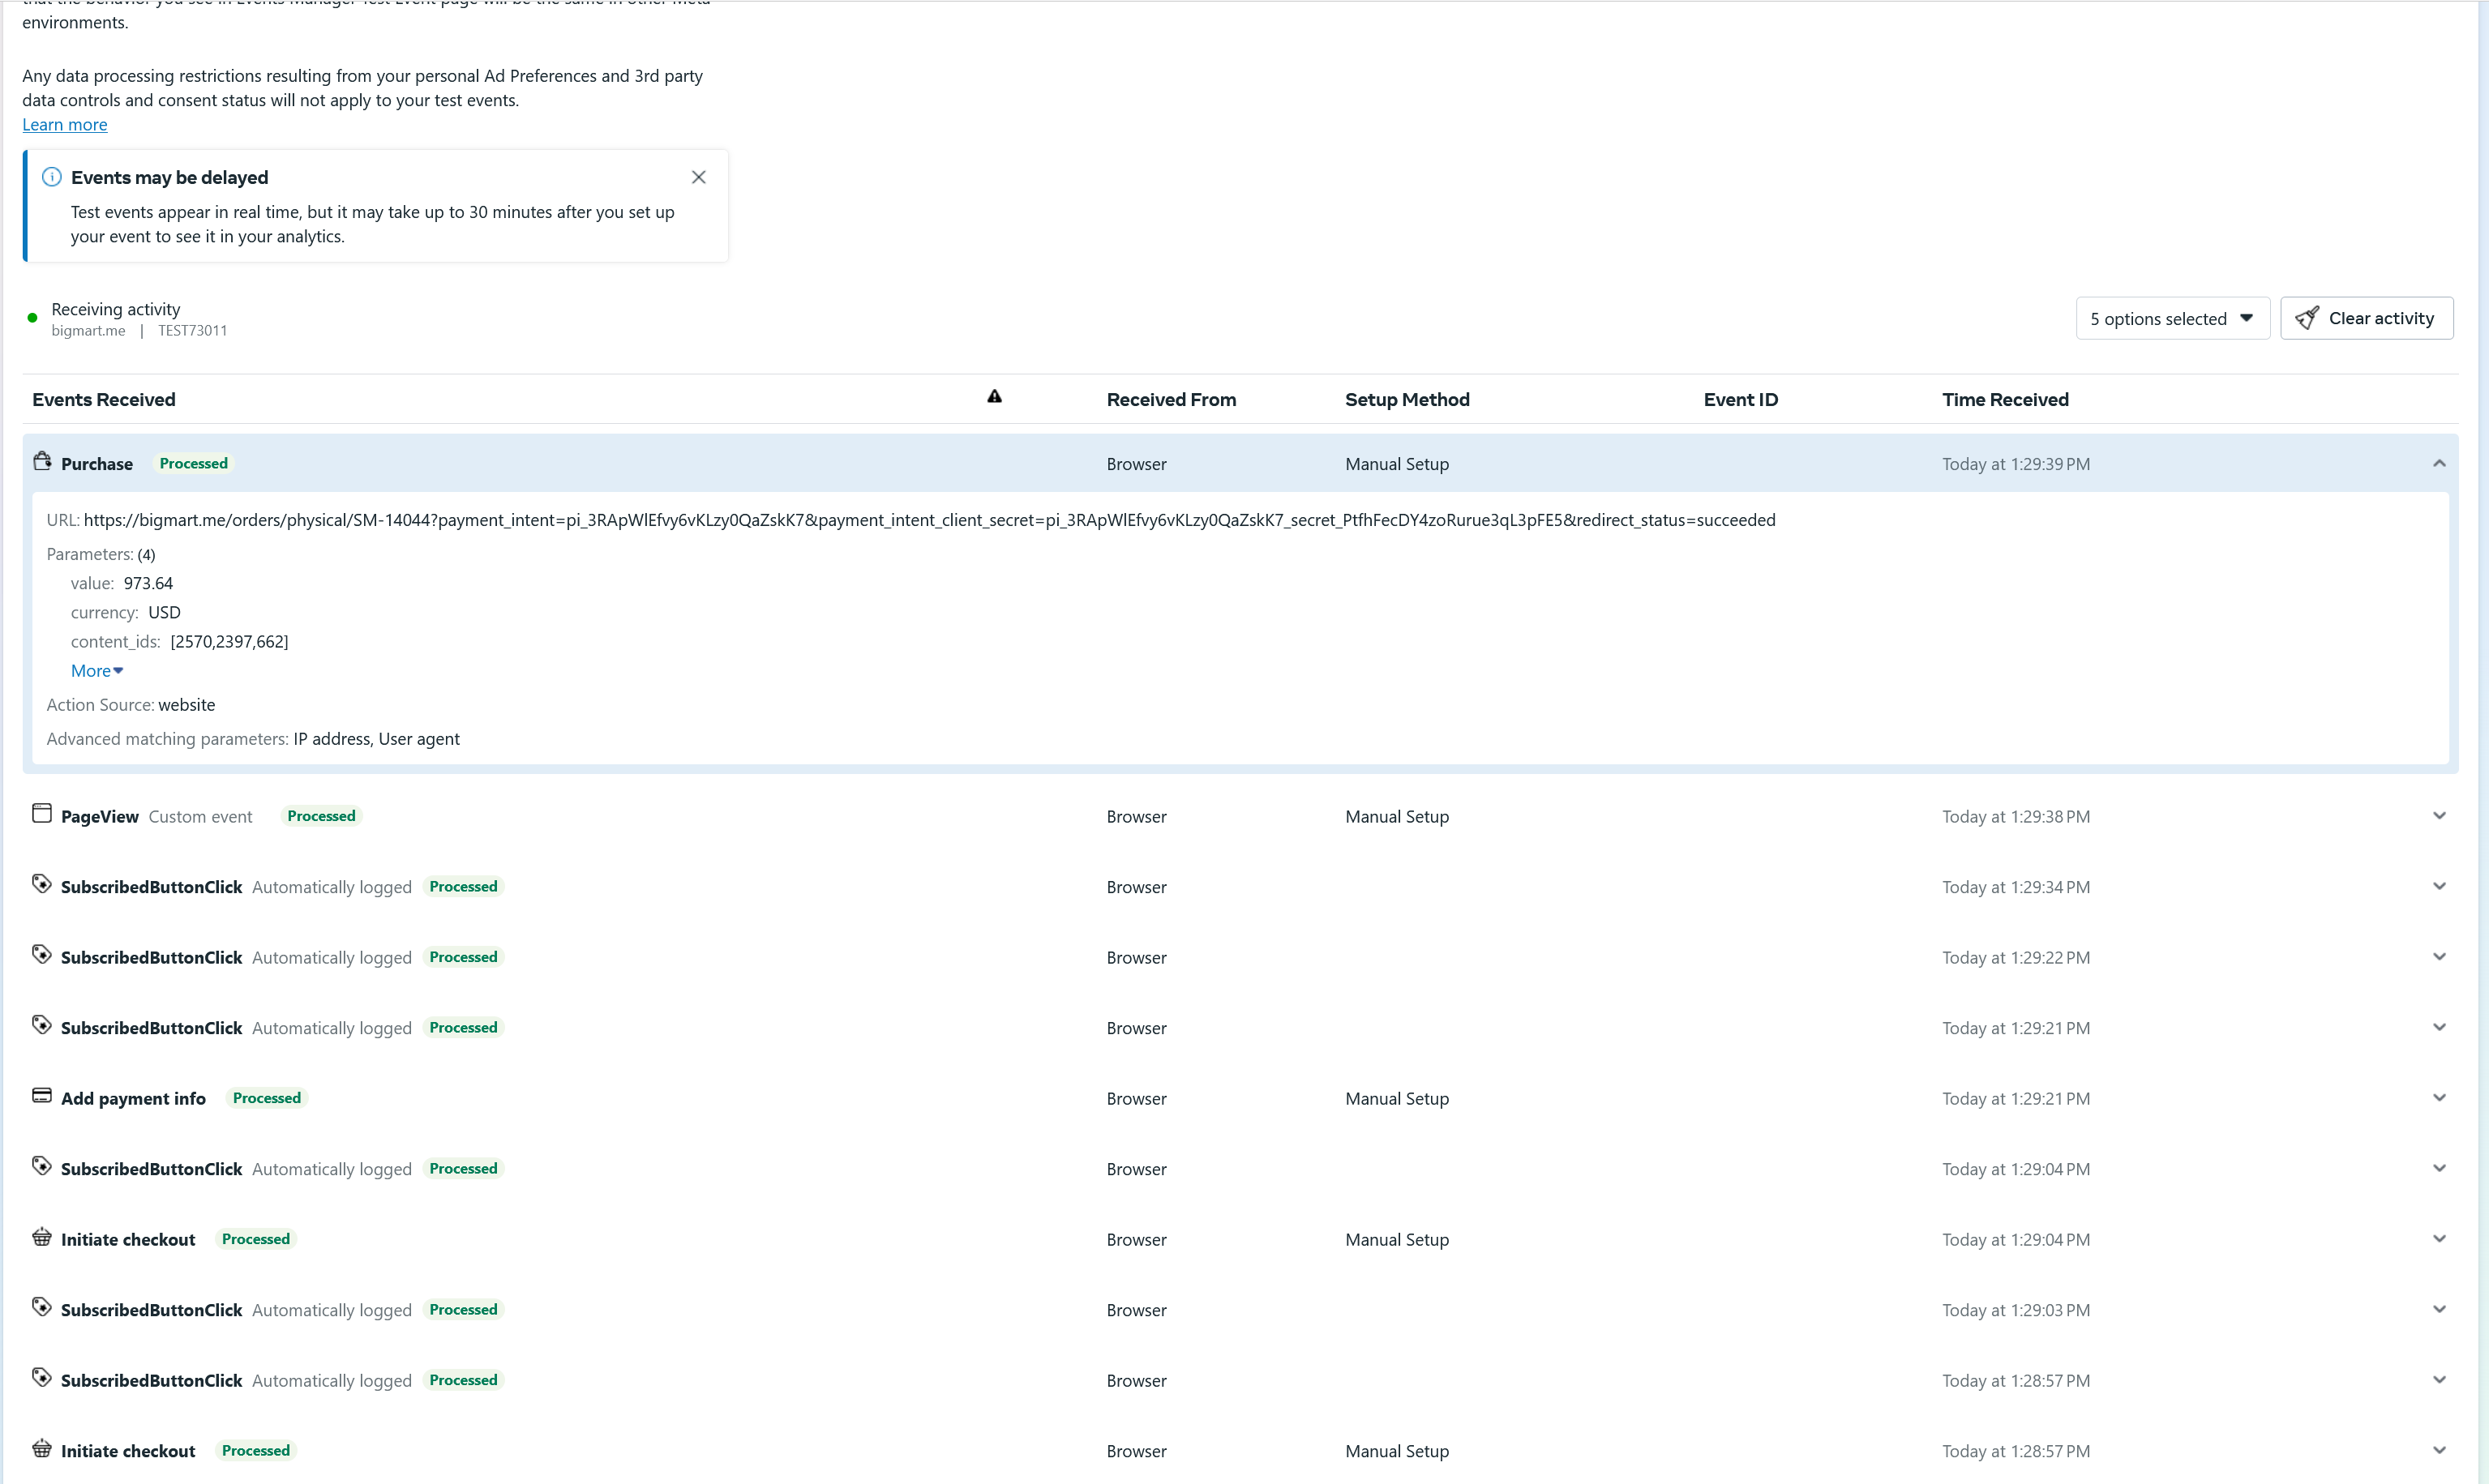
Test Facebook Events
- Testing Setup: Go to Facebook > Data Sources > Test Events tab.
- Verification: Click “Confirm your website’s events are set up correctly” to test and verify event tracking.
Common Issues and Troubleshooting
Events Not Being Sent
- Possible Causes:
- Browser or plugin-based blocking of Facebook tracking scripts.
- Facebook rejecting the script load on your site.
- Solution:
Whitelist your domain to ensure Facebook Pixel can load properly.

Whitelisting Your Domain in Facebook
Access Domain Settings:
- Go to the Facebook Event Manager: Facebook Event Manager.
- Navigate to Data Sources > Settings.
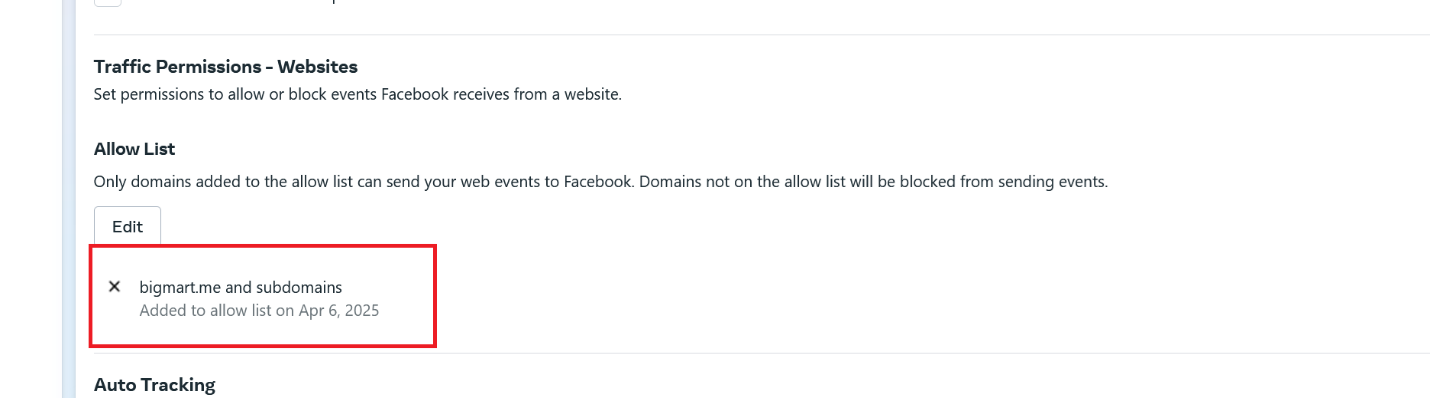
- Scroll down to “Traffic Permissions – Websites”.
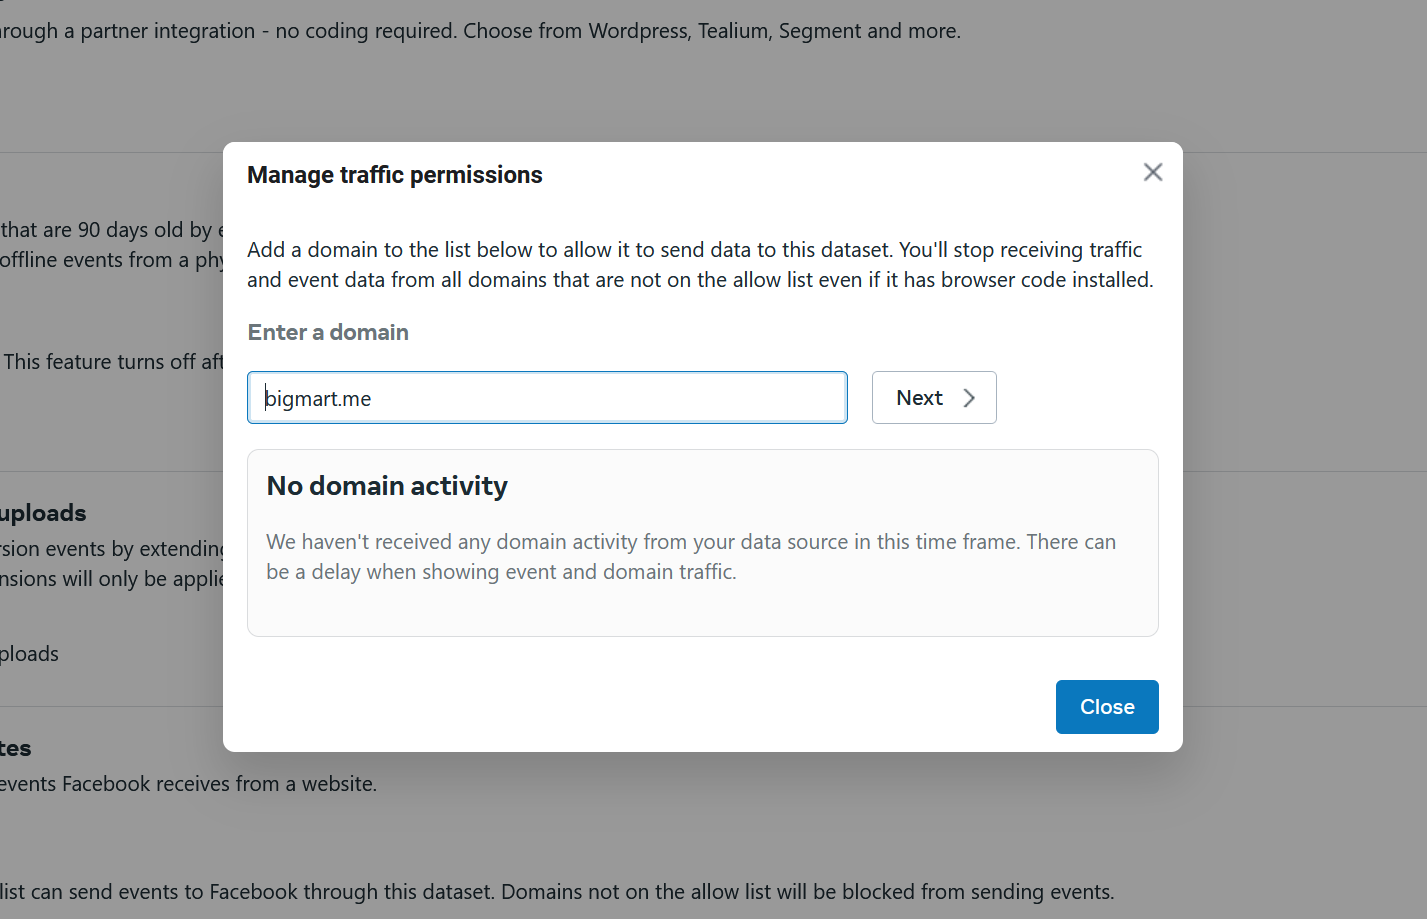
Create an Allow List:
- Click on Create Allow List.
- Once completed, your domain will appear in the allow list.
Now you can see the domain in the allow list:
🚧 Additional Note:
Ensure you disable any tracking blockers (e.g., Firefox’s tracking protection) that might prevent the script from running.
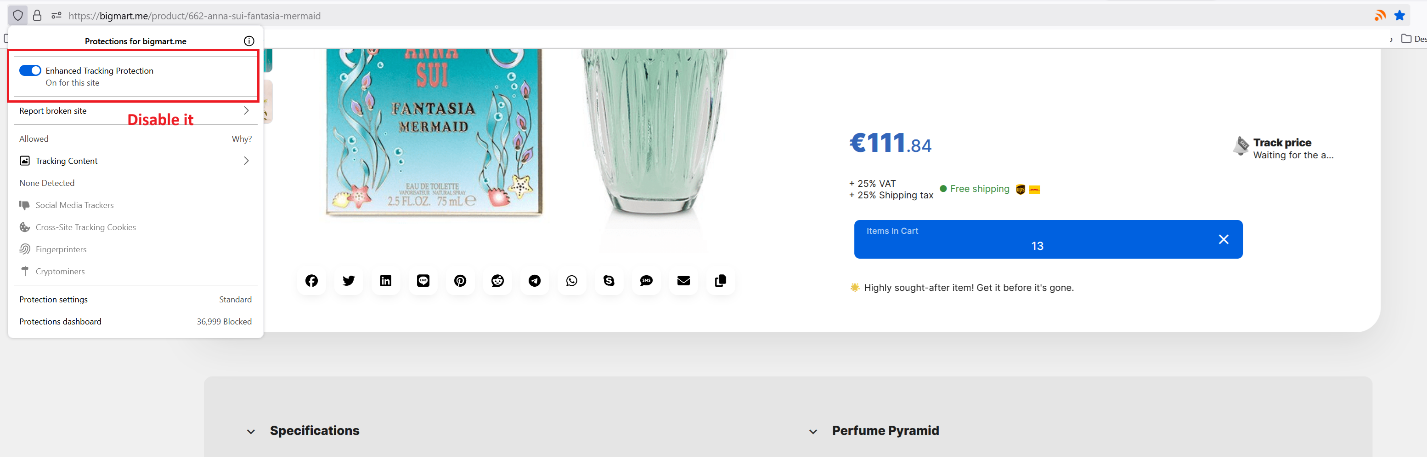
Browser Considerations
Script Loading Issues:
If the Facebook script does not load, you may need to adjust browser settings or try a different browser.
Recommendation:
Use Chrome for testing the Facebook Pixel setup, as it tends to have fewer issues with script blocking.
As demonstrated, when the Pixel is set up correctly, events are successfully sent to Facebook:
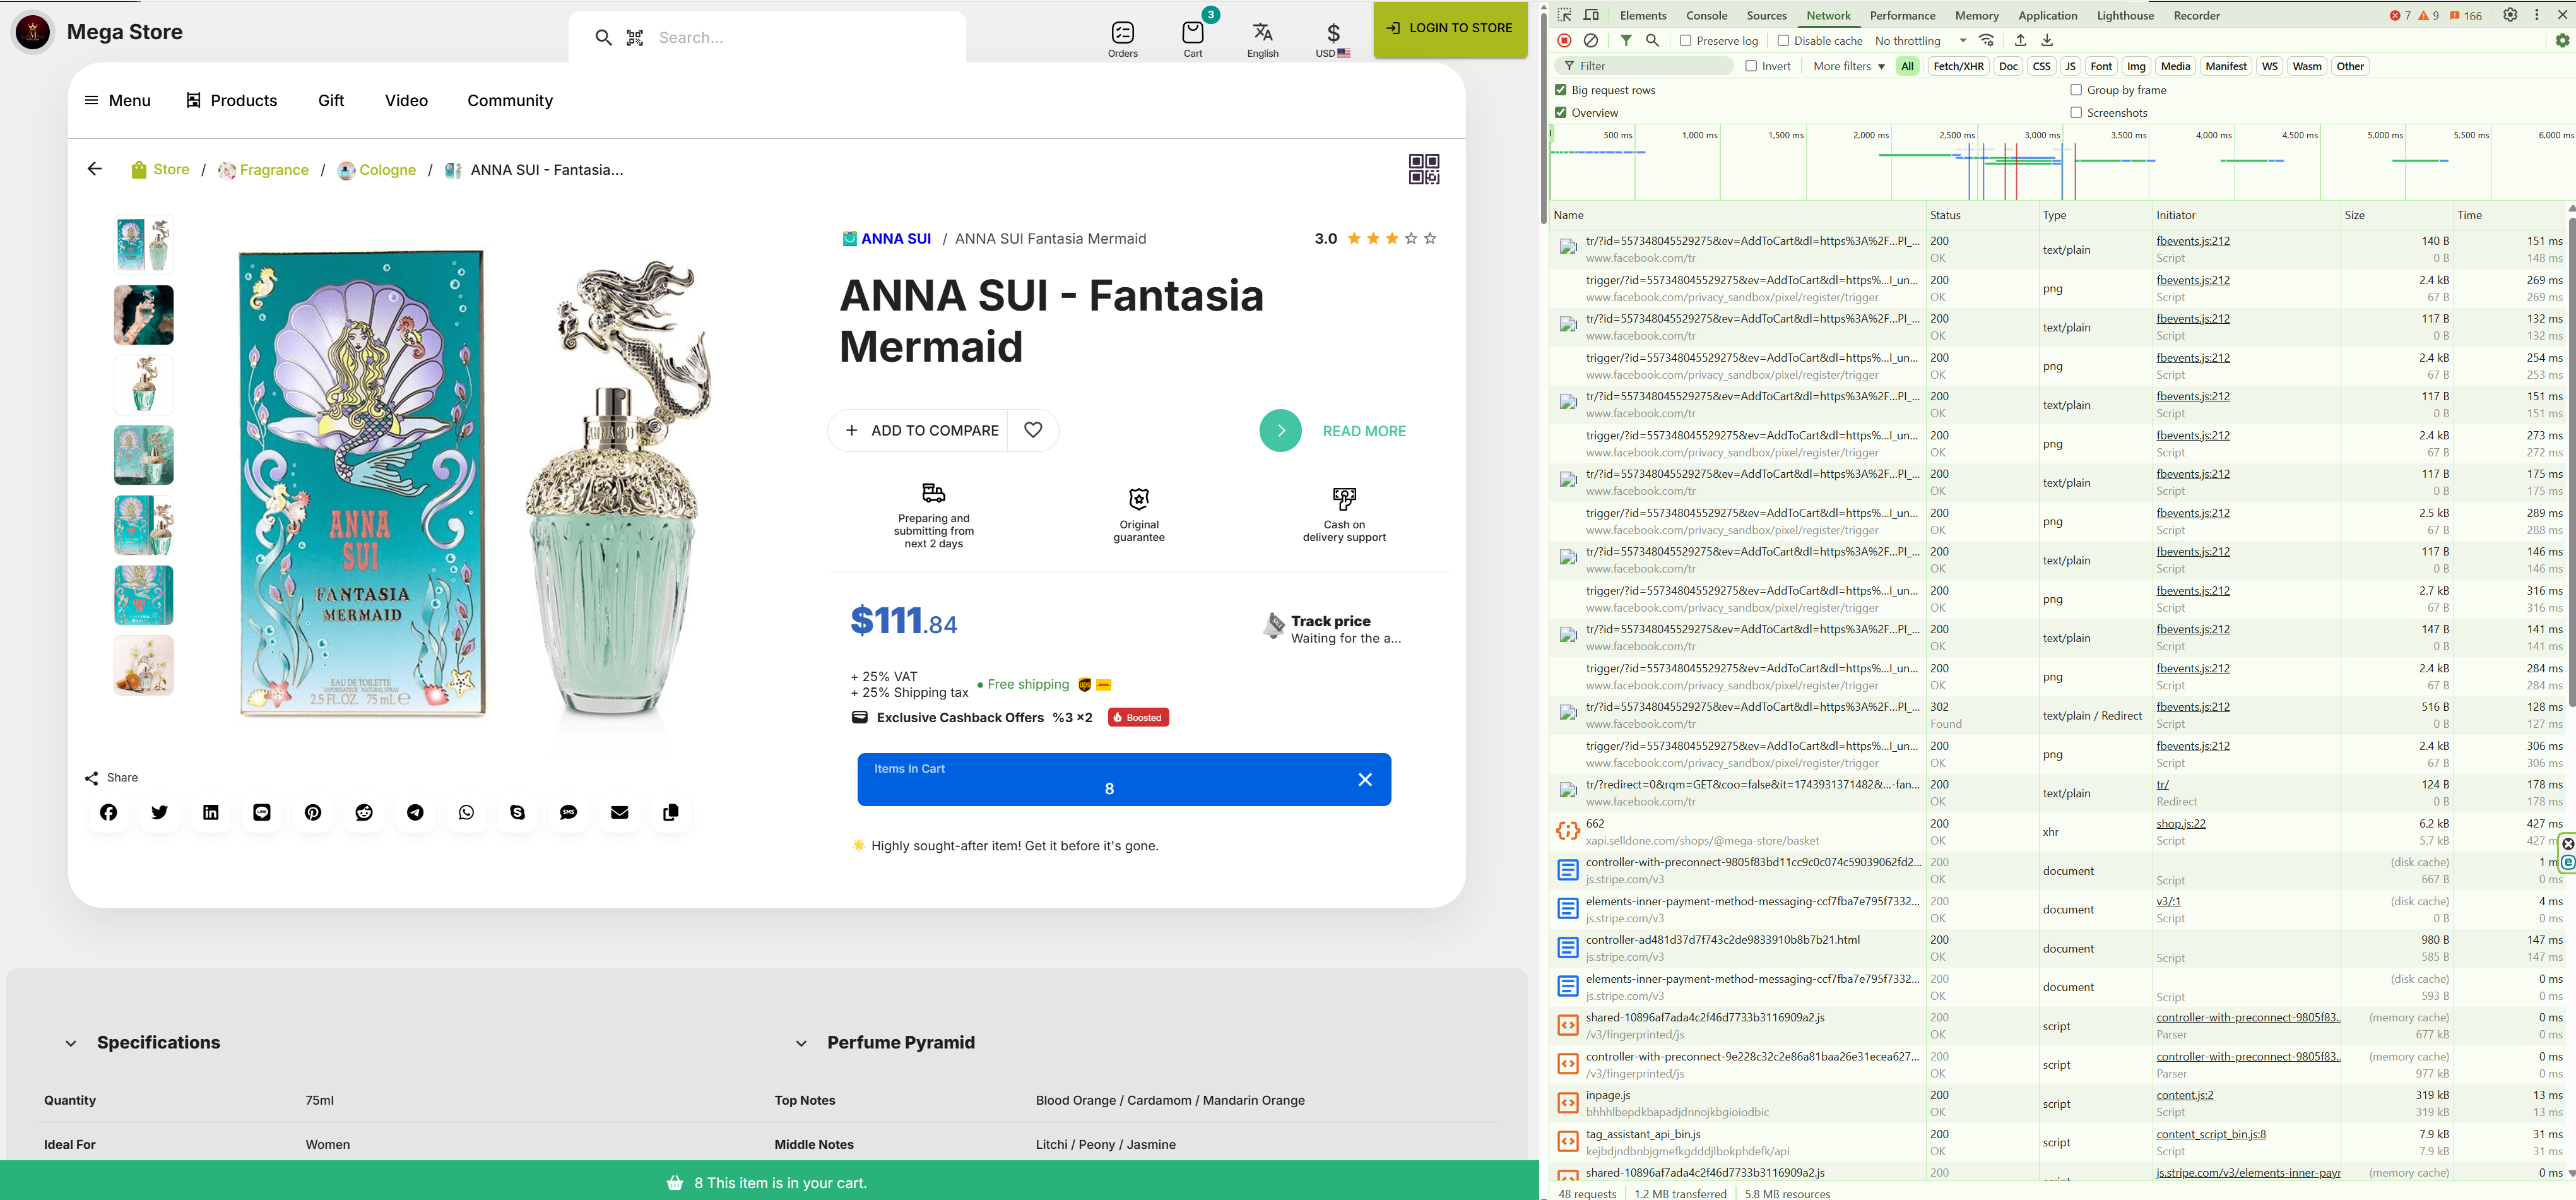
Dashboard Confirmation:
Your Facebook dashboard will display the received events if everything is functioning properly.
Ready To Run Facebook Ads
Setting up Facebook Pixel with full event tracking is crucial for any ecommerce business leveraging Meta’s advertising platforms. This guide covered everything from creating the Pixel and adding it to your website, to configuring advanced matching and troubleshooting common issues. By following these steps, you can ensure accurate data collection and improved ad performance, ultimately helping you better understand your customers and drive more conversions.
Remember, staying compliant with privacy regulations while collecting valuable data is key—so adjust your settings based on your business needs and user consent requirements. Happy tracking!
Make Your Business Online By The Best No—Code & No—Plugin Solution In The Market.
30 Day Money-Back Guarantee
Create Your E-commerce Store Start now — it's freeSay goodbye to your low online sales rate!
FAQ
What is the difference between client-side and server-side Facebook Pixel tracking?
Client-side tracking collects data directly from a user's browser using JavaScript, while server-side tracking sends data from your server to Facebook. Server-side tracking (e.g. using Cloudflare Zaraz) is more reliable because it isn't blocked by browsers or ad blockers, but it requires more technical setup.
Why are some Facebook Pixel events not showing in my dashboard?
This can happen due to ad blockers, browser privacy settings (like Firefox’s Enhanced Tracking Protection), or incorrect Pixel installation. Ensure your domain is whitelisted in Facebook Events Manager, disable browser blockers for testing, and verify that events are logged in your console (press F12).
Can I use Facebook Pixel without installing the full code manually?
Yes! If you're using platforms like Selldone, you only need to paste your Pixel ID in the dashboard. The platform takes care of the rest, including advanced ecommerce event tracking.
How do I know if Facebook Pixel is working properly on my website?
Use the "Test Events" feature in Facebook Events Manager. Also, on your website, press Ctrl + D to enable debug mode and use F12 to view event logs in the console. You should see Pixel events firing like ViewContent, AddToCart, or Purchase.
Does Facebook Pixel collect personal information?
By default, Facebook Pixel can collect hashed identifiers like email or phone for advanced matching, but only if you explicitly enable that. All data is hashed before being sent. Make sure your privacy policy informs users about this and that you comply with GDPR and other regulations.
Can I install multiple Facebook Pixels on one website?
Yes, but it must be handled carefully. If you're manually adding Pixel codes, make sure each has a unique ID and they do not conflict. Selldone currently supports one main Pixel per shop. If you need multiple Pixels (e.g. for different campaigns), you may need a custom setup.
Why does Facebook say "No activity yet" even though I installed the Pixel?
This message usually appears when no valid events have been detected. It could be due to:
- Browser blocking the script.
- Wrong Pixel ID.
- Page caching that skips Pixel code execution.
Try testing the site with an incognito window or different browser and confirm event logs in the developer console.
Do I need consent before tracking users with Facebook Pixel?
Yes, if you're targeting users in regions with privacy regulations (like the EU). You should present a cookie consent banner and only activate the Pixel after user approval. Tools like Cloudflare Zaraz help manage this dynamically and legally.
How can I track custom events with Facebook Pixel?
In Selldone, most events are preconfigured for ecommerce. However, you can define custom events by using the Facebook Pixel Helper or modifying HTML elements and calling fbq('trackCustom', 'EventName') in your script. Use with caution and proper validation.